• Skip to primary navigation
  • Skip to main content
  • Skip to primary sidebar

Western Garden Centers

for what grows here

  • Home
  • How To
  • Gift Cards
  • Calculate Mulch
  • Locations
    • Store Hours
    • About
    • Garden Shop Employment Team
  • Weddings
    • Salt Lake City, UT
    • West Valley, UT
  • Blog
    • Gardening
    • Recipes

Sydney Anderson

Fresh Peach Mint Lemonade

August 1, 2016 by Sydney Anderson

Fresh Peach Mint Lemonade: Sweet peaches paired with cool mint add a refreshing twist to traditional lemonade.

Hello, thanks for stopping by!

Do you love a tangy, refreshing lemonade on a hot summer day?  Me too!  Add in some peaches and mint and you have the ultimate drink…Fresh Peach Mint Lemonade!

Fresh Peach Mint Lemonade: Sweet peaches paired with cool mint add a refreshing twist to traditional lemonade.

Sweet peaches and refreshing mint pair perfectly with tangy lemonade.  We can’t grow lemon trees here in our Utah climate, but if you grow peaches and mint in your garden, this recipe is a necessity!

Fresh Peach Mint Lemonade: Sweet peaches paired with cool mint add a refreshing twist to traditional lemonade.

For help picking the right trees and tips for taking care of them talk, to an expert at Western Gardens.  There are a lot of varieties and they’ll help you choose exactly what you need!  (And if you ask nice, they might even show you some of the cool multi-variety trees like the “fruit salad” tree!  It has four different kinds of fruit grafted onto ONE tree!  So cool, right?!)

Fresh Peach Mint Lemonade: Sweet peaches paired with cool mint add a refreshing twist to traditional lemonade.
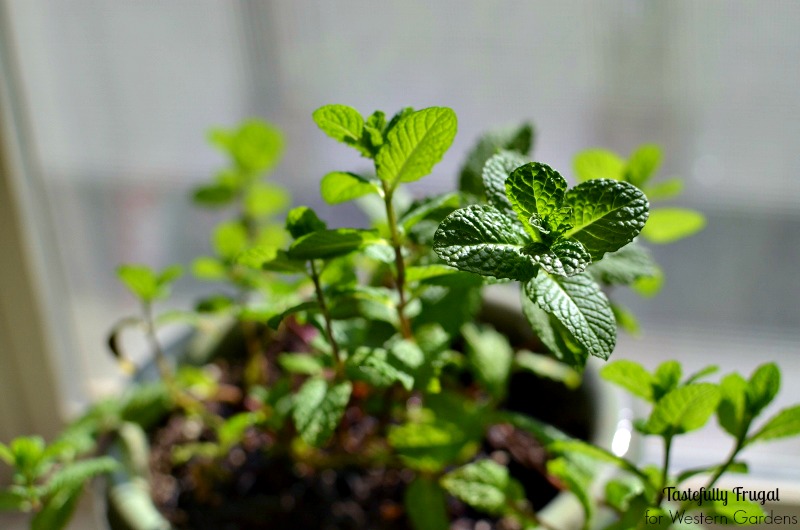
As I was slicing peaches for this lemonade, I saw my blooming mint plant on the counter and decided to throw some mint leaves into the mix too.  And I’m so glad I did!  The mint added a cool, refreshing hint to the sweetness and made every sip a wonderful mix of tart, tangy, sweet and refreshing. I’ve made three batches so far and I’ve found that the longer you let the lemonade cool in the fridge, the better it tastes. I recommend letting it cool in the fridge for at least 3 hours.

Fresh Peach Mint Lemonade

Ingredients:

  • 4 cups water
  • ½ cup sugar
  • 4 medium peaches, pits removed and quartered
  • 2 Tbsp mint leaves
  • 1 cup fresh lemon juice (about 3 large lemons)

Directions:

  1. Add water and sugar to a large saucepan and bring to a boil.
  2. Add mint and peaches to sugar/water mix, reduce heat to med-low and let simmer for 5 minutes.
  3. Pour into a blender jar and remove the center of the lid, if possible (to allow steam to escape).
  4. Place a towel over the lid and blend on low for 25-30 seconds, or until smooth.
  5. Pour through a cheesecloth or fine mesh strainer into a pitcher. Discard the solids.
  6. Whisk in lemon juice and cool in fridge for at least 3 hours.

 Fresh Peach Mint Lemonade: Sweet peaches paired with cool mint add a refreshing twist to traditional lemonade.

Are you a tangy lemonade fan?  Or do you prefer your drinks a little sweeter?  No matter what your taste is, Western Gardens has a wide variety of herbs and fruit trees to make any drink your taste buds can imagine!  Talk to an expert today to see what plants will thrive best in your garden.

If this Fresh Peach Mint Lemonade sounds good, check out these other tasty drinks!Fresh Peach Mint Lemonade

Blackberry Mint Lemonade | Brazilian Lemonade | Lemon Berry Slush

To get a PRINTABLE version of this recipe, click NEXT!

Western Gardens | Utah

Pages: Page 1 Page 2

Filed Under: Fruit, Recipes Tagged With: fresh fruit, lemonade, mint, peach, recipe

DIY Bird House Kid Craft

July 15, 2016 by Sydney Anderson

This DIY Bird House is a great kid craft, it’s easy to make and customize…even for little hands!DIY Bird Feeder Kid Craft: Let kids make their own bird houses in just a few minutes!

Do you get birds in your yard? We didn’t get many last year, but this year it seems like there is always a flock (well, at least 5 or 10!) coming and going throughout the day.  My boys love looking out the window and watching them on the grass, so I decided to bring nature a little closer to home and build a bird house for the front porch!

DIY Bird Feeder Kid Craft: Let kids make their own bird houses in just a few minutes!
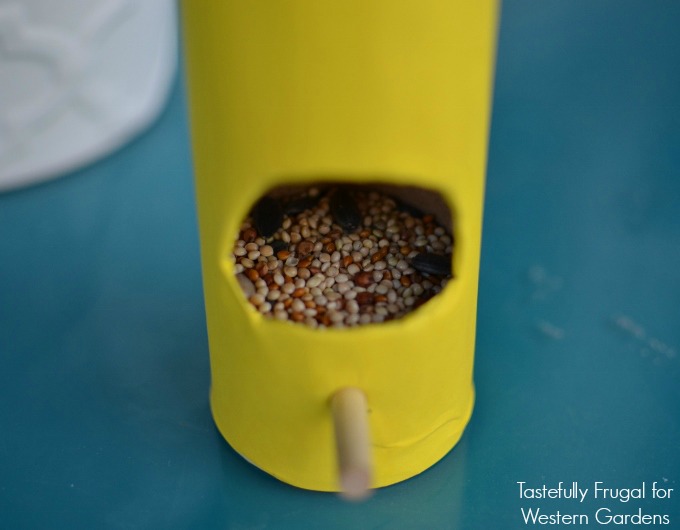
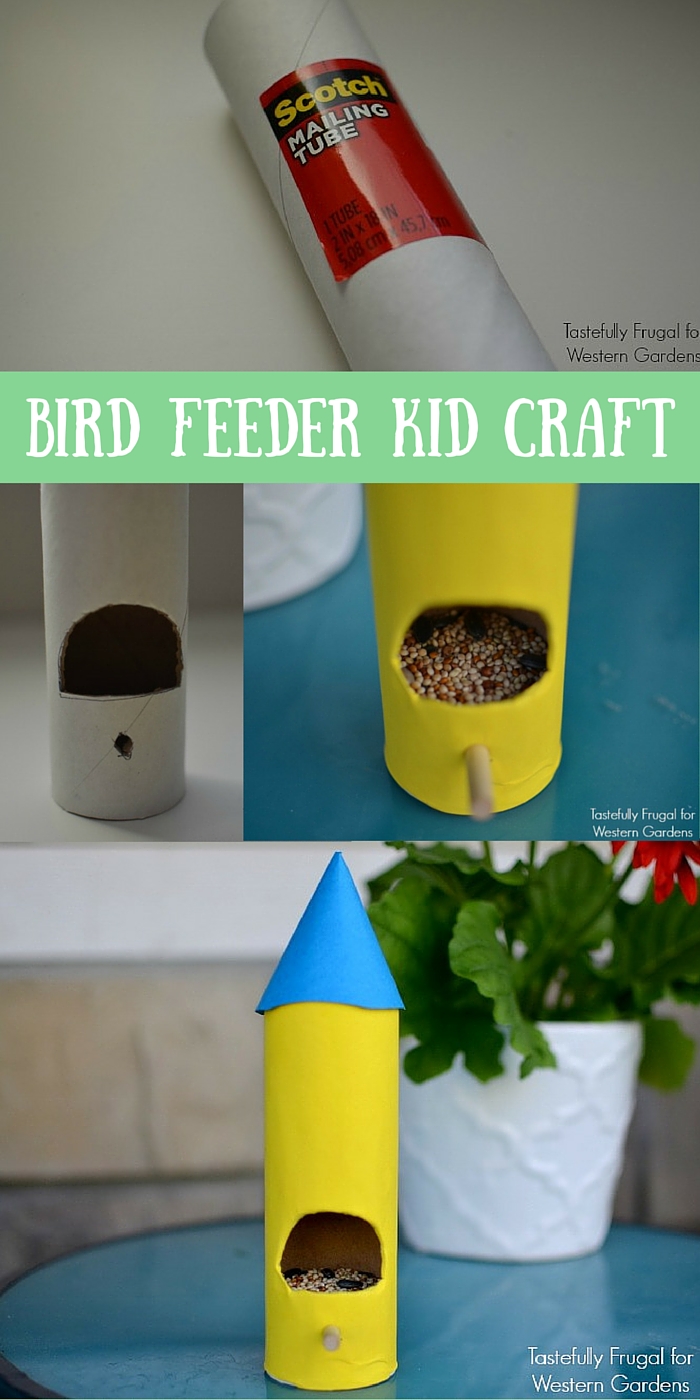
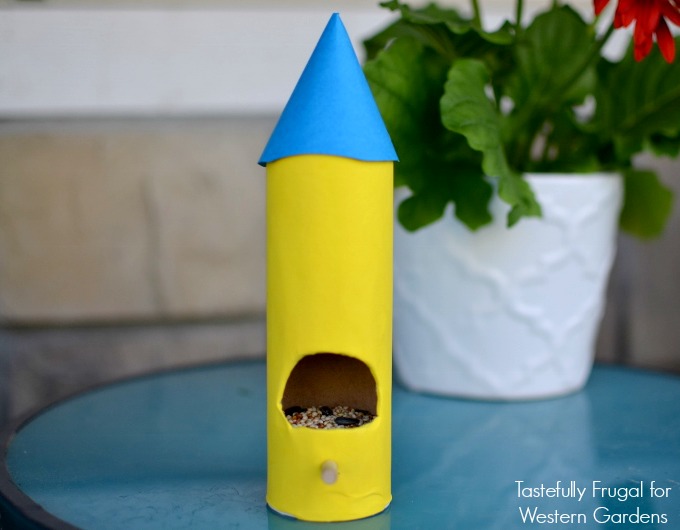
I didn’t think my kids would have the patience to sit through building a birdhouse from wood (they are 3 and 4) so I decided to go with something a little more simple.
DIY Bird Feeder Kid Craft: Let kids make their own bird houses in just a few minutes!

DIY Bird House Kid Craft

Supplies:

  • Shipping Tube (I picked this one up from the FedEx store for $3)
  • Wooden Dowels (you can pick them up at any hardware or hobby store)
  • Cardstock or Construction Paper
  • Scissors
  • Hot Glue Gun
  • X-Acto Knife or Razor Blade
  • Washi Tape, Feathers, Beads or other embellishments
  • Bird Seed (I found a huge variety at Western Gardens)

DIY Bird Feeder Kid Craft: Let kids make their own bird houses in just a few minutes!

DIY Bird Feeder Kid Craft: Let kids make their own bird houses in just a few minutes!

Directions:

  1. Decide on the height of birdhouse you want, measure and cut the shipping tube (we made ours 6″).
  2. Trace a half circle on the shipping tube to put the food in, and cut it out with the X-acto Knife.
  3. Measure and cut the dowel for the perch (ours was about 3″ long).
  4. Cut a small hole below the larger hole in the tube (for the dowel to go in).
  5. Wrap cardstock around tube, measure and cut the cardstock to fit around the tube.
  6. Hot glue the cardstock on to the tube.
  7. Hold the tube up to the light and cut out the large and small circles in the cardstock.
  8. Place the dowel inside the smaller hole and use hot glue to secure.
  9. Hot glue the shipping lid into place.
  10. Cut a piece of cardstock in a contrasting color 6″ x 2.5″.
  11. Roll into a cylinder and hot glue together.
  12. Let kids embellish the roof however they want.
  13. Use hot glue to attach the cylinder to birdhouse.
  14. Pour birdseed into the larger hole.

DIY Bird Feeder Kid Craft: Let kids make their own bird houses in just a few minutes!

Place it on a solid surface, or thread string or rope through the top of the tube to hang from a branch or a porch hook. We have ours sitting on our front patio table and the birds still come up for a snack!  These birdhouses are made with cardstock, so make sure to bring them in if you know a storm is coming…they probably won’t make it through the rain.

DIY Bird Feeder Kid Craft: Let kids make their own bird houses in just a few minutes!

My boys love looking out the window and watching the birds eat from their feeder! We’re also making a bird bath to see if we can get a few more visitors from nature to our porch. What fun ways do you like to bring nature close to home?  Tell me in the comments below!

Check out another fun way to get kids into nature:

Color Scavenger Hunt | Tastefully Frugal

Color Scavenger Hunt

Filed Under: Crafts Tagged With: Birdhouse, DIY, Kids Craft

DIY Kid-Friendly Bug Spray

June 15, 2016 by Sydney Anderson

Make this DIY Kid-Friendly Bug Spray at home with our quick and easy recipe!

DIY Kid Safe Bug Spray: Make your own bug spray at home in minutes and with just 4 ingredients!

Is your favorite part of summer spending those lazy evenings out in the yard, watching the kids play and talking to friends or family?  Mine too!  Avoid making other “friends” while you’re enjoying your summer nights…bugs!

Conventional bug sprays are filled with yucky chemicals that we don’t in our kids’ growing bodies (or our own bodies, for that matter!).  They not only absorb through the skin, but it’s hard to avoid inhaling them while applying the sprays.  We certainly don’t want to do nothing and get bitten…so what’s a mom to do? Make her own, of course!

Kid Safe Bug Spray: Make your own bug spray at home in minutes and with just 4 ingredients!There are lots of different recipes for making your own bug spray because they are so easy to customize to the bugs you want to avoid.  Different bugs dislike different scents, so add what you need in order to avoid those bites! Here are a few essential oils that are good to keep these bugs away:

Mosquitoes—lavender, eucalyptus, citronella

Flies—lavender, peppermint, rosemary

Ticks—lavender, lemongrass, eucalyptus

Some essential oils aren’t safe for kids, so I’ve only included oils in this spray that are safe for everyone…lavender and lemon. Both are fresh scents, safe for kids and good for keeping away mosquitoes and ticks!  And if you want to add some plants to your yard to help repel mosquitoes, click HERE!

DIY Kid-Friendly Bug Spray

Supplies:

  • Spray Bottle
  • Label (you can print your FREE copy here)
  • 1 oz witch hazel
  • 1 oz distilled water
  • 5 drops lavender essential oil
  • 5 drops lemon essential oil

Directions:

  1. Combine all ingredients in spray bottle and shake well to combine.
  2. Shake well before each use.

Notes:

  • I put my Bug Spray in a 2 oz travel size spray bottle.  They are inexpensive and small enough to carry in a purse or diaper bag!

Kid Safe Bug Spray: Make your own bug spray at home in minutes and with just 4 ingredients!

Now that you’re protected from the bugs check out these fun (and FREE) outdoor activities:

Nature Bingo | Tastefully FrugalNature Bingo

Color Scavenger Hunt | Tastefully FrugalColor Scavenger Hunt

Filed Under: Recipes, Tips & How To's Tagged With: bug spray, DIY, kid friendly, tips

DIY Tabletop Terra Cotta Fire Pit

June 7, 2016 by Sydney Anderson

Hi there, thanks for stopping by today!

DIY Fire Pit: Make Your Own Campfire At Home For Less Than $5 | Western Gardens

Do you love camping with your family in the summer?  Roasting hot dogs and marshmallows over a fire with the people you enjoy most?  Me too!

Some of my favorite memories are of camping in the mountains, at the lake, in the desert, and even in the backyard!  I can’t wait to make the same memories with my boys…but since I’m 20+ weeks pregnant, sleeping on the ground isn’t very appealing.
DIY Fire Pit: Make Your Own Campfire At Home For Less Than $5 | Western Gardens

So we’re bringing my favorite part of camping right to our front porch—campfires!

There’s nothing better than sitting around a camp fire, roasting hot dogs, making s’mores and just spending time together, laughing and telling stories. Currently we live in a great little townhome community— without a backyard—so building a fire pit was out of the question.

I couldn’t let that stop me!

DIY Fire Pit: Make Your Own Campfire At Home For Less Than $5 | Western Gardens
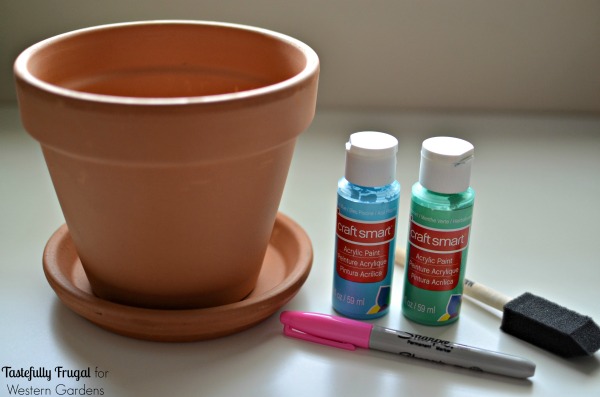
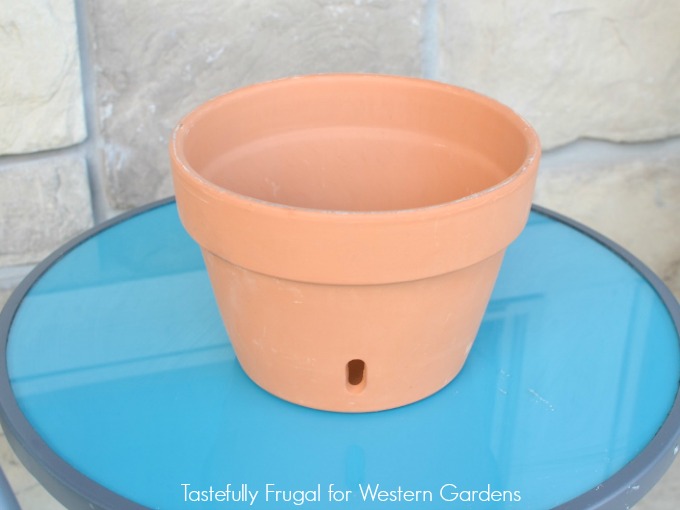
I took matters into my own hands and made a mini fire pit out of a terra cotta pot for our front porch!  I took my husband, who is definitely the brains of our family, into Western Gardens and he picked out this terra cotta pot with holes in the bottom.  The holes allow more oxygen to enter the pot (just like on a charcoal grill), which will let the fire burn longer.

Longer lasting fires are perfect for those summer nights when the kids are playing, grown ups are chatting and you want to be able to make more s’mores when you get that craving (which happens a lot when you’re pregnant!).

Click NEXT to get the simple instructions!

Western Gardens | Utah

Pages: Page 1 Page 2 Page 3

Filed Under: Crafts, Outdoors Tagged With: DIY, Fire Pit, How To, how to's, Terra Cotta Pot, tips, Utah, Western Garden Centers, Western Gardens

Strawberry Mango Salsa

May 28, 2016 by Sydney Anderson

Hi there, so glad you stopped by!

Are you looking for a sweet, tangy and delicious salsa?  Something out of the ordinary that will have everyone begging for the recipe?  Then you’re in the right place!  This Strawberry Mango Salsa has only 6 fresh ingredients, and is ready to eat in less than 10 minutes!

Strawberry Mango Salsa: A sweet and tangy salsa the whole family is sure to enjoy!

Did you know that May is National Strawberry Month?! If it was up to me, every month would be National Strawberry Month.  Since, sadly, it’s not, I will take full advantage of it in May and stock up on strawberries at a great price, while I wait for my strawberry plant to start delivering those red beauties right to my door step!

There are many ways to eat strawberries. From eating them plain to putting them in desserts or drinks, or even in your favorite breakfast.  Strawberries are great no matter how you eat them! Today I’m sharing a new way to eat this delicious red fruit…in salsa!

I’m not a big spicy salsa fan. In fact, most salsas are too spicy for me. So when I heard about fruit salsas, I was in the kitchen whipping up a batch that night. My first attempt was a tasty peach salsa that we made last fall.

Peaches are out of season this time of year and this pregnant mama was wanting a sweet salsa to enjoy with some tortilla chips. Luckily, A few weeks ago I found strawberries for $1 a box and knew they would be a good base for my salsa. I also picked up a few mangoes and limes and made my way home.

I cut some cilantro from my indoor herb garden, diced up some leftover onions from burgers that weekend and mixed it all together. What I got was a sweet and tangy salsa my whole family devoured! I actually had to go back to the store the next day to get more strawberries to make another batch. If you like a little more heat to your salsa you could add some jalapeño or serrano peppers to kick it up a notch.

Strawberry Mango Salsa: A sweet and tangy salsa the whole family is sure to enjoy!

Strawberry Mango Salsa

Ingredients:

  • 1 cup strawberries, diced
  • 1 cup mango, diced (about 1 mango)
  • 1/8 cup red onion, diced
  • 2 Tbsp cilantro, chopped
  • 1 Tbsp honey
  • juice from 1 lime

Directions:

  1. In a small bowl, combine honey and lime juice.
  2. In a large bowl combine strawberries, mangoes, onions and cilantro.
  3. Toss with honey-lime mix.
  4. Chill until ready to serve.

Print
Strawberry Mango Salsa

Strawberry Mango Salsa

Ingredients

  • 1 cup strawberries, diced
  • 1 cup mango, diced (about 1 mango)
  • 1/8 cup red onion, diced
  • 2 Tbsp cilantro, chopped
  • 1 Tbsp honey
  • juice from 1 lime

Instructions

  1. In a small bowl combine honey and lime juice.
  2. In a large bowl combine strawberries, mangoes, onions and cilantro.
  3. Toss with honey-lime mix.
  4. Chill until ready to serve.
3.1
https://westerngardens.com/strawberry-mango-salsa/

What is your favorite way to eat strawberries? Head into any Western Gardens Center to pick up your strawberry plants and get started enjoying the fruit of the month!

 Want a few more tasty strawberry recipes? Check these out:

No Bake Strawberry Cheesecake | Tastefully FrugalNo Bake Strawberry Cheesecake

Strawberry French Toast Cannolis | Tastefully FrugalStrawberry French Toast Cannolis

Copy Cat Sonic LemonBerry Slush | Tastefully FrugalCopy Cat Sonic Lemon Berry Slush

Filed Under: Fruit, Recipes Tagged With: Fruit, recipe, Salsa, Strawberry

7 Plants A Black Thumb Can Keep Alive

May 24, 2016 by Sydney Anderson

Hi there, I’m so glad you stopped by!

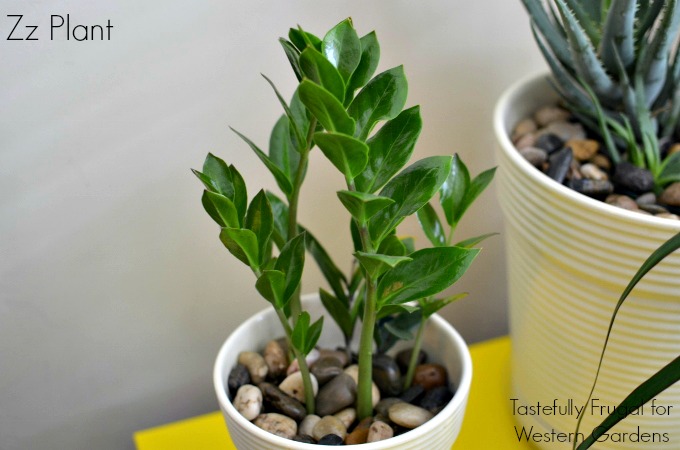
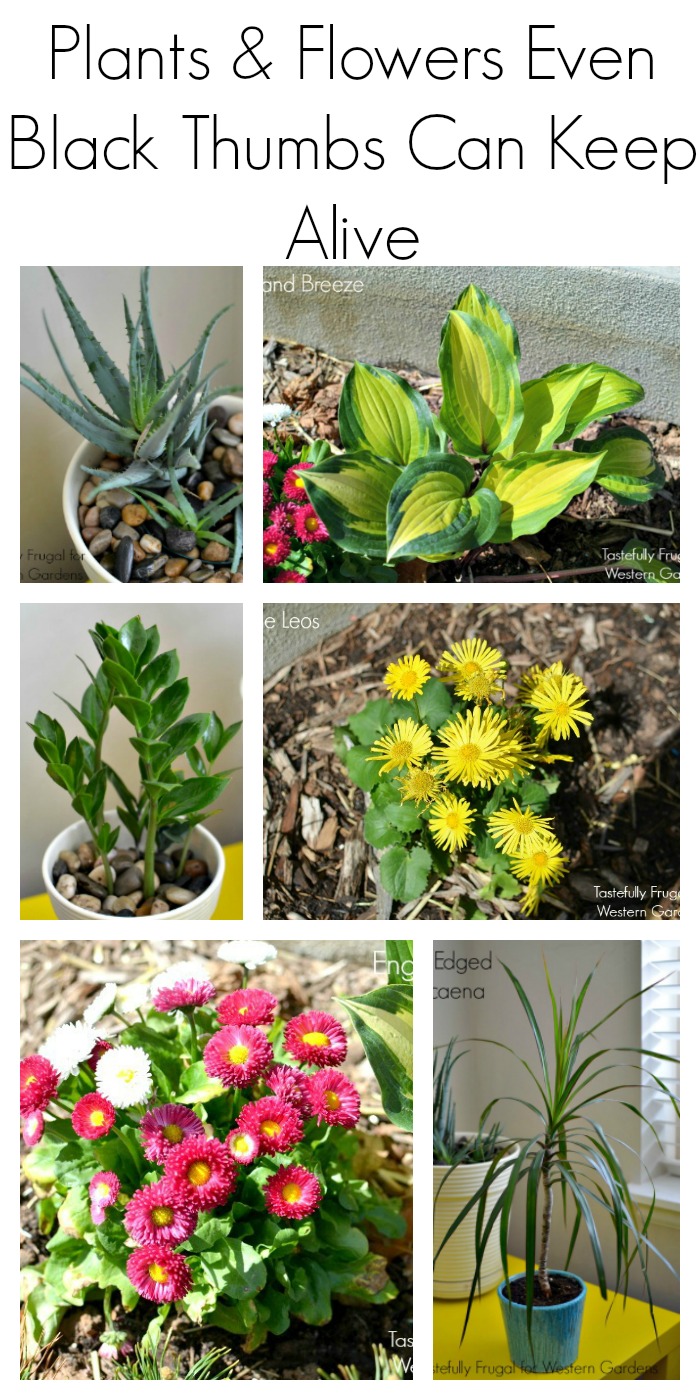
alt=”If you have trouble keeping plants alive, have no fear…. Stick with these 7 varieties and you’ll be able to keep thriving all year long!” width=”700″ height=”1400″ />

Are you prone to killing innocent plants?  Are you a self-proclaimed black thumb?  Well, take a deep breath, I’m here to help!

I’m sharing 7 beautiful plants that will change your luck and grow your confidence (along with your plants!). Take it from a former black thumb, these plants are a breeze to take care of!

If you have trouble keeping plants alive have no fear.... Stick with these 7 varieties and you'll be able to keep thriving all year long!

I’ve always admired beautiful gardens and flowers.  Trying to have them in my home was another story. Part of the problem was forgetting to water them, and then overwatering when I did remember.  The other part was buying the wrong plants and flowers for my area.

No matter what I did for years, every thing I planted died within a month. But not anymore!  I am happy to say I have now kept three (four including the wine glass succulent in my office) houseplants alive for 2 months and a garden full of beautiful plants and flowers (that survived last month’s crazy warm/cold weather mix!).

If you have trouble keeping plants alive have no fear.... Stick with these 7 varieties and you'll be able to keep thriving all year long!

House plants are easier to keep alive since you don’t have to worry about climate changes. If you’re a little nervous about keeping your plant babies alive, start here.

Click NEXT to see my favorite houseplants!

Western Garden Centers | Salt Lake City | Sandy | West Valley UTAH

Pages: Page 1 Page 2

Filed Under: Flowers, Gardening, Outdoors, Tips & How To's, Utah Gardening Tagged With: black thumb, easy to keep alive, house plants

5 Dos and Don’ts for Planting Herbs

May 17, 2016 by Sydney Anderson

Hi friends! I’m so glad you stopped by!

Want to start an herb garden? Here are 5 Dos and Don'ts to help get you started!
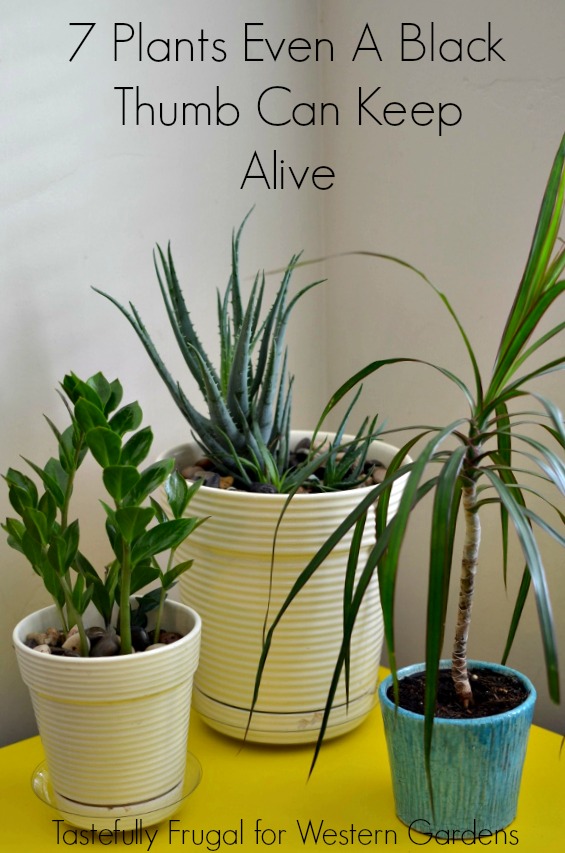
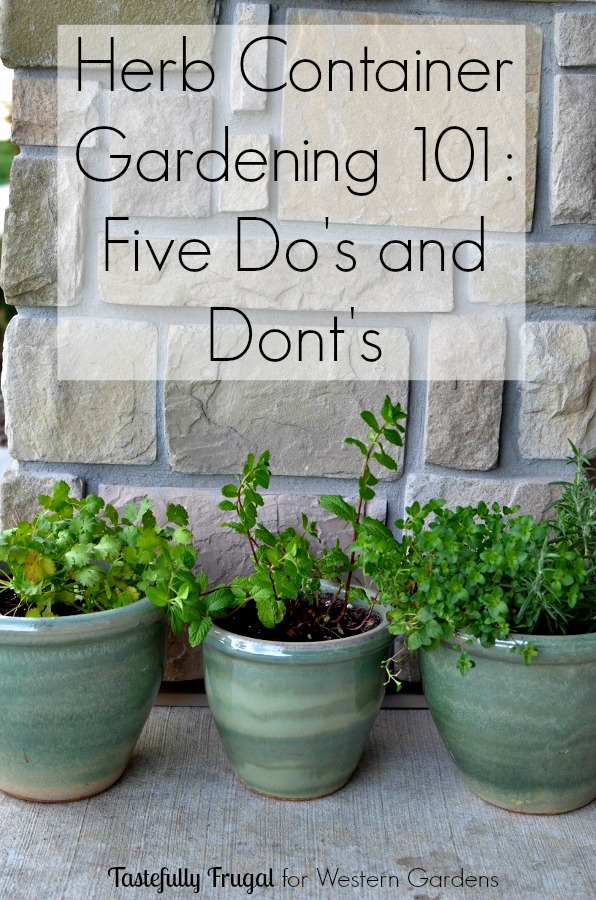
Don’t you just love the smell and taste of fresh herbs?!  Want to have fresh, healthy herbs at home without the expense of an extra grocery store run?  (And have you seen how much they charge for a tiny container of wilted herbs?!)

I’ve cooked with both store-bought and homegrown herbs, and I can tell you two things. One, homegrown always tastes better, and two, you can’t just plant a bunch of herbs in a pot and hope they thrive.

As our family grows, so does our food budget. I’m starting to find ways I can cut our grocery bill here and there so that by the time my kids are teenagers we won’t be stuck spending $1000 a month just on food!

Want to start an herb garden? Here are 5 Dos and Don'ts to help get you started!

One of the first things to know is not all herbs are created equal!  Some need more water, some like less sun, some have long roots and need space to grow. I’m going to share five lessons I’ve learned when it comes to growing your own herbs!

Click NEXT to see the 5 Dos and Don’ts for Growing Great Herbs!

Western Garden Centers | Salt Lake City | Sandy | West Valley UTAH

Pages: Page 1 Page 2

Filed Under: Container Gardening, Gardening, Herbs, How To Tagged With: basil, cilantro, food, Gardening, How To

Mother’s Day Flower Pots

April 19, 2016 by Sydney Anderson

Welcome!  I’m so glad you’re here!

Are you looking for a simple, inexpensive present that the moms in your life will not just cherish, but enjoy every day?  Then create this bright and fun Mother’s Day gift, with the help of little hands!

Mother's Day Flower Pots are the perfect gift for all the mothers in your life! A sweet and simple gift to bring a pop of color to her home and a smile to her face.

Mother’s Day is right around the corner. Somehow this holiday always sneaks up on me! Maybe it’s because we have 5 bazillion birthdays from March to May or maybe it’s because with the warmer weather, I want to spend every waking moment outside; but it seems like I always remember Mother’s Day the Friday before and am always scrambling to make something for the moms in my life. But not this year!

Mother's Day Flower Pots are the perfect gift for all the mothers in your life! A sweet and simple gift to bring a pop of color to her home and a smile to her face.

I’ve learned that handmade gifts are the way to go when it comes to moms (and grandmas). Not only do they always bring a smile to their face, but it’s also more fun to make gifts. And it’s a lot more affordable too!

Mother's Day Flower Pots are the perfect gift for all the mothers in your life! A sweet and simple gift to bring a pop of color to her home and a smile to her face.

For this gift, I enlisted help from my two partners in craft. This gift couldn’t be any easier to make, and what kid doesn’t love getting a little dirty?!

Mothers-Day-Pot-Supplies

Mother’s Day Flower Pots

Supplies

  • Terra Cotta Pot – I used a 6″ because it was the perfect size for my boys’ hands. You may want a bigger or smaller one depending on how big your kids’ hands are.
  • Saucer to go under the pot – This terra cotta saucer costs about $1 but you can get a plastic one for much less.
  • Paint – I like using acyrlic craft paint (like these) because it dries quickly and is easy to clean up.
  • Sponge Paint Brush(es) (optional) – I’ve found after doing hand print art with my boys, the hand prints turn out clearer if you brush the paint onto their hands instead of letting them put their hands in the paint by themselves.
  • Sharpie
  • Flowers – you can buy them now or wait until you’re ready to give your gift. Western Gardens always gets a big shipment of new flowers just before Mother’s Day.
  • Potting Soil

Mother's Day Flower Pots are the perfect gift for all the mothers in your life! A sweet and simple gift to bring a pop of color to her home and a smile to her face.

Directions:

  1. Pick mom’s 2-3 favorite colors (or let your kids pick their favorite colors) and pour some on a paper plate.
  2. Using your paintbrush, paint the first color on one of your kids’ hands (You can also let the kids press their hands in the paint if you don’t have a paintbrush).
  3. Press hand firmly along side of pot.
  4. Paint the next color on the other hand (or next child’s hand) and space about 1″ from the first hand print on the pot.
  5. Continue with same color pattern spacing about 1″ from the last hand print until you’ve covered the whole pot.
  6. Using your Sharpie, write Happy Mother’s Day 2016 on the rim of the pot. (I thought about attaching a tag that said Happy Mother’s Day 2016, but I know the tag will probably get lost, and in 15 years I probably won’t remember what year we made this!)
  7. Plant flowers and give to mom.

Mother's Day Flower Pots are the perfect gift for all the mothers in your life! A sweet and simple gift to bring a pop of color to her home and a smile to her face.

What is your mom’s favorite flower? How great would they look in one of these pots?! Check out Western Gardens for a huge selection of flowers any mom would love.

Here are a few more Mother’s Day gift ideas:

Mothers-Day-Printable-Content-It-Is-A-KeeperMother’s Day Free Printable

Thank You For Helping Me Bloom Mother's Day Gift: A fun, quick and easy gift idea for that special mom in your life. #BestMomsDayEver #ad #CollectiveBiasDIY Tissue Paper Flower

Filed Under: Container Gardening, Crafts, Flowers, How To Tagged With: craft, how to's, Mother's Day

Primary Sidebar

Shopping Cart

Items in Your Cart

Your cart is empty
Visit The Shop

Follow Western Gardens

  • Facebook
  • Instagram
  • Pinterest
  • YouTube

See what we’ve been pinning!

Follow Me on Pinterest
Followed by people.
?

Pinterest Badge by Skipser

Here’s What We’ve Been Up To!

Save water and money by Turf Training - train your lawn to grow deep roots
work at western gardens utah garden center
Senior gardening woman Edu Carvalho from Pexels
nursery center open to public

Copyright © 2023. Western Gardens - Privacy Policy