• Skip to primary navigation
  • Skip to main content
  • Skip to primary sidebar

Western Garden Centers

for what grows here

  • Home
  • How To
  • Gift Cards
  • Calculate Mulch
  • Locations
    • Store Hours
    • About
    • Garden Shop Employment Team
  • Weddings
    • Salt Lake City, UT
    • West Valley, UT
  • Blog
    • Gardening
    • Recipes

Yard Care

Marvelous Garden Mulch

May 12, 2017 by Heather Leister

Welcome, Glad you stopped by!

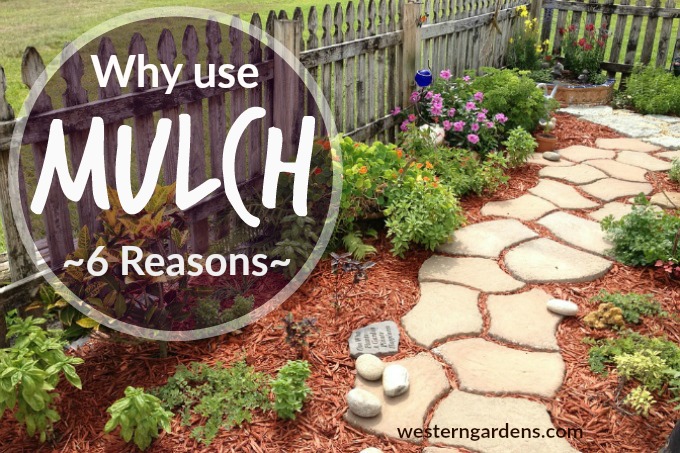
Garden mulch makes a yard look well kept, but there are other excellent reasons why it is good to lay down a layer of this simple garden basic.

Reasons to use mulch in your flower beds

If you give me the choice between spending a Saturday working in the house or working in the yard, I will choose my yard every time. The reason? For me, there is something deeply satisfying in pulling weeds and neatening up flower beds. Yes, I know that the weeds will eventually grow back, but it takes them longer to return than it does the messes in my house. Those will reappear before the day is over!

After I finish weeding my yard, I like to put down fresh mulch. Not only does it make everything look tidy, it’s an important step in taking care of the yard. Mulch provides several key benefits for your yard. If you’ve never put it down before, consider the following benefits that it offers.

Mulch under perennials and stepping stones for a finished look

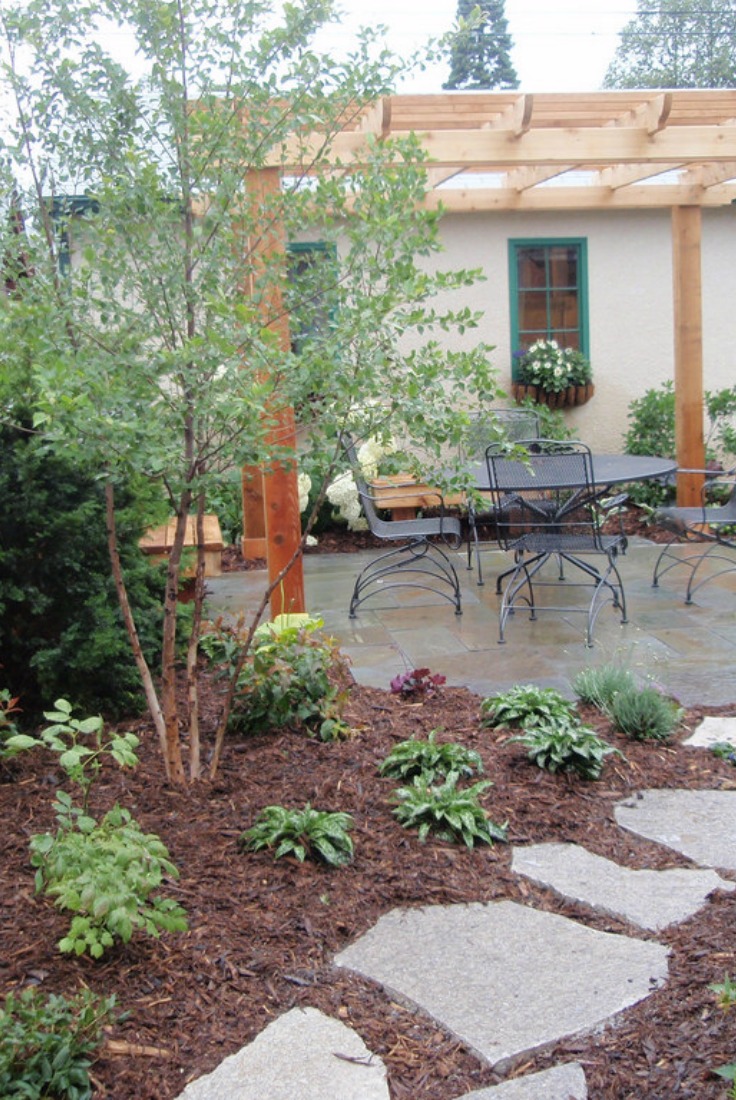
Image credit: Flickr

Weed control: A layer of mulch on your flower beds and around your trees will prevent weeds from germinating and growing.

Moderates soil temperature: Mulch will help prevent the temperature in your beds from fluctuating between too hot and too cold. It’s a good idea to apply your mulch after the soil has had a chance to warm up.

Retains moisture: Mulch prevents moisture from evaporating out of the soil. This benefits plant roots and leads to healthier growth.

Prevents erosion: Mulch will also prevent soil from eroding when it rains. When it rains the water hits the mulch first and keeps the soil from washing away.

mulch and stepping stones

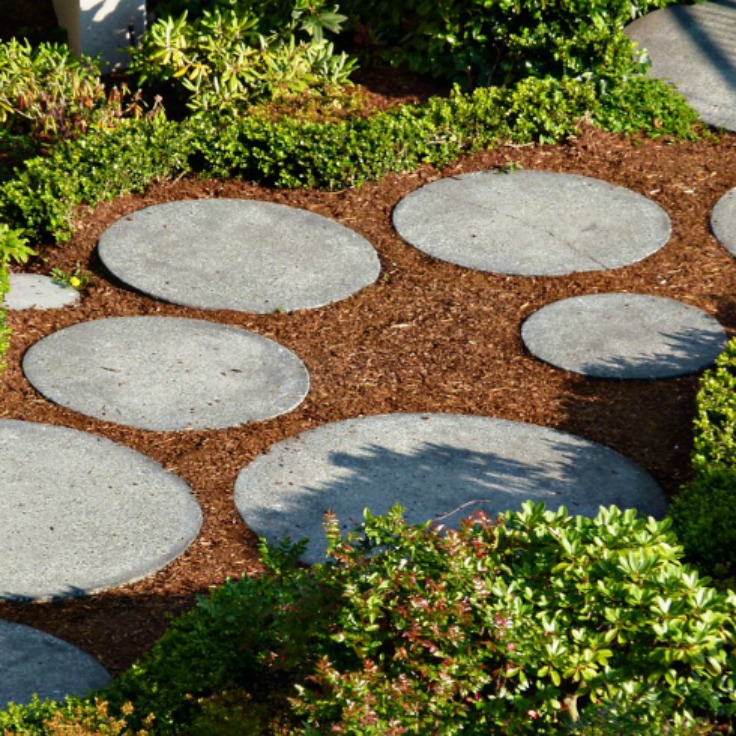
Image Credit: Pixabay

Adds nutrients to the soil: The definition of mulch is anything that you put down on your soil, but if you choose an organic mulch you will have the benefits of adding nutrients to your soil as your mulch decomposes. Even if you don’t select an organic mulch, the layer will prevent the soil’s nutrients from washing away.

Curb Appeal: Mulch gives your yard a polished look and the choices are endless. I prefer the look of a dark mulch, so we tend to use dark organic mixes that will decompose in our flower beds and around our trees. Other possibilities are rocks, compost, bark, wood chips, landscape fabric, or recycled rubber tires. Whatever you choose, pick something that complements your landscaping and gives your yard a finished look.  Western Gardens has a variety of quality mulch products to recommend.

Light colored mulch for a flower bed

Image credit: Pixabay

Filed Under: Gardening, Tips & How To's, Yard Care Tagged With: flower beds, Mulch, Utah gardening, why use mulch, Yard Care

May Gardening To-Do List

May 2, 2017 by Western Gardens

May Gardening To-Do List for all the things you don't want to forget (but don't have time to remember!)

Hello Gardening Friends, thanks for stopping by!

If you’re excited to work in your yard or garden, but not sure where to begin, then you’ve come to the right place!  We’ve put together a list of things to do throughout the month.

May Gardening To-Do List for all the things you don't want to forget (but don't have time to remember!)

You may not need to do everything on this list.  For example, if you don’t have bare patches to reseed or Spring bulb foliage to cut back, skip over those items on the list.  Just pick what applies to your home and yard and plan out when you will do it all throughout the month!

May Gardening To-Do List for all the things you don't want to forget (but don't have time to remember!)

May Gardening To-Do List

➺Train your Lawn – Turn Sprinklers On only when needed – Let the lawn tell you when it needs watering. Click here for more details.

➺Lawn Watering – Use a “moisture meter” probe to determine adequate moisture.

➺Water Conservation – Conserve water by watering before 10:00 am or after 6:00 pm.

➺Lawn Aeration – Its not too late if you haven’t already.

➺Set Lawnmower Height to 2½-3 inches. This allows the lawn to “shade” its soil making for a healthier lawn.

➺Lawn Broadleaf Weed Control (Liquid application) – for Dandelions, violets, etc. Weed-A-Lawn is a great product.  Spot treat or apply to big areas of lawn where needed. Follow manufacturer’s instructions.

➺Lawn Crabgrass and Spurge – Second application of pre-emergent granular (6 weeks after the first application).

➺Fertilize Lawn with a weed-killing post-emergent granular fertilizer —do NOT water in—apply it to a moist lawn and let it sit for a day

➺Seed Bare Patches in Your Lawn unless you’ve already used a pre-emergent, in which case, wait until September to seed bare patches.  Click here for more.

➺Weed, Thin Out & Mulch newly planted seedlings

➺Plant Your Favorite Annuals for beautiful color—most can be safely planted after frost danger has passed (some are hardy enough to be planted earlier, check with your local nursery)

➺Spring Bulbs – Remove Spent Flower Heads (aka dead-heading) and AFTER foliage fades and turns brown, cut back leaves.

➺Summer Blooming Bulbs – Plant dahlias, day lilies, and gladiolus.  Click here for instructions.

➺Plant Trees, Shrubs, and Perennials – Early spring or late fall are great times to do this.  Click here for tips.

➺Divide and/or Transplant Perennials – Summer bloomers: early in the month.  Spring bloomers: after blooming is done.

➺Flowering Shrubs  – Prune after they finish blooming.

➺Pest Control – Boxelder bugs are a nuisance.  Grasshoppers are best controlled when they first hatch.  Watch for Leaf roller on boxelder trees. Try to stay ahead of those slimy slugs and snails.  Closely follow directions on labels when using insecticides as not to harm bees.

➺Plant Outside
Kohlrabi, parsley, parsnips, potatoes,
Until May 15th: onions & peas
After last frost until June 1st: dry beans, snap beans, eggplant, peppers
After last frost until June 10th: watermelon & winter squash
Until July 1st: cauliflower, parsley, swiss chard
Until July 15th: beets & broccoli
After last frost until July 20th: cucumbers and summer squash
Until Sept 1st: radishes

and so much more….

If you liked learning these tips from the experts, here is another good tip – come in and visit us!

Be sure to check out our June Gardening To-Do List too!

*This is not an exhaustive list.  If we’ve overlooked something, feel free to let us know in a comment below!

May Gardening To-Do List for all the things you don't want to forget (but don't have time to remember!)

Filed Under: Gardening, How To, Lawn Care, To-Do List, Utah Gardening, Yard Care Tagged With: Gardening, how to's, may gardening, Monthly To-Do List

Snow Mold on Your Lawn – 8 Simple Ways to Solve

March 11, 2017 by Wendy Pettit

Welcome Gardening Friends! Thanks for stopping by.

When the snow finally melted off our back lawn, my grass looked like it was dying. If yours does too, it could be a lawn fungus called SNOW MOLD. Don’t worry too much, snow mold seldom destroys the lawn; your lawn will recover.  This annoying disease can appear when the snow melts off the lawn in the spring.  Your turf will have circular type patches of matted straw-colored grass and can have a top layer of stringy mold.  (It reminded me of a salad mold that once grew in my refrigerator.) 

Here are 8 simple ways to solve SNOW MOLD on your lawn, and better yet, prevent it from happening.

8 ways solve snow mold on lawn

Current Problem Solutions to Snow Mold –

  • In the spring when you discover the mold, take action by gently raking the area.  This will help the air circulate through the lawn to dry it out and stop the mold from growing further.  Be careful not to rip up the grass.  The disease usually affects only the blade, so the crown of the plant is still good and will recover.  Throw away the grass you have raked up.rake grass to stop snow mold from growingbefore-and-after photos of raked lawn for snow mold
  • According to the proper schedule, regular fertilizing and mowing will help your lawn outgrow the fungus.  The lawn will green up and the damaged blades will eventually be cut off.
  • If your lawn has extreme snow mold, and you have tried the above solutions, a disease control product may need to be applied to the affected area.  See your local garden center, like the experts at Western Gardens, to obtain the correct product.  It’s always a good idea to take to the garden shop samples of the diseased plant and a photo of the area.

discard snow mold contaminated grass

Snow Mold Preventative Actions –

  • In the fall, be sure to rake leaves off the lawn. This can be annoying if you have trees that take all winter to lose their leaves, like a Sycamore.
  • In the fall, be careful not to use excessive nitrogen fertilizer. This will help slow down the growth of the grass before winter arrives.
  • In the fall, be sure to continue mowing until the lawn’s growth slows down.  Make sure your last mowing is a shorter cut.  The taller the blades of grass when winter hits, the more snow mold is encouraged to develop.  (I believe this was the culprit for our problems this spring. We put the lawnmower away and then had a mild fall.)bicycle lawn mower
  • If each year you have this problem in certain areas, apply a fungicide to the grass in the fall.  Be sure to talk with your local garden expert for the correct preventative product.
  • In the winter, if piles of snow build up where you or the street plows have worked, be sure to disperse the snow.  Where the snow is too deep on your lawn, it can take much longer in the spring to melt, inviting snow mold to grow with the warm spring temperatures. riding snow plow in cold winter
snow mold close up on lawn

SNOW MOLD on my Utah lawn

This warm weather signals time to dig in the dirt; but first, I’m going to walk barefoot through my recently raked and drying lawn.

barefoot in grass

Filed Under: Gardening, Lawn Care, Tips & How To's, Yard Care Tagged With: fall lawn care, how to's, Lawn Care, lawn disease, lawn fungus, snow mold, spring lawn care

How To Reseed Bare Patches in a Lawn

May 21, 2016 by Heather Leister

Welcome, thanks for stopping by!

Do you have bare patches in your lawn? Check out these easy steps for reseeding your grass!

landscape grass

Have you ever had bare patches in your lawn that you weren’t quite sure what to do with?  I’m here to help!  I’ve put together a list of easy instructions to help get your lawn back in shape.

I’ve decided that lawns, like people, have unique personalities. I’ve had lawns that were resilient, with turf that endured kids and a dog, yet still came back lush and full each spring.

Our current lawn is the exact opposite. It’s moody, and reactive, affected by the slightest change in the environment. We’ve reseeded every year, but our lawn is stubborn and resistant, always leaving just enough bare patches that we must repeat the practice the following year.

If you’re dealing with a stubborn, angsty lawn with bare patches, I’ve put together my best tips for reseeding it!

lawn topsoil

How To Reseed Bare Patches In A Lawn:

  • The best time to reseed and repair bare spots in the lawn is in the spring, when the ground temperature is approximately 52 degrees.
  • Before you lay down any seeds, make sure that fungi, grubs, or other pests aren’t the cause of your bare patches. If they are, then address those problems first.
  • After determining that the area is free from pests, use a spade to dig approximately 6” into the dirt where you you want to seed. Break up the soil and dirt clumps.
  • Mix a quality topsoil into the area. This will improve the soil quality and give the seeds a healthy head start.
  • Rake the soil and dirt together, then tamp it down so that the repair area is level with the rest of the lawn.
  • Apply your grass seed in a thin layer over the area. Seed may be applied on its own, or in combination with a fertilizer (do NOT use a pre-emergent fertilizer, it will prevent your seeds from germinating). You may also consider a lawn patch product that combines seed, fertilizer, and mulch in one.
  • If you apply seed on its own, cover it with mulch to retain moisture and protect it from birds. Straw is an excellent, inexpensive choice.
  • Water the area well.
  • Continue to water the area regularly, once or twice daily. You will want to keep the area moist, but not drenched.
  • After the new grass is well established, apply fertilizer.  When grass is approximately ⅓ higher than your normal mowing height, include the area in your lawn mowing routine.
  • Monitor the area for the rest of the season to ensure no further problems.lawn care

Have you ever had to reseed bare patches in your lawn?  Tell us about it in the comments below!

bare-feet-in-the-grass

Images:
Barefeet in Grass: Public Domain Pictures
Lawnmower & Grass: Pixabay
Topsoil on Grass: YouTube

Filed Under: How To, Yard Care Tagged With: lawn, Reseeding, Yard Care

10 Deer-Resistant Plants

April 27, 2016 by Heather Leister

Welcome, I’m so glad you stopped by!

Are deer eating everything you plant? Try these 10 deer-resistant plants, your landscape will thank you!

Do you have frequent visitors to your yard?  Visitors that may not be very welcome…because they’re eating your landscape?!  Oh, deer!  If you get these visitors like we do, we are here to help!  We’re sharing 10 beautiful plants you can add to your flower beds and containers, that deer will leave for you instead of taking for a snack.

Several years ago we moved to a new area with a well-known urban deer population. The city’s deer herd was notorious for visiting yards and sampling the local landscaping. In the beginning, being in the midst of the deer was a treat. We had never lived in an area with this much access to wildlife.

The novelty quickly wore off as our plants began to vanish.

Plants that had thrived for years in our old yard were no match for the deer’s appetites. It became clear that we had to adapt our landscaping or our yard would continue to serve as a 24-hour deer buffet.

Through research, trial and error, we found deer-resistant plants that grow in our area. There are still a few deer delicacies planted in the yard (I just can’t give up my hostas!) but for the most part we’ve been successful in keeping them away.

When looking for a deer-resistant plant, a good rule of thumb is to choose something fragrant, prickly, or poisonous to the deer. The deer won’t always obey this rule, especially if they’re hungry and food is scarce, but this is a good place to start. Here are 10 deer-resistant plants that thrive in a variety of environments.

10 Deer-Resistant Plants

FRAGRANT PLANTS

1. Lavender

Are deer eating everything you plant? Try these 10 plants that are deer-resistant, your landscape will thank you!

Lavender is always an excellent choice for a deer resistant plant. This hardy, fragrant perennial requires little water and maintenance.

2. Salvia

Are deer eating everything you plant? Try these 10 plants that are deer-resistant, your landscape will thank you!

Salvia is another perennial that produces a strong fragrance which deer find extremely unpleasant. The plant comes in a wide variety of colors and is a strong perennial that will be easy to care for year after year.

3. Yarrow

Are deer eating everything you plant? Try these 10 plants that are deer-resistant, your landscape will thank you!

Yarrow plants are not overly picky about soil requirements, making them an excellent choice for many people. Bright, colorful flowers bloom throughout the summer, but the deer won’t be tempted to snack thanks to the strong aroma produced by the yarrow leaves.

4. Butterfly Bush

Are deer eating everything you plant? Try these 10 plants that are deer-resistant, your landscape will thank you!

 Another fragrant, drought-resistant perennial, Butterfly Bush is an excellent choice if you are looking for a flowery, deer resistant shrub. It grows quickly, produces a large amount of blooms, and does well in almost any type of soil.

Click NEXT to see which beautiful prickly plants will keep deer away! Western Garden Centers | Salt Lake City | Sandy | West Valley UTAH

Salvia image courtesy of Rawich at FreeDigitalPhotos.net
Lavender and Yarrow images courtesy of wikimedia commons
Butterfly Bush image courtesy of staticflickr

Pages: Page 1 Page 2 Page 3

Filed Under: Flowers, Gardening, Outdoors, Perennials, Tips & How To's, Yard Care Tagged With: flowers, Gardening, how to's, tips, Western Garden Centers

Compost and Amending Soil

February 23, 2016 by Becky

Compost | Amending Soil | Why you should STOP tilling your garden!  www.westerngardens.comCompost | Amending Soil | Why you should STOP tilling your garden!

Compost and amending soil can seem tricky and intimidating if you’re not sure where to start.  It’s actually a simple process that will give you great results in your garden and better nutrition in your harvest.  We’re breaking it down for you and explaining why we recommend {or don’t recommend!} different products and processes.  Let’s get started!

compost and soil ammendments | gardening | how toAmending Soil–What is it, Why and How Often?

Amending soil means adding organic matter to your garden in order to give back the nutrition your fruits & veggies took from it last year to grow your healthy, beautiful plants.  Without soil amendments, your garden could be deficient in different nutrients necessary to grow healthy plants and yield a strong harvest.  You should amend your soil every year by placing a 2-3″ layer of compost over your garden beds.

Why Compost?

Also called Gardener’s Gold or  Black Gold, compost is both partially decomposed organic matter {mostly plants and the manure of plant-eating animals} and the microbes that do the decomposing.  Because it is made up primarily of plant matter, compost contains the right proportion of the elements needed for plant growth.  Compost does many things for your soil, including:

  • Provides Nutrition  It’s the source of all basic nutrition for plants.
  • Improves Soil Structure  It separates soil particles and creates aeration, and nurtures the organisms that build and maintain it.
  • Increases the Ability of Soil to Retain Water Compost can hold up to 6 times its weight in water.
  • Contributes to the Health of Plants  May help prevent some diseases and promotes plant growth.
  • Moderates Soil pH  Most compost is already the ideal pH for optimal plant growth, and will help moderate the pH level in the soil.
  • Feeds Soil Organisms  Compost is the food source for many, many organisms whose activities greatly improve soil structure, increase aeration and water retention, and make it easier for plant roots to grow.  Compost feeds not only worms, but also soil bacteria and fungi, protozoa, nematodes, and more.  (The Vegetable Gardener’s  Bible, 142)

compost and soil ammendments | gardening | how to

Bumper Crop

Bumper Crop Organic Soil AmendmentNot everyone can compost because of space, time, location, or other reasons.  You can still amend your soil even if you don’t save your kitchen scraps and lawn clippings!  Our favorite soil amendment is Bumper Crop, a compost with an organic fertilizer, mycorrhizae (a beneficial bacteria that supports stronger root systems), worm castings (lots of plant-ready nutrients), and kelp meal (filled with micro-nutrients).  This is what we use in our own gardens, and recommend to our customers.

Click NEXT to find out why you might NOT want to till your garden!

Next Button


Images courtesy of winnod and posterize at FreeDigitalPhotos.net

Pages: Page 1 Page 2

Filed Under: Gardening, Tips & How To's, Yard Care Tagged With: compost, dirt, flowers, gardening, how to's, soil, tilling, veggies, Western Gardens

How to Plant a Spring Flower Bed

April 1, 2015 by Becky

Planting a Spring flower bed may seem like a daunting task if you’re new to gardening, but we have 10 easy tips and tricks to help you create a beautiful, inviting  space in your yard.

Planting Spring Flowers1 -Lay Out Your Plants Before You Buy.  Today’s planting actually started out on the floor in the nursery of Western Gardens.  I laid out all of my plants on a cement square to help me decide how much I needed for the space to be planted.  Once I had what I needed, it was easy to load up and head to the flower bed!

Planting Spring Flowers2- Clean Up Your Flower Beds.  I always start every planting by cleaning up what’s already there.  It seems simple, but it makes a big impact to just clear away old debris. 3- Add 2 Inches of Compost Over Top of the Flower Bed.  No need to work it into the soil, the nutrients will work their way down to your plants’ roots.  We could almost just stop here, at this point the bed already looks so much fresher and cleaner!  The fun part is next though, so let’s get planting!

Planting Spring Flowers4- Use an Auger to Plant Bulbs.  One of my favorite tools is a bulb planting auger.  It’s an attachment that fits a standard-size drill, and it makes planting bulbs SO easy and fast!  {You can pick one up at your nearest Western Gardens.}  Just drill down about 6 inches, drop your bulbs in, and fill back in with soil!  Bulb planting at its finest.  And simplest.

Planting Spring Flowers5- Add Unique Plants like Veggies!  I am always looking for ways to plant veggies in a landscape, so I took some along.  Lettuce for some extra green, and some sugar snap peas to put on the trellis.  It’s a great addition because it’s unique and beautiful, and who doesn’t want a sugar snap pea on their way out the door?

Planting Spring Flowers6- Incorporate Unique Elements that you might not always see in a flower bed.  I found a trellis at Western Garden Center that went perfectly with the yellow front door and bistro table on the patio.  Always try to find cool things to throw in a landscape, but never force it.  If it doesn’t go with the flow, don’t try to make it work.

Planting Spring Flowers7- Adjust Flowers Prior To Digging.  Before I dig any holes for my flowers, I lay them all out in the bed still in their containers.  This is the time to make changes and play around with design.  One important tip I always give is, take 10 steps back, take a deep breath, and look at what you are about to do.  Adjust now before it’s too late!

Planting Spring FlowersIf everything looks perfect, take your hand shovel, and dig into that bed!  All the hard work is over now, so it is time to get everything into the ground.  8- Before the flowers go in the ground, gently tear part of the plants’ root systems…it will encourage the roots to grow into the surrounding soil instead of circling itself (like it’s been doing in the container).  9- Once all your flowers are planted, quickly give it a drink of water.  If you’re planting when it’s hot outside, there’s a good chance those plants are in shock.  Watering them right away will help them get established in their new home.

Planting Spring Flowers10- Don’t Be Afraid To Try Something New!  We can’t wait to see those Sugar Snap Peas on that trellis!  Now grab a lemonade,  pull up a chair and enjoy your beautiful new flowers… and enjoy a sugar snap pea for me!

Planting Spring FlowersPlants in this post’s flower bed include:   Sugar Snap Peas, Lettuce, Pansies, Prim Rose, Ornamental Cabbage, Ranunculus

{We are often asked what kind of compost we use in our own gardens.  We recommend Bumper Crop all natural organic soil builder.  It’s great for veggie gardens, flower beds, planter boxes, and pretty much anywhere else you want to put it!}Planting Spring Flowers

Filed Under: Flowers, Gardening, Outdoors, Tips & How To's, Yard Care Tagged With: flowers, garden tools, gardening, how to's, tips, Western Garden Centers, Western Gardens

Deadhead Flowers

June 21, 2014 by Becky

You want your garden to always look it’s best, so don’t forget to deadhead your flowers when the blooms are spent!  It’s easy, quick, and gives your plants a fresh look.  It will also encourage more blooms on your flowers, so you get more bang for your planting buck.

deadhead flowers Collage main

Why Deadhead?

Plants want to ensure the survival of their species, so they produce seeds to grow the next generation.  Flowers produce blooms, which will typically develop seeds.  Once the plant has gone to seed, it will stop producing blooms because it has already done its job…it doesn’t need any more flowers.  To get your flowers to keep producing beautiful blooms, remove the dead ones so they can’t produce seeds, and it will continue flowering in an effort to get those seeds! {THIS BEING SAID HOWEVER, most flower plants that are sold in stores are hybrids.  They are bred by growers to develop different traits like color and hardiness.  These flowers generally DO NOT produce seeds that should be replanted.  Do not save seeds from hybrids, they will not produce a plant that is the same as the parent plant.  Check with your local garden center if you aren’t sure about your particular plants.}

How Often?

How often you deadhead really depends on the size of your garden and how much you are in it.  A small garden can go a couple of weeks in between deadheading, while some gardeners deadhead every day.  You will quickly figure out how often you need and want to deadhead as you spend time in your garden.

How do I Deadhead a Flower?

It’s easy to deadhead flowers!  You can pinch off the expired bloom between your thumb and forefinger, or go down to the first leaf below the flower and pinch it off there to hide the cut stem.  If you don’t want to use your fingers, or the stem is too tough, use garden shears or even scissors for a nice, clean cut.

deadhead flowers Collage

My 7 year old wanted to paint my nails sparkly green. Not sure if it’s coincidence or fate that I have a green thumb in these pictures!

As you deadhead flowers in your garden, you will notice more blooms and get more mileage out of your beautiful flowers.  It only takes a few minutes to clear the dead flower heads away, but it will give you (and everyone else who sees your garden) more enjoyment as you spend time in your lovely space.

Happy Gardening!

Filed Under: Flowers, Gardening, Tips & How To's, Yard Care Tagged With: deadhead, flowers, gardening, how to's, tips

How to Water Your Lawn

May 24, 2014 by Becky

Have you ever wondered how to water your lawn correctly?  Think you’re watering too much?  Not enough?  Not at the right time of day?  Or maybe you’ve never even thought about it!  We’ve put together some pointers for you to cut out the guessing and save you water and money this summer!  Because who doesn’t want to go green and save some green?!

how to water lawnClimate and soil and sprinklers are different everywhere you go.  When people ask us how long to water their lawn, it would be great to have a tidy, pat answer to give.  But because there is so much variation even within the same area, the answer usually starts with, “It depends.”  It depends on how well your soil drains, how much water your sprinklers put out, what time of day you water, and even how long your grass is!  Even though there isn’t a one-size-fits-all answer for everyone, it isn’t hard to determine how much water to give your grass.

How Much Water Does My Lawn Need? 
Lawns in the Salt Lake area need about 2 inches of water per week (not per watering).  An easy way to see how much water your lawn is getting in a watering cycle is to place some straight-sided containers around your lawn.  Empty tuna cans work great.  Check them after the watering cycle and measure how much water is in them.

How Often Should I Water My Lawn?
If your lawn is planted in loam or clay soil, it’s best to water twice a week with one inch applied at each watering.  Sandy and gravel soils won’t hold an inch of water in one watering, so they need to be watered a little more often (every other day works well with about 0.6″ applied each time).

When Should I water My Lawn?
Early Morning is the best time to water.  Watering in the evening or late at night is not a good time because the lawn remains wet overnight and is more susceptible to fungus,  and makes snails and slugs harder to control.  Never water during the heat of the day—most of that water will just evaporate.

What Else Can I do to Save Water?
Set your lawnmower height as high as you can stand it.  The longer the grass, the more shaded the soil will be, and the more moisture it will retain.  Shorter grass doesn’t shade the soil as well and the heat of the summer sun will evaporate all the moisture you just worked to get in there.

how to water your lawnFor more specific questions about your lawn or soil type, stop by one of our locations (Salt Lake, Sandy or West Valley) and talk to one of our helpful plant pros!

Follow us on Instagram for all the latest!

Filed Under: Tips & How To's, Yard Care Tagged With: grass, how to's, lawn, Lawn Care, tips, watering lawn

Tips for Early Spring Gardening

April 11, 2014 by Becky

Haven’t started thinking about your garden yet for this year?  Still deciding if you should start your very first garden?  Looking for some inspiration?  Now is a great time to start, and we want to make it easier by giving you a few tips we’ve learned over the years.  Whether you are a beginner or a seasoned gardener, you should find something helpful!

Start Small

  • If you have never planted a garden before, start small so you don’t overwhelm yourself and give up.  Choose 3-5 of your favorite veggies or fruits.  If you have more favorites than that, choose the produce that is the most expensive to buy at the store or farmer’s market!

Make it Easy

  • If you are starting your garden from seed, you want to avoid regular soil, which can carry diseases that your tiny seedling won’t be able to combat well.  Use a seedling starter mix.  We like to add some water to the mix before pulling it out of the bag!  This way it stays evenly moist during the germination process.
  • Mike from our Sandy store demonstrated this on a great gardening segment for our local news channel.  You can see him adding the water here before they pull any potting mixture out of the bag.  We are working on getting a link to the actual video so we can show you his other great tips!

gardening news spot

Protect

  • If you want to get your veggies outside and into the ground right now, just be sure to protect them from frost.  A wall o’ water is a great way to protect individual plants, the wall of water surrounding the plant will insulate it from any cold nights that will hit.  The average last frost date in Utah is May 15th, so a good rule of thumb is to protect your tender plants until about Mother’s Day.
  • Ever tried to fill a wall o’ water?  It can be tricky!  Check out our quick video tip to see a fast & easy way to do it.  Subscribe to our YouTube channel for more great gardening tips!

Grow Boxes

  • If you are trying your hand at container gardening/grow boxes/raised beds, make sure they are the right size for you!  You should be able to reach into the middle with your hand…so when you are building them, measure with the span of your arm.  This is so when you are weeding, caring for your plants, and harvesting, you will be able to reach comfortably into the center of the bed.
  • If you are doing a vertical container garden, make your boxes a few inches smaller than this so you can reach the fruits & veggies that are growing up high.
  • Try to get 8-10 inches of soil in your grow box.  The roots of your plants will be happier if they can get this far down into the soil.

Compost

  • Add a 2-3 inch layer of compost to your garden beds, the nutrients will seep down into your soil, and weeds will be kept at bay.

Pace Yourself

  • Try to do a little gardening every day, rather than saving it all for the weekend.  Weekly gardening can seem overwhelming, but 15 minutes a day will keep the weeds down and spirits up!

There are as many good gardening ideas as there are gardeners.  If you have a great tip you want to share with us, please leave us a comment!  We might just feature you in an upcoming blog post!

Happy Planting!

FOLLOW US  on  Facebook  Instagram  Pinterest  Twitter  Google+  YouTube

Filed Under: Gardening, Outdoors, Tips & How To's, Vegetables, Yard Care Tagged With: gardening, how to's, in the news, tips, veggies

  • « Go to Previous Page
  • Go to page 1
  • Go to page 2
  • Go to page 3
  • Go to Next Page »

Primary Sidebar

Shopping Cart

Items in Your Cart

Your cart is empty
Visit The Shop

Follow Western Gardens

  • Facebook
  • Instagram
  • Pinterest
  • YouTube

See what we’ve been pinning!

Follow Me on Pinterest
Followed by people.
?

Pinterest Badge by Skipser

Here’s What We’ve Been Up To!

Save water and money by Turf Training - train your lawn to grow deep roots
work at western gardens utah garden center
Senior gardening woman Edu Carvalho from Pexels
nursery center open to public

Copyright © 2022. Western Gardens - Privacy Policy