• Skip to primary navigation
  • Skip to main content
  • Skip to primary sidebar

Western Garden Centers

for what grows here

  • Home
  • How To
  • Gift Cards
  • Calculate Mulch
  • Locations
    • Store Hours
    • About
    • Garden Shop Employment Team
  • Weddings
    • Salt Lake City, UT
    • West Valley, UT
  • Blog
    • Gardening
    • Recipes

Western Gardens

10 Flowers for Beautiful Hanging Baskets

May 11, 2016 by Kirsten

Welcome, I’m so glad you’re here!

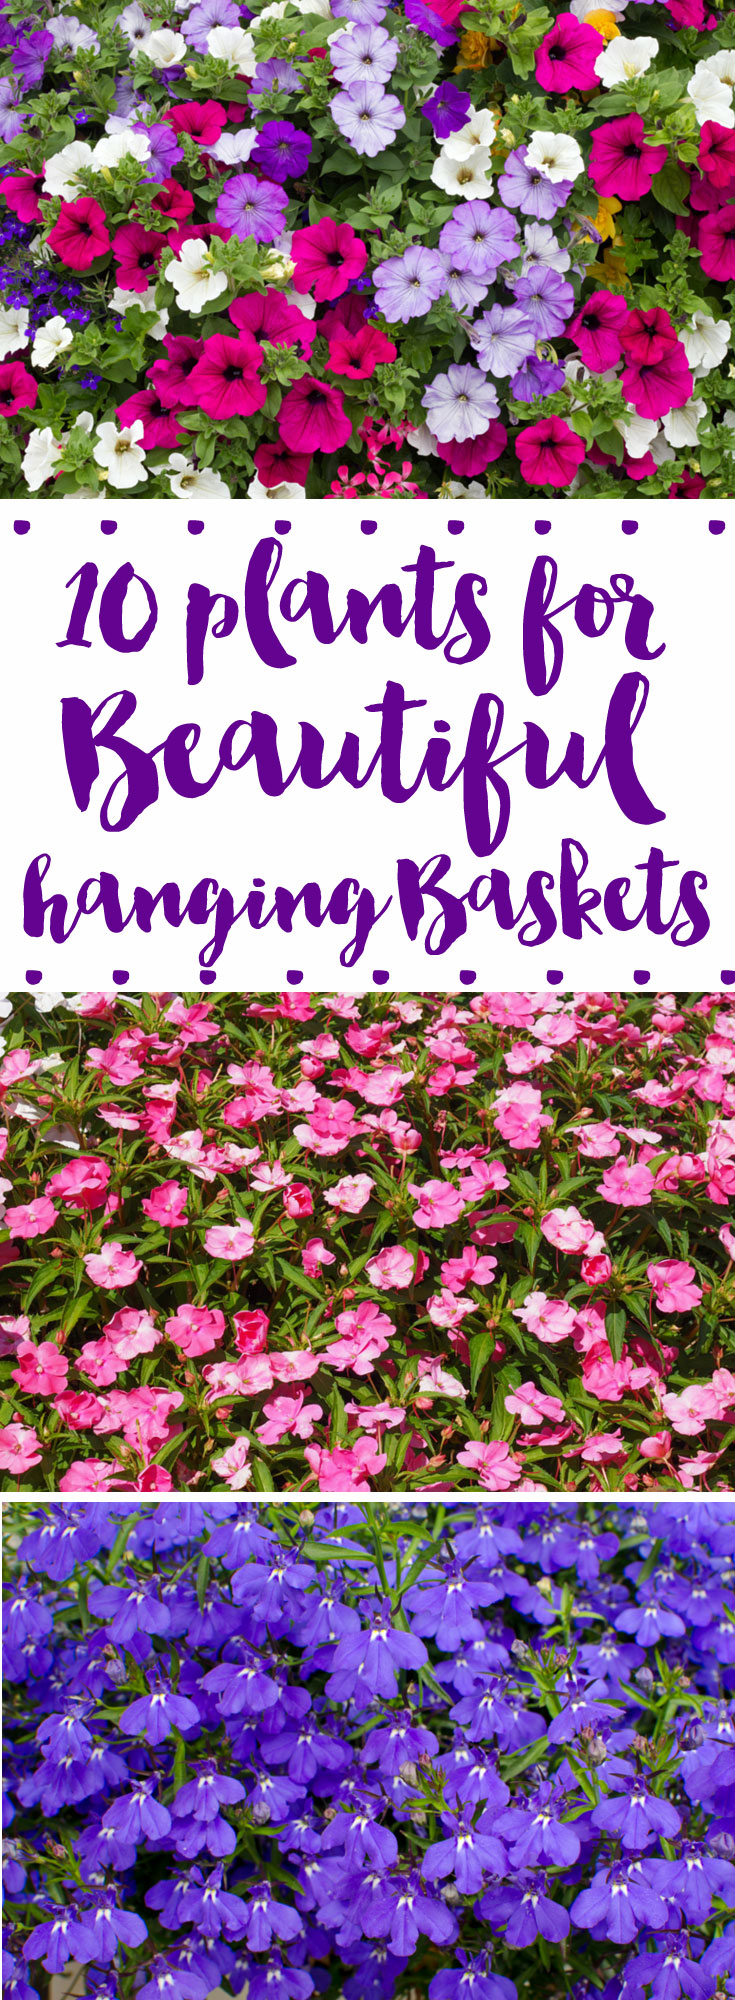
Do you ever see gorgeous hanging baskets that are filled to the brim with blooms cascading down over the sides, and wonder what kind of flowers they are?   And how you can get your hands on some to beautify your own yard?!

Hanging baskets can add so much to a sunny wall, or brighten up shady areas with flowers that flourish in the shade. I also love giving hanging baskets as a gift for those who are getting up in age or have bad knees, because there is no kneeling down in the dirt required, and choosing the appropriate flower can bring the receiver blooms from the summer months, on up to the fall!

If you have ever wondered what the best flowers for hanging baskets are, I’ve got you covered!

10 plants for beautiful hanging baskets- https://westerngardens.com/

One of the most important things you need to consider is if the space you want to decorate has full sun, or if it is in the shade most of the day. If you plant sun-loving flowers in the shade, they won’t thrive.  The same is true if you plant shade lovers in the sun.

You can have each hanging basket dedicated to one type of flower, or you can mix different flowers in each basket giving different colors and textures. Just be sure to put Shade Lovers together and Sun Lovers together!  Also make sure you get the trailing variety of flower for your hanging baskets.

Filed Under: Annuals, Container Gardening, Flowers, Gardening, Outdoors, Perennials, Tips & How To's, Utah Gardening Tagged With: flowers, Gardening, Mother's Day, tips, Western Gardens

10 Tomato Varieties You Should Grow

May 4, 2016 by Vanessa Myers

 Welcome!  I’m so happy you’re here!

10 tomato varieties you should grow this year. Unique and delicious tomatoes that you can't beat!

Do you love home-grown tomatoes?  Then you’re in the right place!  There’s nothing quite as satisfying as a vine-ripened tomato fresh from the garden.  They offer bold flavors not usually found in grocery store varieties, which are often chosen for how well they ship and store on the shelf, instead of taste.

You will come across a wide selection of tomato varieties when you are shopping for seeds or starts. Before you rush out to pick out the first tomato plants you see, research what will do best in your yard and fit your culinary needs.

Tomato varieties come in a variety of shapes, sizes and colors

Image by aurélien under a Flickr Creative Commons Attribution-ShareAlike License

Considerations for Picking Tomato Varieties

General types of tomatoes include:

  • Beefsteak (big, great for slicing)
  • Cherry (small for salads and eating out of hand)
  • Plum (good for sauces and pastes)
  • Salad (medium, good for general use)

Tomatoes are also divided into whether they are determinate or indeterminate. If one is determinate, it will grow to a certain height and width and then stop. One crop will be produced before the plant dies. On the other hand, indeterminate plants will keep growing throughout the season. This is important to know if space is a consideration as indeterminate varieties can turn into a jungle if the conditions are favorable.

Finally, they will be labeled as either hybrid or heirloom. If a plant is hybrid, it is the result of crossing other varieties. They are not likely to retain their desired characteristics if you try to save the seeds for the next year, and they may even be sterile.  In contrast, you can collect seeds from heirlooms because they do generally keep the same genetics in their seeds.

Tomato Varieties to Check Out

The Black Krim tomato can have dark skin and flesh

Image by bert_m_b under a Flickr Creative Commons Attribution License

1.Black Krim

  • Type: Beefsteak
  • Growth: Indeterminate
  • Genetics: Heirloom
  • Days to Harvest: 80

Interested in trying a tomato that isn’t red? Go for the Black Krim! This Russian variety sports fruit that bears a rich purple-red hue and is packed full of flavor.

Image by timlewisnm under a Flickr Creative Commons Attribution-ShareAlike License

Image by timlewisnm under a Flickr Creative Commons Attribution-ShareAlike License

2. Brandywine

  • Type: Beefsteak
  • Growth: Indeterminate
  • Genetics: Heirloom
  • Days to Harvest: 78

This is the most common type of heirloom that you will see available for sale, and has been planted since the 1800s. Each pinkish-red tomato can weigh over a pound!

Early Girl tomatoes are indeed one of the first varieties to mature

Image by Prestonbot under a Flickr Creative Commons Attribution License

3. Early Girl

  • Type: Salad
  • Growth: Indeterminate
  • Genetics: Hybrid
  • Days to Harvest: 54-59

This variety is very popular due to its early harvest date. Early Girl will work well as a general purpose tomato for all of your favorite recipes.

Great White tomatoes will live up to the name and be white in hue

Image by quinn.anya under a Flickr Creative Commons Attribution-ShareAlike License

4. Great White

  • Type: Beefsteak
  • Growth: Indeterminate
  • Genetics: Heirloom
  • Days to Harvest: 85

In addition to red, orange, pink, purple, green and yellow, tomatoes can also be white when ripe. This variety is notable for being especially sweet, making it a delight to eat fresh!

Click NEXT for 6 more delicious varieties!

Western Garden Centers | Salt Lake City | Sandy | West Valley UTAH

Pages: Page 1 Page 2

Filed Under: Veggie Gardening Tagged With: Gardening, tomato varieties, tomatoes, veggies, Western Gardens

Best Plants for Window Boxes

April 23, 2016 by Jenn Crookston

Welcome!  I’m so glad you stopped by!

Are you looking for the best plants that will really stand out in your window boxes this year?  Flowers that will thrive, even in uncertain Spring weather?  Then you’ve come to the right place!  I’m sharing 6 of my favorite picks for gorgeous window boxes.

The best plants for your spring window boxes! Flowers that will survive sun and snow.Those who know me well know that my house and I just aren’t best friends.  I probably couldn’t have picked a house with an exterior that I like less!  But since an all-new exterior isn’t in the plans, I have to do what I can to make it as pretty as possible.

The best plants for your spring window boxes! Flowers that will survive sun and snow.

A few years ago I finally convinced my husband that we needed flower boxes for the windows.  We’ve had varying degrees of success, so this year I am determined to get these window flower boxes prize-worthy!  You know what I’m talking about, right? Jaw-dropping window boxes like this one from The Lily Pad Cottage.
The best plants for your spring window boxes! Flowers that will survive sun and snow.
Isn’t it just beautiful? I’m in awe.

I needed some advice to start out right in my quest for gorgeous window boxes, so I headed to Western Gardens to get some help.  Andrea answered all my questions and gave me some great tips that I can’t wait to share with you!

The best plants for your spring window boxes! Flowers that will survive sun and snow.

Prep Your Boxes Correctly:

  • Replace the liners in each flower box.  I was amazed at what this did to make everything look better immediately!
  • Fill the liners a little less than half full with styrofoam packing peanuts.  This will reduce weight and save potting soil, and allow more air and water to get to the roots.
  • Fill the rest of the liner with fresh potting soil, like Gardner’s Gold.
  • Plan out your flowers.  I planted earlier in the spring than normal, so I made sure to choose flowers that were all cold-tolerant (since April snow is a thing here!)
  • Ensure you have doubles of every flower, if you need to make matching boxes like I did.
  • Don’t overfill your boxes. Let your flowers get established before you fill in gaps.

Window Box Flowers (left to right, repeated in each box):

  1. Pansy Frizzle Sizzle Mix
  2. Primrose Danova Mix
  3. Vinca Bowles Cunningham Periwinkle
  4. Ranunculus Bloomingdale Mix
  5. Pansy Delta Premium Beaconsfield
  6. Pansy Matrix Lemon
  7. Pansy Frizzle Sizzle Mix

The same rules apply to window boxes as porch pots.  To create a truly awe-inspiring display, you need a filler, a spiller, and a thriller.  See my tips for porch pots if you’re not sure what this means!

Pansies and primrose are great fillers with a lot of wonderful color.  The Vinca will spill beautifully over the sides, and the tall, red Ranunculus is currently thrilling my boxes!

As these flowers grow and spread, they will fill the boxes nicely. These flowers should all last several months, depending on how quickly our Utah weather turns hot.

The best plants for your spring window boxes! Flowers that will survive sun and snow.

Two final tips for healthy window boxes:

  • Check the water regularly.  The heat from the house may increase your boxes’ water needs.
  • Fertilize regularly for the best blooms.  I use ferti-lome blooming and rooting soluble plant food, which is perfect for big, beautiful blooms.  Click here to see why I recommend this one!

I can’t wait to share how my window boxes progress this summer.  Here’s to growing gorgeous!

While I’m waiting for my flower boxes to fill out, I’ll be enjoying these delicious recipes with my family:

The best plants for your spring window boxes! Flowers that will survive sun and snow.
Gluten Free Oatmeal Cookies ~ Spinach Salad w/Poppy Seed Dressing ~ Strawberry Lemonade Cookies

Filed Under: Annuals, Container Gardening, Gardening, Utah Gardening Tagged With: flowers, Gardening, How To, how to's, tips, Utah, Western Garden Centers, Western Gardens

April Gardening To-Do List

March 30, 2016 by Western Gardens

April Gardening To-Do List | Easy Garden Tips | How to Garden in Utah | Beginning Gardener

Welcome gardening friends, thanks for stopping by!

If you’re excited to work in your yard or garden, but not sure where to start now that Spring is here, then you’ve come to the right place!  We’ve put together a list for you of things to do throughout the month.

April Gardening To-Do List
You may not need to do everything on this list.  For example, if you don’t have shade trees to fertilize or seedlings to harden off, skip over those items on the list.  Just pick what applies to your yard and plan out when you will do it all throughout the month!

April Gardening To-Do List

April Gardening To-Do List

➺Plant all trees and shrubs

➺Fertilize lawns with a pre-emergent fertilizer to prevent weed seeds from germinating (if not done in March), repeat in 6 weeks if you had a difficult weed problem last year.

➺Fertilize lawns with a regular fertilizer if you plan to seed your lawn/bare patches
in your lawn (if not done in March), repeat every 6 weeks.  See Westerns 4 step program for the season.

➺Fertilize trees and shrubs

➺Thin Out seedlings you began indoors

➺Harden Off Seedlings by moving them to a cool place like a garage for two
or three days before planting them outside

➺Fertilize seedlings with a root starter during/after transplant

➺Aerate Lawn if not done in the Fall.  If you have a new lawn of 2 years or less, no need to aerate.

➺Water Lawn only if needed, or to water in fertilize, water early in the day or at night

➺Remove or Spray Weeds when they first appear

➺Seed Bare Patches in Lawn do NOT use a pre-emergent fertilizer, OR you can plan to lay seed in September if you have already used a pre-emergent. Not sure how?  See our article on Seeding Bare Patches in a Lawn!

➺Spurge & Crabgrass Control if not already done

➺Drain Snow Blower Gas and run it until it quits

➺Lay Sod any time you can find it, you can plant it

➺Deep Soak Trees & Shrubs if rainfall is inadequate

➺Harden Off Tender Annuals before planting outside

➺Spray Fruit Trees for fungus and pests with Fertilome Fruit Tree Spray AFTER the
flowers have fallen off

➺Do a Second Planting of lettuce & radish

➺Transplant kohlrabi, lettuce, onions, broccoli, cabbage, cauliflower, etc

➺Plant Outside
Until May 1st: kohlrabi, lettuce, parsnips, potatoes, rhubarb, asparagus, cabbage, spinach, turnips
Until May 15th: onions & peas
Until June 15th: carrots & endive
Until July 1st: cauliflower, parsley, swiss chard
Until July 15th: beets & broccoli
Until Sept 1st: radishes

March Gardening To Do List | Things to do in your yard and garden all month long

Be sure to check out our May Gardening To-Do List!

*This list is not exhaustive.  If we have overlooked something you’d like to see on this list, tell us in a comment below!

Filed Under: Gardening, To-Do List Tagged With: Gardening, Lawn Care, Monthly To-Do List, tips, Utah, Western Gardens

Compost and Amending Soil

February 23, 2016 by Becky

Compost | Amending Soil | Why you should STOP tilling your garden!  www.westerngardens.comCompost | Amending Soil | Why you should STOP tilling your garden!

Compost and amending soil can seem tricky and intimidating if you’re not sure where to start.  It’s actually a simple process that will give you great results in your garden and better nutrition in your harvest.  We’re breaking it down for you and explaining why we recommend {or don’t recommend!} different products and processes.  Let’s get started!

compost and soil ammendments | gardening | how toAmending Soil–What is it, Why and How Often?

Amending soil means adding organic matter to your garden in order to give back the nutrition your fruits & veggies took from it last year to grow your healthy, beautiful plants.  Without soil amendments, your garden could be deficient in different nutrients necessary to grow healthy plants and yield a strong harvest.  You should amend your soil every year by placing a 2-3″ layer of compost over your garden beds.

Why Compost?

Also called Gardener’s Gold or  Black Gold, compost is both partially decomposed organic matter {mostly plants and the manure of plant-eating animals} and the microbes that do the decomposing.  Because it is made up primarily of plant matter, compost contains the right proportion of the elements needed for plant growth.  Compost does many things for your soil, including:

  • Provides Nutrition  It’s the source of all basic nutrition for plants.
  • Improves Soil Structure  It separates soil particles and creates aeration, and nurtures the organisms that build and maintain it.
  • Increases the Ability of Soil to Retain Water Compost can hold up to 6 times its weight in water.
  • Contributes to the Health of Plants  May help prevent some diseases and promotes plant growth.
  • Moderates Soil pH  Most compost is already the ideal pH for optimal plant growth, and will help moderate the pH level in the soil.
  • Feeds Soil Organisms  Compost is the food source for many, many organisms whose activities greatly improve soil structure, increase aeration and water retention, and make it easier for plant roots to grow.  Compost feeds not only worms, but also soil bacteria and fungi, protozoa, nematodes, and more.  (The Vegetable Gardener’s  Bible, 142)

compost and soil ammendments | gardening | how to

Bumper Crop

Bumper Crop Organic Soil AmendmentNot everyone can compost because of space, time, location, or other reasons.  You can still amend your soil even if you don’t save your kitchen scraps and lawn clippings!  Our favorite soil amendment is Bumper Crop, a compost with an organic fertilizer, mycorrhizae (a beneficial bacteria that supports stronger root systems), worm castings (lots of plant-ready nutrients), and kelp meal (filled with micro-nutrients).  This is what we use in our own gardens, and recommend to our customers.

Click NEXT to find out why you might NOT want to till your garden!

Next Button


Images courtesy of winnod and posterize at FreeDigitalPhotos.net

Pages: Page 1 Page 2

Filed Under: Gardening, Tips & How To's, Yard Care Tagged With: compost, dirt, flowers, gardening, how to's, soil, tilling, veggies, Western Gardens

How to Plant a Spring Flower Bed

April 1, 2015 by Becky

Planting a Spring flower bed may seem like a daunting task if you’re new to gardening, but we have 10 easy tips and tricks to help you create a beautiful, inviting  space in your yard.

Planting Spring Flowers1 -Lay Out Your Plants Before You Buy.  Today’s planting actually started out on the floor in the nursery of Western Gardens.  I laid out all of my plants on a cement square to help me decide how much I needed for the space to be planted.  Once I had what I needed, it was easy to load up and head to the flower bed!

Planting Spring Flowers2- Clean Up Your Flower Beds.  I always start every planting by cleaning up what’s already there.  It seems simple, but it makes a big impact to just clear away old debris. 3- Add 2 Inches of Compost Over Top of the Flower Bed.  No need to work it into the soil, the nutrients will work their way down to your plants’ roots.  We could almost just stop here, at this point the bed already looks so much fresher and cleaner!  The fun part is next though, so let’s get planting!

Planting Spring Flowers4- Use an Auger to Plant Bulbs.  One of my favorite tools is a bulb planting auger.  It’s an attachment that fits a standard-size drill, and it makes planting bulbs SO easy and fast!  {You can pick one up at your nearest Western Gardens.}  Just drill down about 6 inches, drop your bulbs in, and fill back in with soil!  Bulb planting at its finest.  And simplest.

Planting Spring Flowers5- Add Unique Plants like Veggies!  I am always looking for ways to plant veggies in a landscape, so I took some along.  Lettuce for some extra green, and some sugar snap peas to put on the trellis.  It’s a great addition because it’s unique and beautiful, and who doesn’t want a sugar snap pea on their way out the door?

Planting Spring Flowers6- Incorporate Unique Elements that you might not always see in a flower bed.  I found a trellis at Western Garden Center that went perfectly with the yellow front door and bistro table on the patio.  Always try to find cool things to throw in a landscape, but never force it.  If it doesn’t go with the flow, don’t try to make it work.

Planting Spring Flowers7- Adjust Flowers Prior To Digging.  Before I dig any holes for my flowers, I lay them all out in the bed still in their containers.  This is the time to make changes and play around with design.  One important tip I always give is, take 10 steps back, take a deep breath, and look at what you are about to do.  Adjust now before it’s too late!

Planting Spring FlowersIf everything looks perfect, take your hand shovel, and dig into that bed!  All the hard work is over now, so it is time to get everything into the ground.  8- Before the flowers go in the ground, gently tear part of the plants’ root systems…it will encourage the roots to grow into the surrounding soil instead of circling itself (like it’s been doing in the container).  9- Once all your flowers are planted, quickly give it a drink of water.  If you’re planting when it’s hot outside, there’s a good chance those plants are in shock.  Watering them right away will help them get established in their new home.

Planting Spring Flowers10- Don’t Be Afraid To Try Something New!  We can’t wait to see those Sugar Snap Peas on that trellis!  Now grab a lemonade,  pull up a chair and enjoy your beautiful new flowers… and enjoy a sugar snap pea for me!

Planting Spring FlowersPlants in this post’s flower bed include:   Sugar Snap Peas, Lettuce, Pansies, Prim Rose, Ornamental Cabbage, Ranunculus

{We are often asked what kind of compost we use in our own gardens.  We recommend Bumper Crop all natural organic soil builder.  It’s great for veggie gardens, flower beds, planter boxes, and pretty much anywhere else you want to put it!}Planting Spring Flowers

Filed Under: Flowers, Gardening, Outdoors, Tips & How To's, Yard Care Tagged With: flowers, garden tools, gardening, how to's, tips, Western Garden Centers, Western Gardens

Raised Garden Beds

May 17, 2014 by Becky

Garden Box Collage Main

Raised garden beds have become very popular in recent years, and for good reason.  Growing more food in less space with less work sounds too good to be true, but it’s not!   If you are thinking about taking the plunge and building raised beds for your garden, we’ve included links to 12 different tutorials for raised beds.

Why Raised Beds?

Less Compacted Soil.  Roots (and worms!) need air space in the soil to grow, so if you’re stepping in your garden beds, you are compacting the soil and destroying that important air space!  For more information about compost and soil amending, see this blog post all about it.

Deeper Soil.  The deeper the roots can grow, the healthier your plants will be and the better your harvest.  It is often suggested to line  the bottom of your garden box with cardboard or black weed barrier cloth, but this will prevent your roots from growing as deep as they want.  Try it without and see how your garden grows!

Weed Control.  Your veggies will be further from the grass and weeds in your yard, but you will also be able to plant more densely…crowding out weeds that would otherwise grow.

Grow More in Less Space (with less work!)  Traditionally, our gardens have always had narrow rows for plants and wide rows for walkways.  There is no real reason to design your garden this way, except maybe because it’s how your grandparents gardened.  If you have wider rows for your plants, you can fit much more than if you were to plant single rows.  Utilize your space more efficiently and you can grow more in your garden than ever before!

Here is a great link to another good article about raised garden beds and on how to build a raised garden bed.

Check out these great tutorials for raised garden beds!

Garden Box Collage

 Rectangle Garden Boxes    |   Vinyl Garden Boxes

Garden Bed CollageU-Shaped Garden Box   |   Narrow Garden Box

Garden Box Collage 3Long Garden Boxes   |   Cinder Block Garden Box

Garden Box Collage 4Garden Box with Brick Border   |   Tall Garden Box

Raised Beds Collage 5Rolling Casters Patio Box   |   Painted Garden Box with Cage

Garden Box Collage 5Raised Garden Boxes   |   Vertical Pallet Planter

Let us know what kind of raised beds you have in your garden, or what you plan to try!

Happy Gardening!

Filed Under: Gardening, Outdoors, Tips & How To's Tagged With: Garden Boxes, Gardening, how to's, Raised Garden Beds, tips, veggies, Western Gardens

Priming Your Utah Garden Rake!

September 7, 2013 by Becky

Necessity is the mother of invention!  I believe it!  Check out this fun idea of how to utilize your garden rake while you are waiting for the leaves to fall!  We suggest a leaf rake without painted tines.  Of course, you will want to begin with a clean sterilized rake; you know how to do that.  Gather your ingredients.  Get your fire-pit going with just the right coals.  Now you are ready to assemble, roast, and enjoy your s’mores.  Follow the photo – a picture is worth a 1000 words!

Call your local Western Gardens store to check on current stock of these rakes; these are a most popular garden tool, now for several purposes!  Happy s’moriing while you wait for the raking to begin!

Fall store hours – 10am-6pm


Leaf Rake Smores

Filed Under: Gardening, Recipes, Uncategorized, Yard Care Tagged With: garden rakes, garden tools, s'mores, Utah Garden rake, Western Gardens

Utah Garden Centers – Planting Trees in the Right Spot

June 11, 2013 by Becky

Planting trees is a long term investment.   Initially, it costs you time and money and then years of watering and tending.  Your tree can become priceless to you and so worth your time and effort.  However, don’t let your investment go to waste by planting your favorite trees in the wrong spot.  You’ll end up ripping out your tree, fixing house and sidewalk problems, or experience a ghastly sight if the power company has to come and trim your branches away from the power lines.  Avoid these potential problems by planning ahead.  Even if you start a one-gallon sized tree, following these simple guidelines before you dig your hole, will save you time and money and heartache in the future.  Planting trees in the right spot is very important!

The most important overriding rule is know the final/adult size and shape of your tree.  All little babies grow up, even cute little baby saplings.  Good independent garden centers in Utah, like Western Garden Centers, will provide excellent quality material and you’ll have the information you need for these guidelines.

#1 Plan where you plant your tree in relation to your house or buildings.  We have a friend who moved into a neighboring house.  The previous owners liked a little blue spruce and wanted to frame their home with it.  Well, they actually did frame it, about 2 feet away from the home.  They didn’t plan ahead for a potentially 40 foot blue spruce to be so close to the home.  In a few more years, even the trunk itself could be up again the rain-gutter.  Eventually, the new owners will have to take out the tree to save on expensive eave and roof repairs.    Misplaced trees can also have their roots damage your home’s foundation, sidewalk, and driveway.  Know your tree’s potential, above ground and below! 

#2 – Do not plant under power lines if your tree will become too tall or big!  If your tree looses a branch and cuts the electricity during a Utah heavy snow storm, then remember that all your neighbors will be ticked off as they rush to save the food in their freezers and hope that their computers didn’t fry on the disruption.  Know that eventually, the power company does have the right to keep clear any branches of residence and business’ trees.  It’s part of living in a community!  They will come and clear away any and all branches within a certain amount of feet from the lines.  Plus, anything directly above the lines have to be pruned also.  Your trees won’t get the tender loving care of a good arborist, the power company will cut away like a marine hair cut!   Know your tree and be responsible!

#3 – Don’t plant too many “baby” trees together just because you like the look of a lot of material.  Again, eventually you’ll be ripping out your good money.  They will grow and crowd each other, also causing disease and basic illness of some of your trees.   Know your tree and don’t overplant!

Last week I went driving within a 4 mile radius of our home and took photos of trees that were not well thought out before they were planted.   Carefully examine and don’t become a victim of this common error.  Know your Tree!

Filed Under: Gardening, Yard Care Tagged With: garden centers in Utah, Independent garden centers in Utah, plant under power lines, Planting trees, Planting trees in the right spot, Western Garden Centers, Western Gardens, where to plant trees

  • « Go to Previous Page
  • Go to page 1
  • Go to page 2

Primary Sidebar

Shopping Cart

Items in Your Cart

Your cart is empty
Visit The Shop

Follow Western Gardens

  • Facebook
  • Instagram
  • Pinterest
  • YouTube

See what we’ve been pinning!

Follow Me on Pinterest
Followed by people.
?

Pinterest Badge by Skipser

Here’s What We’ve Been Up To!

Save water and money by Turf Training - train your lawn to grow deep roots
work at western gardens utah garden center
Senior gardening woman Edu Carvalho from Pexels
nursery center open to public

Copyright © 2023. Western Gardens - Privacy Policy