• Skip to primary navigation
  • Skip to main content
  • Skip to primary sidebar

Western Garden Centers

for what grows here

  • Home
  • How To
  • Gift Cards
  • Calculate Mulch
  • Locations
    • Store Hours
    • About
    • Garden Shop Employment Team
  • Weddings
    • Salt Lake City, UT
    • West Valley, UT
  • Blog
    • Gardening
    • Recipes

Crafts

Mother’s Day Flower Garden in a Basket

April 30, 2016 by Jenn Crookston

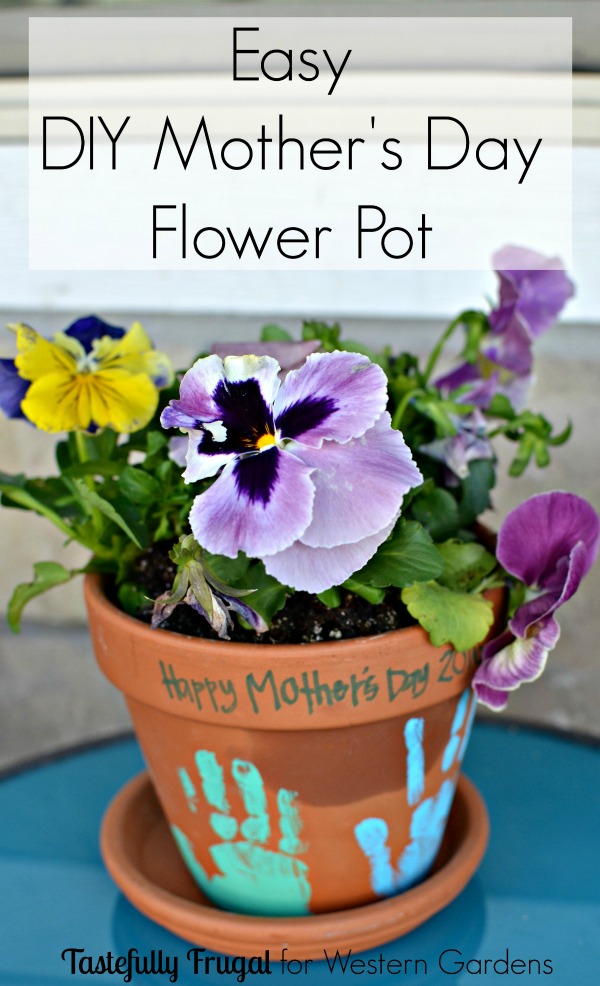
Welcome!  I’m so glad you’re here.

Mother's Day flower garden in a basket

Do you love gardening and giving beautiful gifts?  Then I have the perfect project for you!

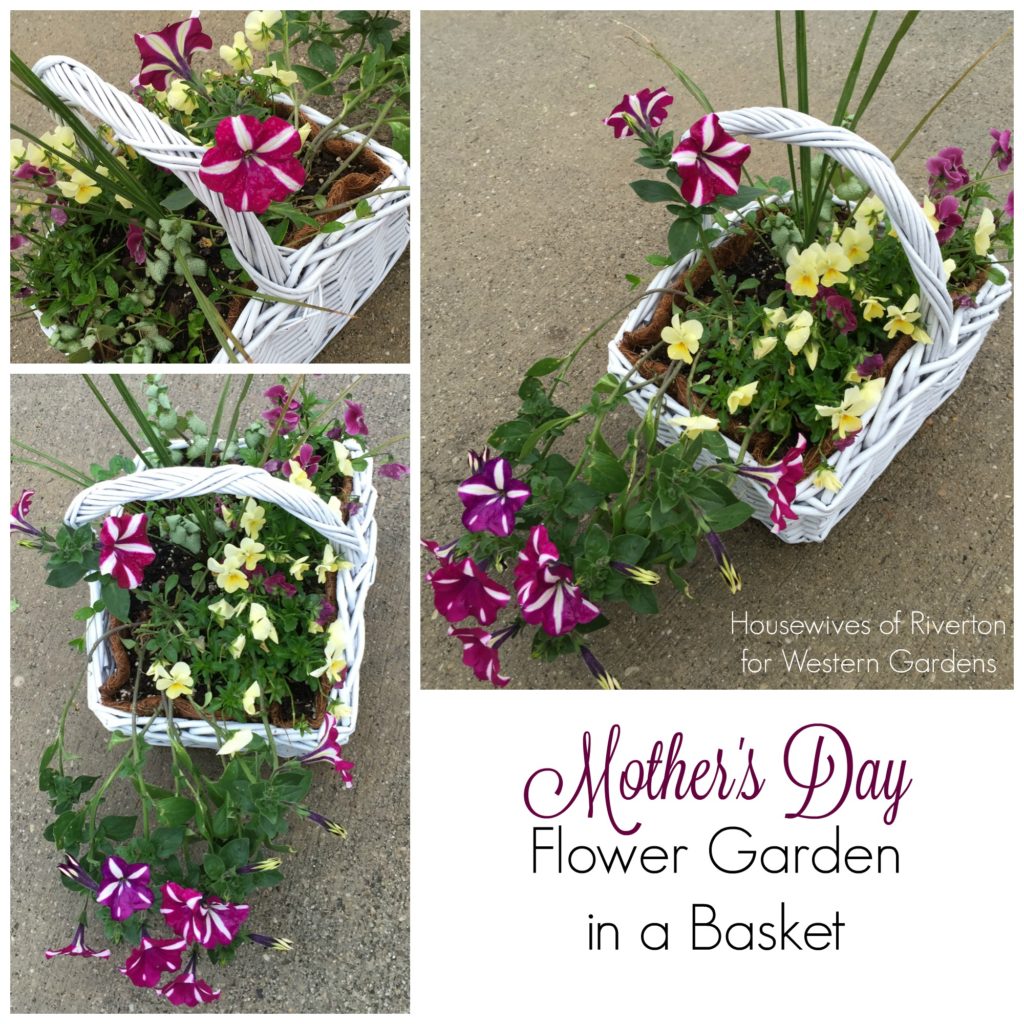
I’ve been bitten by the gardening bug this year.  I have been enjoying getting my hands dirty and creating beautiful things with flowers.  This Mother’s Day Flower Garden in a Basket quickly turned into a favorite project!

Looking for a simple but beautiful gift for Mom? Try this Mother's Day Flower Garden in a Basket!

I love when an idea turns out how I hoped it would when I imagined it.  What I love about this project is that it is easy to customize, it can be as big or small as you want and can include a variety of flowers.

For this project you’ll need:

  • Favorite flowers
  • Basket
  • Potting Soil
  • Basket Liner

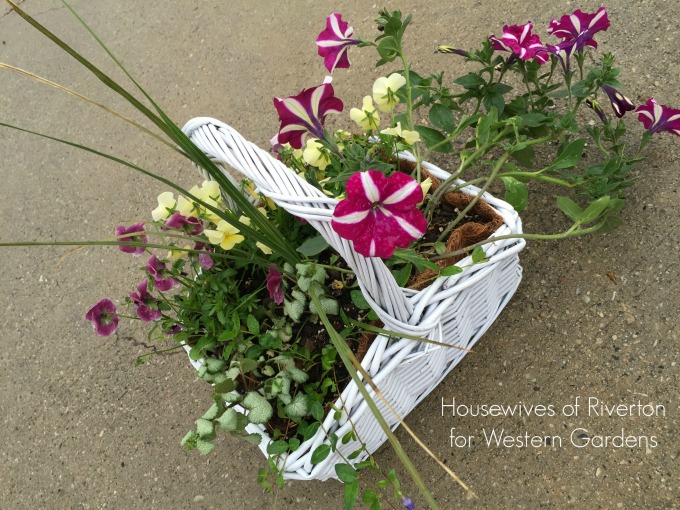
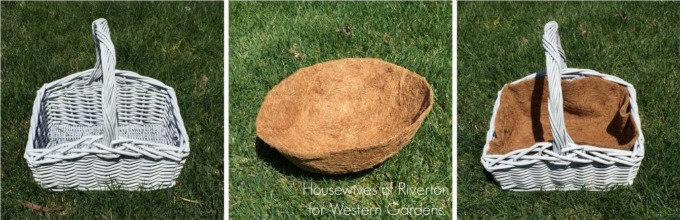
For my particular basket I collected some of my favorite flowers and an old Easter basket.  The Easter basket was blue and that didn’t work for what I wanted, so I started by painting it white.  I was happy that the basket liner fit well inside which helped make everything look nicely put together.

Looking for a simple but beautiful gift for Mom? Try this Mother's Day Flower Garden in a Basket!
The reason I call this a Flower Garden in a Basket is because in a big enough basket you can place the plants inside the basket in their original container making it easy for the receiver of the basket to plant the flowers in their yard or into flower pots if they want to.  For my basket I took the flowers out of their containers but kept them separated with additional potting soil which will still make them easy to remove from the basket if that is what is desired.

Looking for a simple but beautiful gift for Mom? Try this Mother's Day Flower Garden in a Basket!

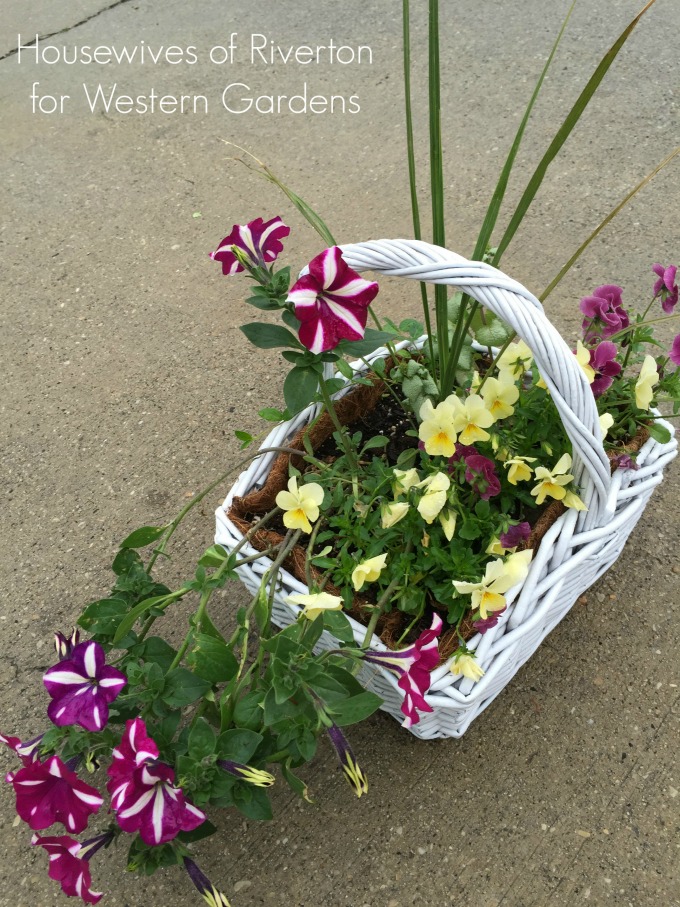
This basket contains the following flowers/plants:

  1. Cordyline Indivisa Spikes
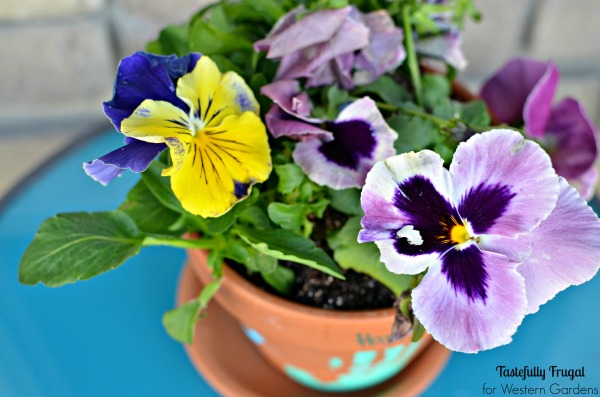
  2. Pansies
  3. Trailing Petunia
  4. Red Nancy
  5. Bowles Cunningham Periwinkle

If they stay in the basket they’ll fill in beautifully and look fantastic on an outdoor table or on the porch.  If they are taken out of the basket they’ll be a wonderful addition to the yard or another flower pot.

I can’t wait to put a few more of these together to give to some of the best Mother’s I know!

Here are a few breakfast recipes sure to make Mom smile when you make her breakfast in bed Mother’s Day morning!

Looking for a simple but beautiful gift for Mom? Try this Mother's Day Flower Garden in a Basket!
Stuffed French Toast Casserole ~ Breakfast Burritos ~ Strawberry Shortcake Pancakes

Filed Under: Annuals, Container Gardening, Crafts, Flowers, Gardening, How To, Perennials, Tips & How To's Tagged With: flowers, Gardening, How To, how to's, Mother's Day

DIY Hanging Basket Frame – A Mother’s Day Gift

April 28, 2016 by Kirsten

Looking for the perfect gift for the gardening mom? Check out this simple and beautiful DIY Hanging Basket Frame - A Mother's Day Gift www.westerngardens.com

Welcome!  I’m so happy you’re here!
DIY Hanging Basket Frame - A Mother's Day Gift www.westerngardens.com

Are you looking for a beautiful, unique gift for your favorite gardening mom?  With Mother’s Day just around the corner, I’ve come up with a gift idea for all the moms out there who have a hard time gardening because they can no longer kneel down for long periods of time.  Whether it’s because of knee problems or advancing age, this DIY Hanging Basket Frame is perfect for any sitting gardening enthusiast!

This frame is about 3 feet tall, can accommodate 3 hanging baskets, and has 2 “shelves” for boxes on each side. I love this frame because all the planting can be done at a table, and once its set up, watering can easily be done with a watering can. It has been a fun addition to our own yard, and one I wish we had for our patio all those years we were renting apartments!

I drew up my idea, and my husband made it a reality. He was in fabrication/welding for several years and told me this would not only be visually appealing, but also strong enough to handle a lot of weight…and I think we accomplished both of those things! The other awesome thing about it is that we were able to make it for less than $15!

DIY Hanging Basket Frame – A Mother’s Day Gift

Supplies for your Hanging Basket Frame:

  • Miter Saw (you need to be able to make 22.5° angled cuts)
  • Power Drill with #2 Phillips bit and ⅛ inch drill bit (for pilot holes)
  • 2 – 8 ft pieces of wood 2.5 x 1.5 inches
  • 1 – 8 ft piece of wood 1.5 x 1.5 inches
  • 1 – 8 ft piece of wood 1.5 x .5 inches
  • 3  J-Screws (4 inch)
  • 3 nuts (¼ of an inch)
  • 24 – 2 inch wood screws
  • Sand paper
  • Exterior Stain (I used Olympic Maximum)
  • Paint brush

You will begin by measuring and marking each cut.

DIY hanging basket frame www.westerngardens.com

Measure and mark the 1.5 x 1.5 piece at 58 inches. **If you would like to add another 10 inches, you would be able to hang two additional hanging baskets, one on each side.  This is up to you.

Measure and mark the  2.5 x 1.5 at 38 inches  (x4)

Measure and mark the 2.5 x 1.5 at 19 ¾ inches (x2)

Measure and mark the 1.5 x .5 at 9 inches (x4)

Once you have measured them all go ahead and cut each piece.

DIY Hanging Basket Frame - A Mother's Day Gift www.westerngardens.com

Pull the 38 inchers aside. You will cut each end with a 22.5° angle, opposite direction on each end – this will help the two A-frames to sit right on the ground.

Now take the two 19 ¾ inchers and cut each end at a 22.5° angle – same direction on each end.

DIY Hanging Basket Frame - A Mother's Day Gift www.westerngardens.com

These 4 pieces will make your two “A” frames.

DIY Hanging Basket Frame - A Mother's Day Gift www.westerngardens.com 
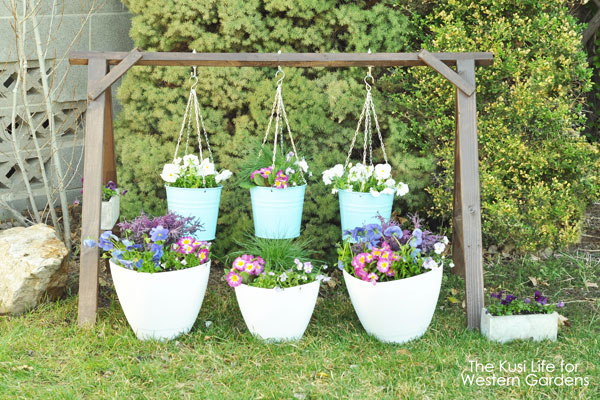
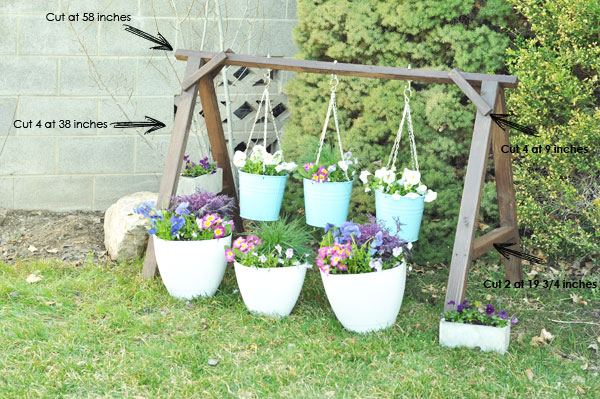
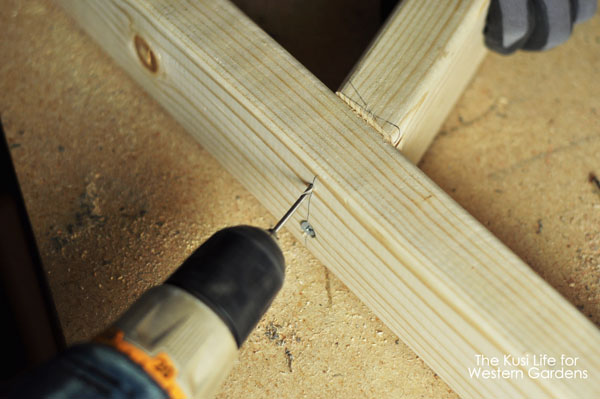
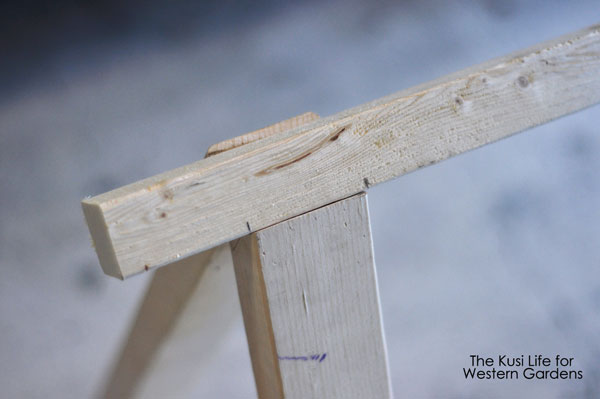
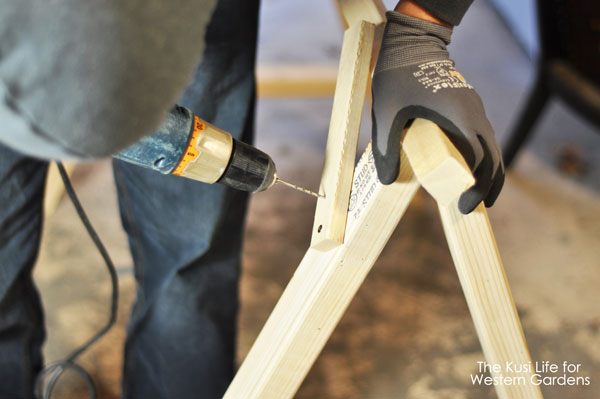
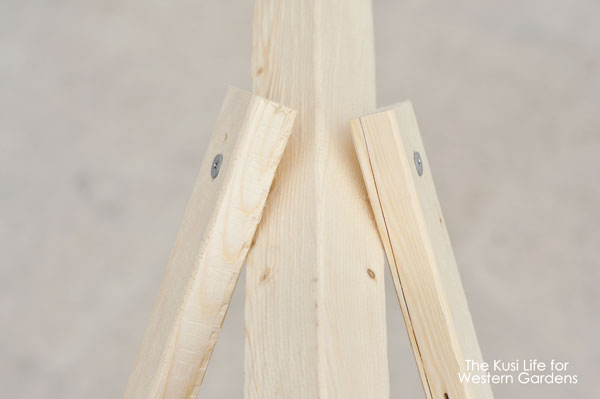
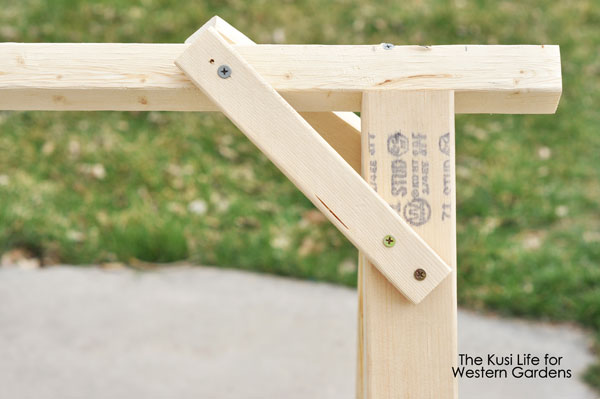
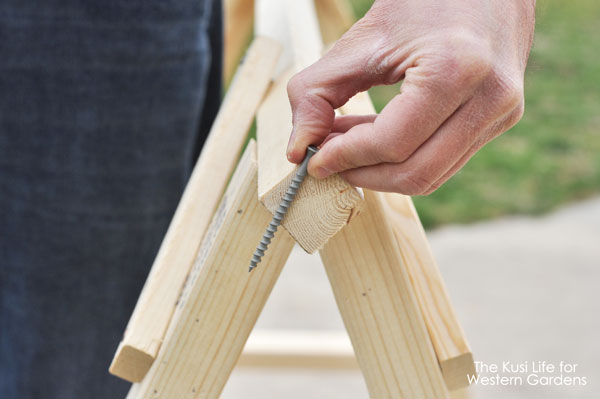
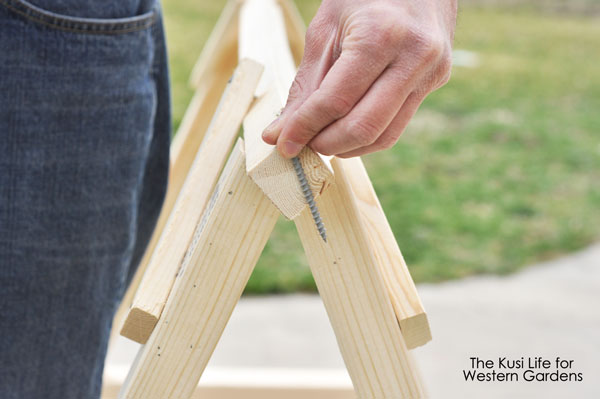
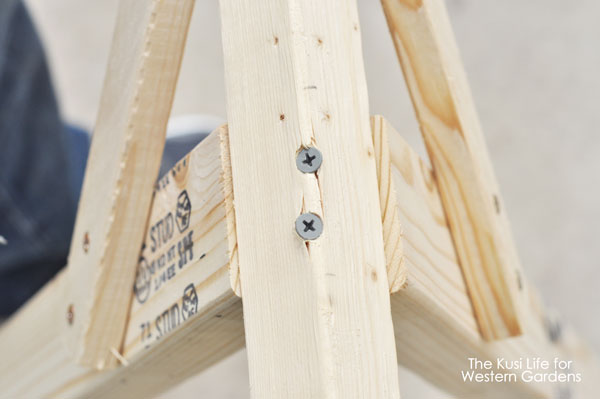
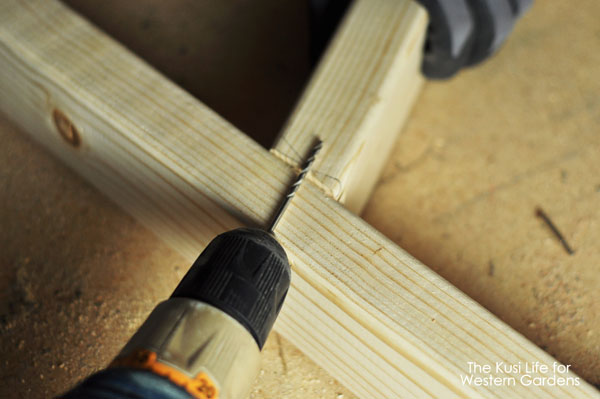
Lay the two 38 inchers on the ground with the 19 ¾ incher in the middle to form the “A.” Using your drill, you will drill a pilot hole in the direction shown here.

DIY Hanging Basket Frame - A Mother's Day Gift www.westerngardens.com

With the #2 Philips bit, insert the screw. Make another pilot hole about ¾ of an inch apart from the other screw, as shown in the picture above. Repeat this step on all 4 sides of the frame. Now you should have the two “A” pieces done.

DIY Hanging Basket Frame - A Mother's Day Gift www.westerngardens.com

For this step you will need someone to help hold the two “A” frames up. Lay the 58 incher on top of the two frames and measure 5 inches from the end. This is where it will lay. **If you decided to add the 10 inches, measure 10 inches from the end.

DIY Hanging Basket Frame - A Mother's Day Gift www.westerngardens.com

Now take the 9 inchers and drill a pilot hole, then screw it in. You will add another screw about ¾ of an inch just above that. Do the same on the other side.

DIY Hanging Basket Frame - A Mother's Day Gift www.westerngardens.com

Before you drill the pilot hole from the 9 incher into the 58 incher, use a level and make sure it is level and sitting evenly. Repeat it on the back side of the frame now.

DIY Hanging Basket Frame - A Mother's Day Gift www.westerngardens.com

Now drill the pilot from the 9 incher into the 58 incher, then screw them together.

DIY Hanging Basket Frame - A Mother's Day Gift www.westerngardens.com

It should look like this.
DIY Hanging Basket Frame - A Mother's Day Gift www.westerngardens.com DIY Hanging Basket Frame - A Mother's Day Gift www.westerngardens.com

Now, to secure the 58 incher, you will drill two pilot holes in opposite directions as pictured above, on each side.

DIY Hanging Basket Frame - A Mother's Day Gift www.westerngardens.com

It should look like this.

DIY Hanging Basket Frame - A Mother's Day Gift www.westerngardens.com

I did a quick sand job so it would be smooth and easy to stain.

DIY Hanging Basket Frame - A Mother's Day Gift www.westerngardens.com

I used Olympic Maximum Sealant and Stain in one. We used it for our deck and it has held up really well.

Hanging Basket Frame www.westerngardens.com

After allowing it to dry over night, we then drilled the 3 pilot holes 12 inches apart for the hanging baskets.
DIY hanging basket frame www.westerngardens.com

Here is what  the “J” screws look like. They come with only one nut so you have to buy 3 extra nuts to have one nut on the bottom of the the “J” and another on the top, so it will be secure. Screw those in and you are ready to hang your baskets!

DIY Hanging Basket Frame - A Mother's Day Gift www.westerngardens.com

I had a blast going to Western Gardens to purchase all my flowers. The staff there are awesome and helped me make my vision become a reality!  If you think Mom will want to choose her own flowers for her Hanging Baskets, a gift certificate to Western Gardens is the perfect idea so she can add her own special touch to this gorgeous display.

I have had lots of compliments on how much this adds to our yard, and my husband has had people ask him to make them one too! It really is an easy project that I think anyone would love to receive as a gift for Mother’s Day! How will you celebrate the women in your life this year?

See the Happy!

Kirstensig


Filed Under: Annuals, Container Gardening, Crafts, Gardening, How To, Utah Gardening Tagged With: DIY, frame, gift, hanging baskets, Mother's Day, tutorial

Mother’s Day Flower Pots

April 19, 2016 by Sydney Anderson

Welcome!  I’m so glad you’re here!

Are you looking for a simple, inexpensive present that the moms in your life will not just cherish, but enjoy every day?  Then create this bright and fun Mother’s Day gift, with the help of little hands!

Mother's Day Flower Pots are the perfect gift for all the mothers in your life! A sweet and simple gift to bring a pop of color to her home and a smile to her face.

Mother’s Day is right around the corner. Somehow this holiday always sneaks up on me! Maybe it’s because we have 5 bazillion birthdays from March to May or maybe it’s because with the warmer weather, I want to spend every waking moment outside; but it seems like I always remember Mother’s Day the Friday before and am always scrambling to make something for the moms in my life. But not this year!

Mother's Day Flower Pots are the perfect gift for all the mothers in your life! A sweet and simple gift to bring a pop of color to her home and a smile to her face.

I’ve learned that handmade gifts are the way to go when it comes to moms (and grandmas). Not only do they always bring a smile to their face, but it’s also more fun to make gifts. And it’s a lot more affordable too!

Mother's Day Flower Pots are the perfect gift for all the mothers in your life! A sweet and simple gift to bring a pop of color to her home and a smile to her face.

For this gift, I enlisted help from my two partners in craft. This gift couldn’t be any easier to make, and what kid doesn’t love getting a little dirty?!

Mothers-Day-Pot-Supplies

Mother’s Day Flower Pots

Supplies

  • Terra Cotta Pot – I used a 6″ because it was the perfect size for my boys’ hands. You may want a bigger or smaller one depending on how big your kids’ hands are.
  • Saucer to go under the pot – This terra cotta saucer costs about $1 but you can get a plastic one for much less.
  • Paint – I like using acyrlic craft paint (like these) because it dries quickly and is easy to clean up.
  • Sponge Paint Brush(es) (optional) – I’ve found after doing hand print art with my boys, the hand prints turn out clearer if you brush the paint onto their hands instead of letting them put their hands in the paint by themselves.
  • Sharpie
  • Flowers – you can buy them now or wait until you’re ready to give your gift. Western Gardens always gets a big shipment of new flowers just before Mother’s Day.
  • Potting Soil

Mother's Day Flower Pots are the perfect gift for all the mothers in your life! A sweet and simple gift to bring a pop of color to her home and a smile to her face.

Directions:

  1. Pick mom’s 2-3 favorite colors (or let your kids pick their favorite colors) and pour some on a paper plate.
  2. Using your paintbrush, paint the first color on one of your kids’ hands (You can also let the kids press their hands in the paint if you don’t have a paintbrush).
  3. Press hand firmly along side of pot.
  4. Paint the next color on the other hand (or next child’s hand) and space about 1″ from the first hand print on the pot.
  5. Continue with same color pattern spacing about 1″ from the last hand print until you’ve covered the whole pot.
  6. Using your Sharpie, write Happy Mother’s Day 2016 on the rim of the pot. (I thought about attaching a tag that said Happy Mother’s Day 2016, but I know the tag will probably get lost, and in 15 years I probably won’t remember what year we made this!)
  7. Plant flowers and give to mom.

Mother's Day Flower Pots are the perfect gift for all the mothers in your life! A sweet and simple gift to bring a pop of color to her home and a smile to her face.

What is your mom’s favorite flower? How great would they look in one of these pots?! Check out Western Gardens for a huge selection of flowers any mom would love.

Here are a few more Mother’s Day gift ideas:

Mothers-Day-Printable-Content-It-Is-A-KeeperMother’s Day Free Printable

Thank You For Helping Me Bloom Mother's Day Gift: A fun, quick and easy gift idea for that special mom in your life. #BestMomsDayEver #ad #CollectiveBiasDIY Tissue Paper Flower

Filed Under: Container Gardening, Crafts, Flowers, How To Tagged With: craft, how to's, Mother's Day

Watering Jugs for Kids

August 23, 2012 by Becky

These easy watering jugs for kids are perfect when you need something to do with the kids (and secretly want them to help water the plants without them knowing they’re helping with chores, because sometimes you just have to get through the day without anyone crying).  I promise they were all excited about this, despite the legos, sleepy face, and snack that were all happening simultaneously.

All you need is one empty, clean milk jug per kid, a nail, a hammer, and small stack of newspaper.

Using the nail and hammer, make about 15 holes in the lid of your milk jug.

Then just fill your jug, screw the lid on, and the kids will be so excited to water every green thing they see!


I need to refresh my pots a little.  We’ve been focusing on quality beauty survival this summer.

Summer is quickly fading…hopefully you’re enjoying yours as much as we’ve enjoyed ours!

Filed Under: Crafts

Easy Bird Feeders!

June 30, 2012 by Becky

Toilet paper tubes are great for a lot of things besides holding toilet paper!  And I promise I’m not hoarding empty tp rolls.  I’m just saving them for all the great projects I have in mind…like these super easy bird feeders!

This summer has been so busy with swimming, zoo trips, afternoons at the waterpark, hikes & friends, that I’ve been waiting for weeks to makes these with my kids.  When we sat down to make our bird feeders, the doorbell rang.  It was our neighbor friend, so we invited him in and he made a bird feeder too!  The kids even acted like they thought it was kind of cool.

This is all you need for your easy bird feeders:

empty toilet paper rolls
creamy peanut butter
bird seed
rimmed cookie sheet
table knives
your favorite kids

Spread the peanut butter all over the outside of your tube.

Hopefully it will look something like this:

Pour about 5 cups of birdseed into your rimmed cookie sheet, and roll your peanut butter tube in it.  Press firmly to make sure all of the peanut butter is covered in seeds.

And then it should look like this!

Repeat with all your tubes

Hang them in your favorite tree!  Just slide them onto a branch.

And then wait for the birds to come!  We haven’t seen any yet, but I’m sure it won’t be long!

Filed Under: Crafts

  • « Go to Previous Page
  • Go to page 1
  • Go to page 2

Primary Sidebar

Shopping Cart

Items in Your Cart

Your cart is empty
Visit The Shop

Follow Western Gardens

  • Facebook
  • Instagram
  • Pinterest
  • YouTube

See what we’ve been pinning!

Follow Me on Pinterest
Followed by people.
?

Pinterest Badge by Skipser

Here’s What We’ve Been Up To!

Save water and money by Turf Training - train your lawn to grow deep roots
work at western gardens utah garden center
Senior gardening woman Edu Carvalho from Pexels
nursery center open to public

Copyright © 2025. Western Gardens - Privacy Policy