• Skip to primary navigation
  • Skip to main content
  • Skip to primary sidebar

Western Garden Centers

for what grows here

  • Home
  • How To
  • Gift Cards
  • Calculate Mulch
  • Locations
    • Store Hours
    • About
    • Garden Shop Employment Team
  • Weddings
    • Salt Lake City, UT
    • West Valley, UT
  • Blog
    • Gardening
    • Recipes

DIY

Fresh From The Garden Gift Tags

July 12, 2017 by Jenn Crookston

gift tags for garden produce for neighbor gifts
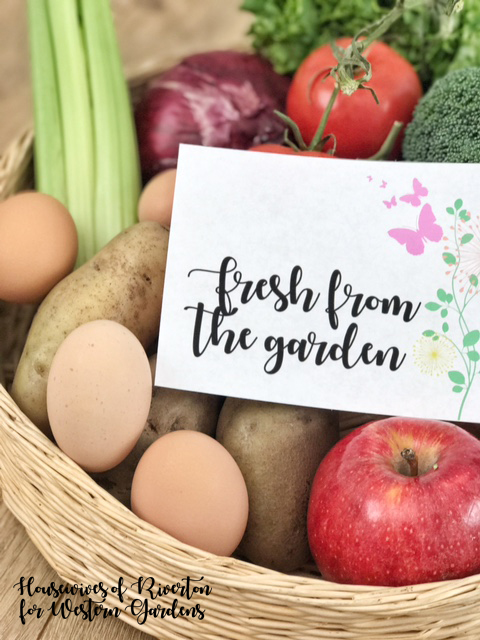
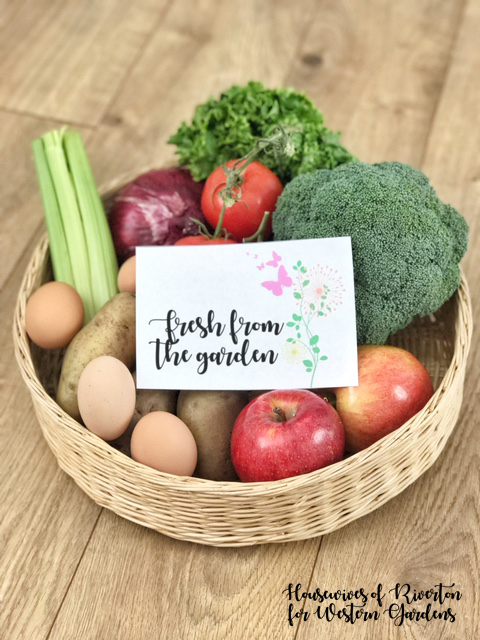
We’re heading into the very best time of the year when it comes to fresh fruits and vegetables.  If you’ve got a garden you know how quickly, once things start to ripen, you can end up with lots of extras.  These Fresh from the Garden gift tags may be incentive to get out and share your joy!

I have loved sharing my bounty with friends and neighbors over the years.  It’s always nice when something I’m not in need of brings a smile to someone else’s face.

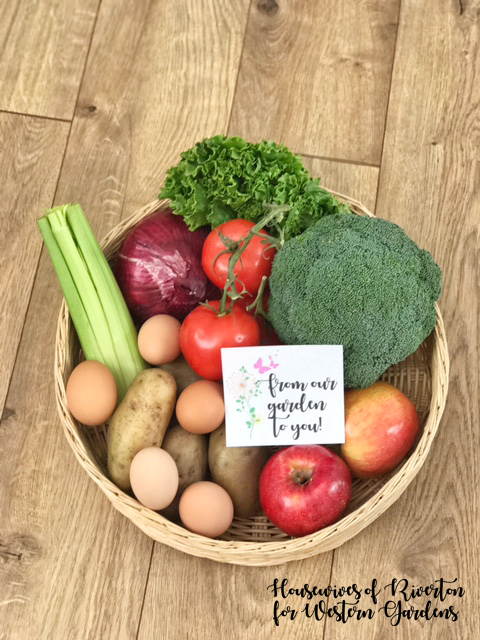
July 15th is National “Give Something Away” Day.  I created these bright “Fresh from the Garden” and “From our Garden to You” printable tags to celebrate this fun day.  Grab a small basket (or large, depending on your bounty), fill it with garden fresh fruits and veggies, print off a cute tag and deliver to one of your favorite people.

This would also be a cheerful tag to use with a fresh loaf of zucchini bread or other garden fresh treat.
Ready to print garden gift tag for giving fruits and vegetable away from your garden.

Click HERE for the Fresh From the Garden tag.

Garden gift tag "From Our Garden to You!" - ready to print

Click HERE for the From Our Garden to You tag.

I think sharing is one of my favorite things about having a garden (and having chickens, I love sharing fresh eggs).  In the past, a few neighbors and I were very intentional with our gardening.  We looked at the things we knew we wanted to grow and used a lot of and then sort of split up the planting.  Why would everybody in the neighborhood plant zucchini plants when we knew a couple well maintained plants would supply more than enough for us all.  Same with tomatoes and cucumbers.  As I’m trying my hand more at canning having a couple plants each of my own has been awesome and there is still plenty to share.
Fresh from the garden gift tags to use on a basket of produce for someone in need.
I hope you take advantage of National Give Something Away Day this July 15th.  Remember while these fresh from the garden and from our garden to you tags are created for you to gift something from your garden this is also an opportunity for other ways to give something away.

Give Something Away Idea – Go through your home, find those items that are still in good repair that are just not being utilized by you or your family, then donate them as well!

Give Something Away Idea – Put together your own little farmer’s market where neighbors can gather and share their bounty.

Give Something Away Idea – Create a little swap-n-shop where people can bring things they no longer need and look through things others have brought that might be a perfect fit in their home.

You can download the free printable tags here and here.  We’d love to see how you use them!
Happy Summer!!

Filed Under: Crafts, Gardening, Holidays, Tips & How To's, Utah Gardening Tagged With: DIY, eat your garden, fresh produce gifts, garden gifts, Gardening, national holidays, tips, Utah gardening, Western Garden Centers

DIY Porch Planter Box for Mother’s Day

May 7, 2017 by Jenn Crookston

Welcome – Glad you dropped in for a great idea!

Mother’s Day is just around the corner and I’ve got the perfect Mother’s Day gift that you’ve got plenty of time to create because it is such a fast build.  Your mother/wife/friend will love this DIY Mother’s Day Porch Planter Box.
Geraniums in a planter box for your porch
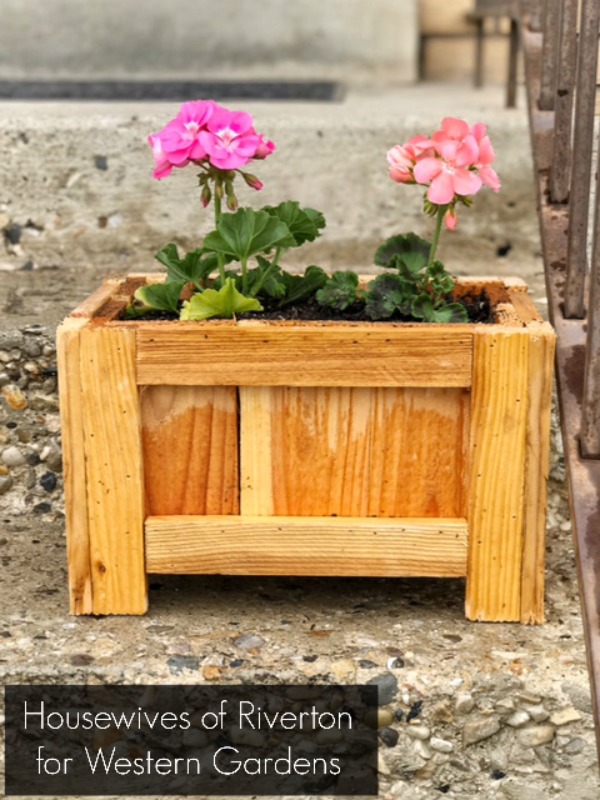
I’m pretty sure it’s a proven fact that anything is automatically cuter when it’s small.  That fact holds true with this Mother’s Day Porch Planter Box.  I am completely smitten with how cute it looks sitting on my steps and can’t wait to make it a couple of sisters.  You’re going to love me when I tell you how easy this was to make too.
Because I wanted this planter box to be able to sit on a single step on my porch I needed to find materials that weren’t big and bulky.  After walking around the home improvement store for a while and looking at the different options I went with wood fencing and stakes.  Since both of these items are made to be outside in all weather conditions I figured they were perfect for this project and they aren’t bulky pieces of wood which means more room inside the box for flowers.
Here is a good photo of the box assembly.  The fencing is less than $2 a board and the stakes we had on hand but I’m pretty sure were around a dollar each.  I used just over 1 fencing board and 2 stakes for one box.  I think with 4 boards and 7 stakes you could make 3 planter boxes, including nails I think you’re looking at 3 planter boxes for under $20, pretty awesome if you ask me!
construction of DIY porch planter box for mother's dayI used our miter saw to cut my pieces, if you don’t have a saw at home here is your cut list and the people at the home improvement store can cut them for you.

Cut List:

10 #1 (side pieces) – 3.5″x 6″
4 #2 – (long side braces) 1.4″x 8 5/8″
1 #3 – (middle bottom) 3.5″x 11.5″
2 #4 – (side bottom) 1.5″x 11.5″
2 #5 – (short side braces) 1.5″x 5 1/4″
8 #6 – (corners/legs) 1.5″x 8″

Porch Planter Assembly:

I used a brad nailer to create the box with 1″ finish nails.  If you don’t have a nail gun you can use tiny nails and a hammer to create the box it’ll just take a little more time.  These nails are perfect because they’re easily painted over and hidden if you choose to paint your planter box.

To create my planter box I started by creating one side as shown in photo 1. 

Once I got that side done I created the corners as shown in photos 2-4.

When I had the corners done assembly was easy.  I placed the side brace against one corner piece and then nailed into place.

When it was attached I then placed the next side piece in place and attached it to the side brace.

Photos 5 and 6 show the bottom of the planter box.  As you can see in photo 5 there isn’t quite enough room for 2 pieces of fencing on the bottom.  Photo 6 shows how perfect once piece of fencing and two pieces cut from a stake fit leaving enough room between the pieces to allow water drainage.

As you can see in photo 7 I wasn’t too worried about a perfectly smooth surface, you can sand and paint/stain as desired, I love the little more rustic look so this was perfect for me.
Planter box with living flowers on front porch stairs of house
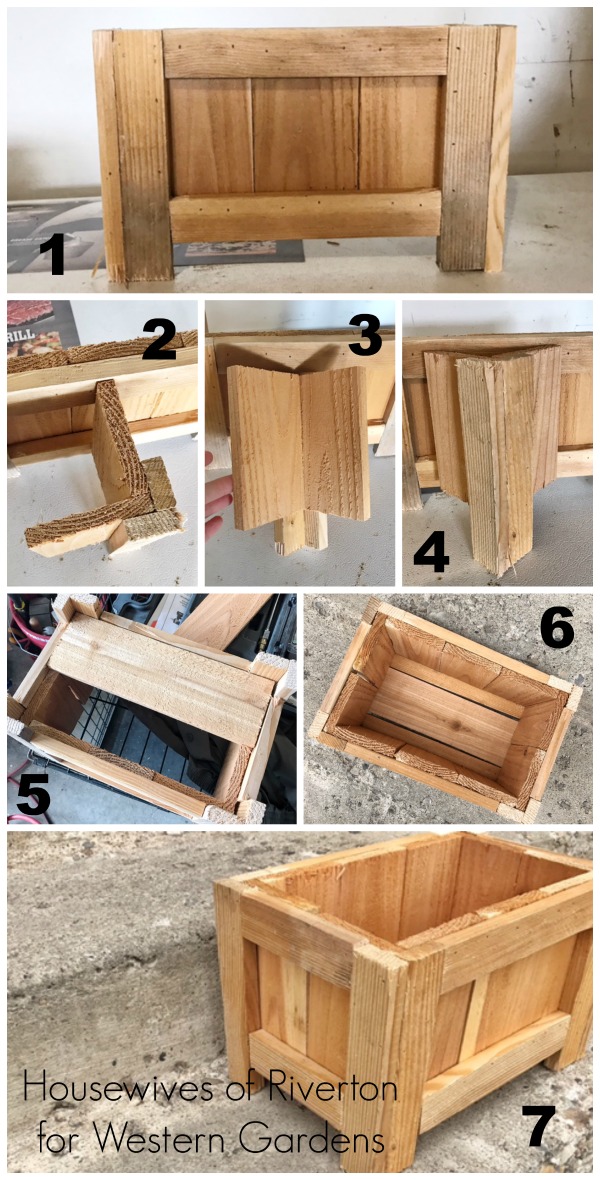
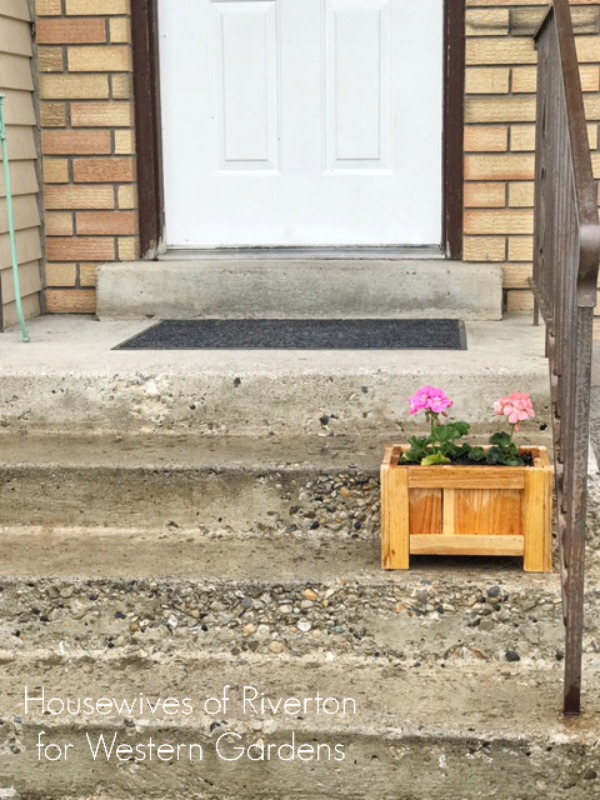
Can’t you just picture a few more of these darling little planter boxes leading all the way up the stairs.  I can’t wait to get them all finished and filled with beautiful flowers from my local independent garden shop Western Garden Centers.
You can easily make this planter box and fill it with flowers for less than you would spend on a bouquet of cut flowers for Mother’s Day and they’ll last all season long and the planter for years to come.
western gardens have geraniums for your planter box

Filed Under: Container Gardening, Flowers, Gardening, How To, Outdoors, Tips & How To's Tagged With: container gardening, DIY, flowers, mother's day gift idea, porch planter, simple gift

Use Living Flowers for Centerpieces during Easter and Spring

April 14, 2017 by Jenn Crookston

Use living flowers for centerpieces this Easter. Contains basket, tulips, bunnies, fake grass and plastic eggs
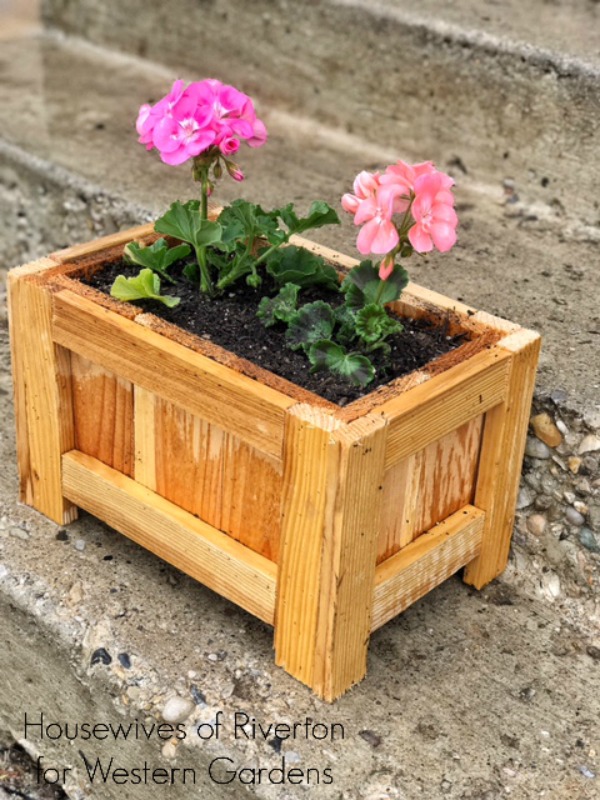
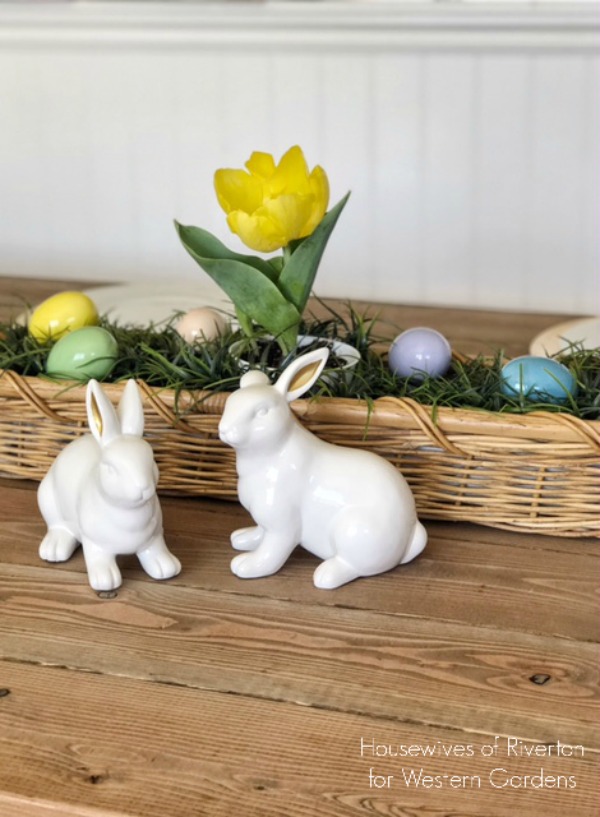
It’s pretty safe to say the very best part of Spring is the beautiful living flowers for centerpieces.  I love having fresh flowers in and around my home.  I love the instant brightness they bring and the amazing smells…it’s like bringing sunshine right inside the house.

As I plan my spring and Easter decor I love to plan for flowers anywhere and everywhere I can.  While I love a beautiful spring bouquet I especially love finding ways to use fresh flowers inside that I can then transfer outside so they can continue to grow and beautify my home.
Easter table centerpieces with tulips and ceramic bunnies
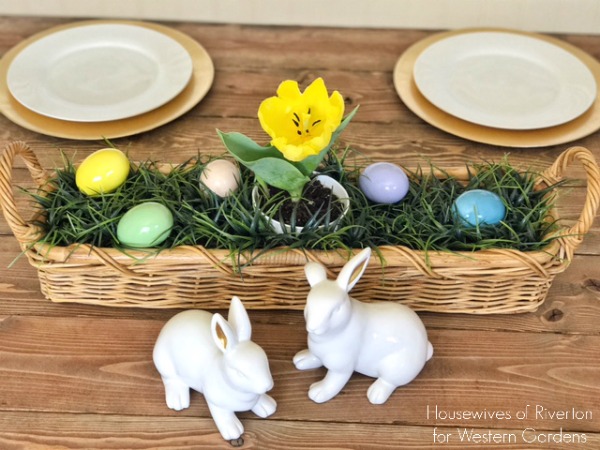
First up I have this adorable Easter Table Centerpiece.  Using just a few items (many you may already have on hand) you can create the perfect centerpiece for your Easter dinner that will last for years to come because you can take that Tulip bulb and plant it in your yard!

Easter Table Centerpiece Supplies:
Basket
(I used a long skinny one I had on hand, you could use any variety)
Fake Grass
(or real grass if you plan ahead and grow some – see growing Wheatgrass)
Small Bucket
Fake Eggs
Ceramic Bunnies
Live Flowers
(I used a tulip, but again any flower would work.  Dainty primroses and colorful pansies are also great living flowers in centerpieces.)

First gather your supplies, plant your flower in the bucket and then place the bucket in the center of the basket and arrange your fake grass.  Once you have the grass arranged place fake eggs in the grass, mine had a hole in one end so I made sure to place the egg so that wouldn’t show.

I used two ceramic bunnies in front of the basket to bring the whole Easter look together. Simple and oh so cute.
Geraniums are a great way to use living flowers for centerpieces.
Once bunnies and Easter eggs are past being in season it’s time for a new Spring Centerpiece to take over the table.

Spring Table Centerpiece Set Up:
I found this cute blue crate at Target and flipped it upside down then added these little chubby birds and tiny cake stand from Hobby Lobby.  The Love Grows Here crate is also from Target and I love that it comes lined with plastic so adding flowers that need watering won’t damage it or anything under it.

I added two geraniums in their little plastic store bought containers, they are a perfect fit!
Easter table centerpieces with geraniums
While I love love love how both of these centerpieces turned out I think my very favorite part is that when I’m ready to make a change for the next season/holiday I get to plant these flowers outside and watch them continue to grow, I don’t have to throw them away in 7-10 days like we have to with cut flowers.

I highly recommend finding ways to bring living flowers into your decor.  I promise they’ll put a smile on your face every time you walk past them.

Filed Under: Crafts, Flowers, How To, Tips & How To's Tagged With: DIY, easter centerpieces, flowers, home decor, living flowers, living flowers centerpieces, spring centerpieces, use living flowers in centerpieces, Western Gardens

DIY Bird House Kid Craft

July 15, 2016 by Sydney Anderson

This DIY Bird House is a great kid craft, it’s easy to make and customize…even for little hands!DIY Bird Feeder Kid Craft: Let kids make their own bird houses in just a few minutes!

Do you get birds in your yard? We didn’t get many last year, but this year it seems like there is always a flock (well, at least 5 or 10!) coming and going throughout the day.  My boys love looking out the window and watching them on the grass, so I decided to bring nature a little closer to home and build a bird house for the front porch!

DIY Bird Feeder Kid Craft: Let kids make their own bird houses in just a few minutes!
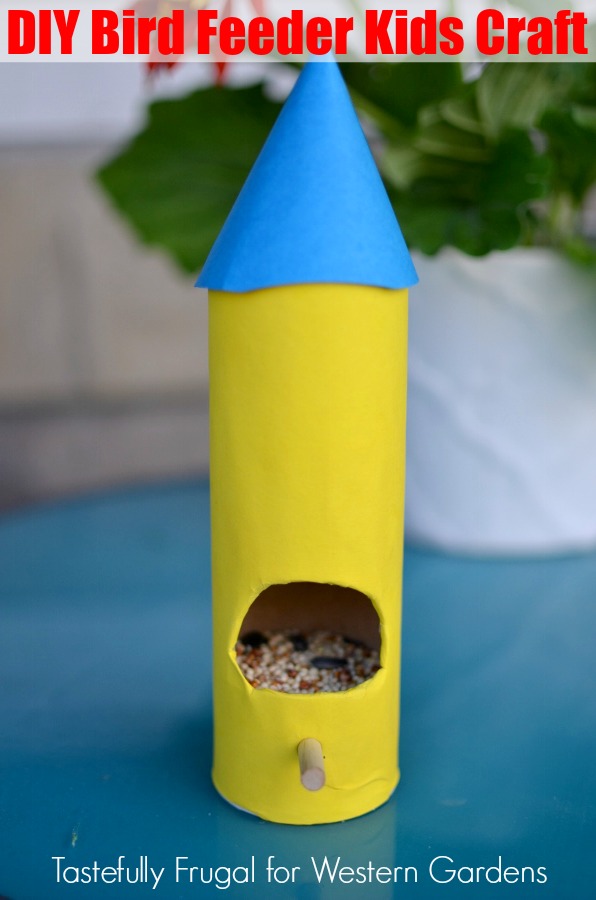
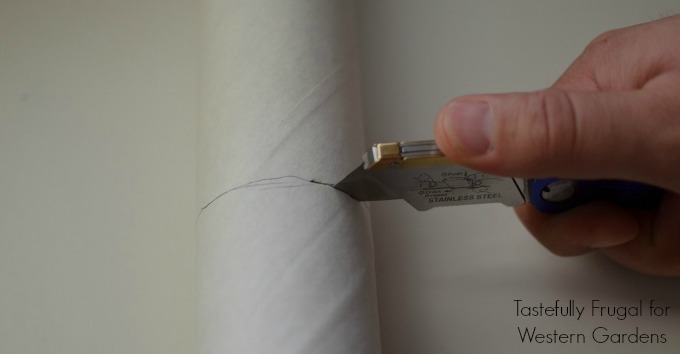
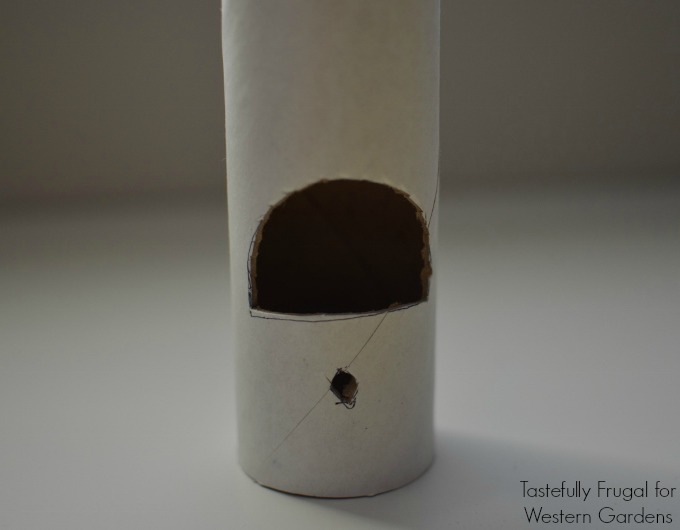
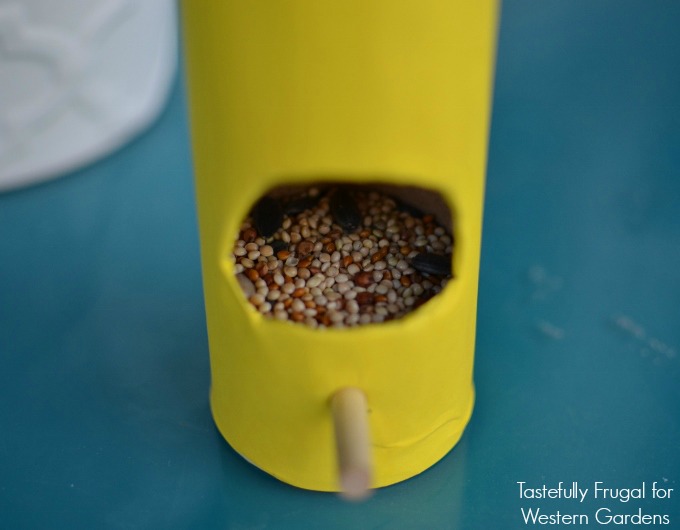
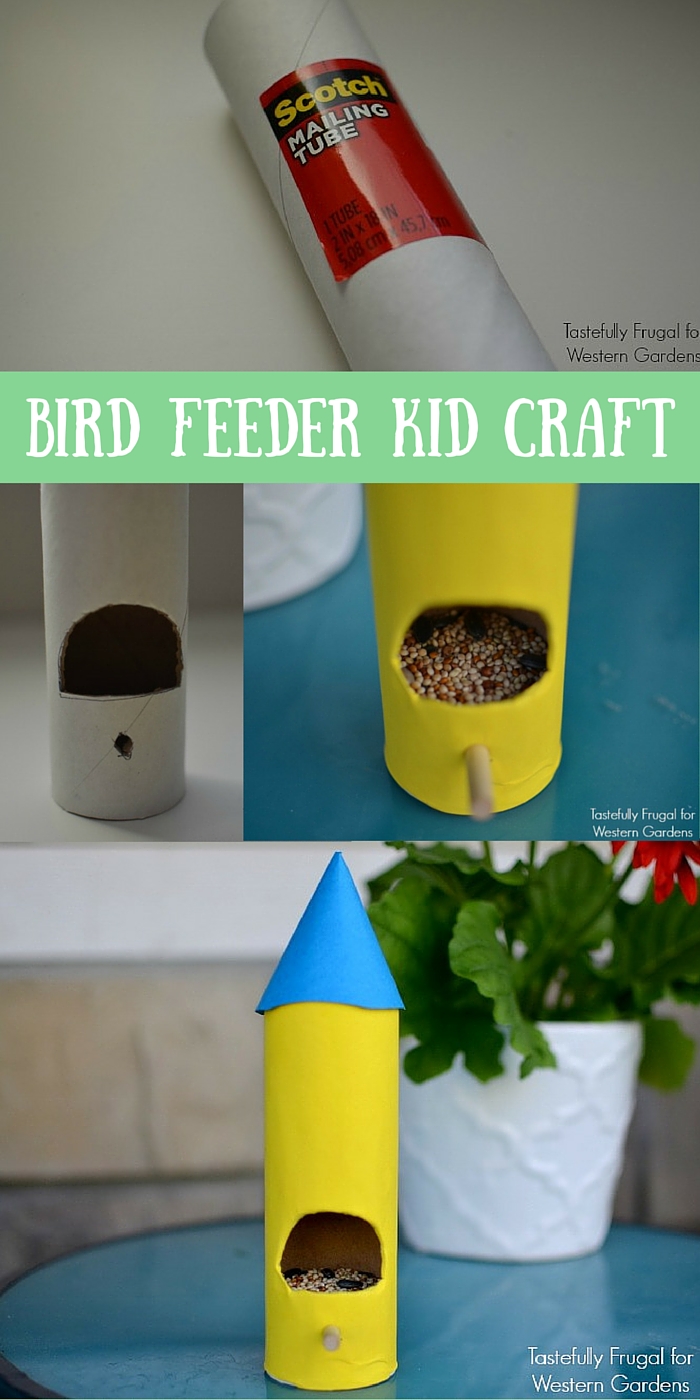
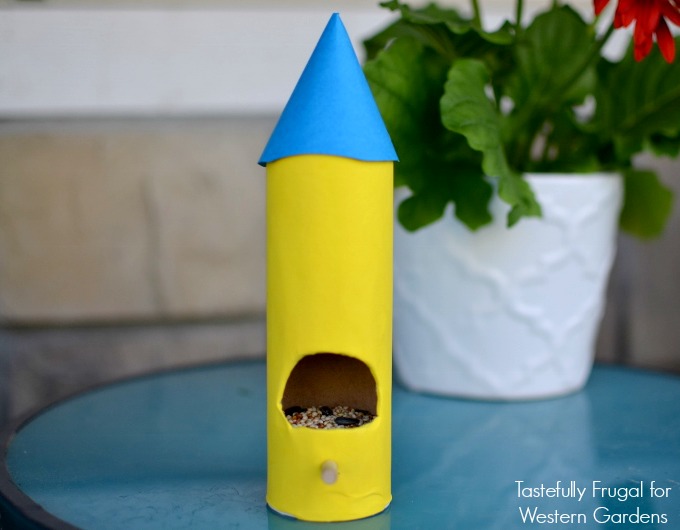
I didn’t think my kids would have the patience to sit through building a birdhouse from wood (they are 3 and 4) so I decided to go with something a little more simple.
DIY Bird Feeder Kid Craft: Let kids make their own bird houses in just a few minutes!

DIY Bird House Kid Craft

Supplies:

  • Shipping Tube (I picked this one up from the FedEx store for $3)
  • Wooden Dowels (you can pick them up at any hardware or hobby store)
  • Cardstock or Construction Paper
  • Scissors
  • Hot Glue Gun
  • X-Acto Knife or Razor Blade
  • Washi Tape, Feathers, Beads or other embellishments
  • Bird Seed (I found a huge variety at Western Gardens)

DIY Bird Feeder Kid Craft: Let kids make their own bird houses in just a few minutes!

DIY Bird Feeder Kid Craft: Let kids make their own bird houses in just a few minutes!

Directions:

  1. Decide on the height of birdhouse you want, measure and cut the shipping tube (we made ours 6″).
  2. Trace a half circle on the shipping tube to put the food in, and cut it out with the X-acto Knife.
  3. Measure and cut the dowel for the perch (ours was about 3″ long).
  4. Cut a small hole below the larger hole in the tube (for the dowel to go in).
  5. Wrap cardstock around tube, measure and cut the cardstock to fit around the tube.
  6. Hot glue the cardstock on to the tube.
  7. Hold the tube up to the light and cut out the large and small circles in the cardstock.
  8. Place the dowel inside the smaller hole and use hot glue to secure.
  9. Hot glue the shipping lid into place.
  10. Cut a piece of cardstock in a contrasting color 6″ x 2.5″.
  11. Roll into a cylinder and hot glue together.
  12. Let kids embellish the roof however they want.
  13. Use hot glue to attach the cylinder to birdhouse.
  14. Pour birdseed into the larger hole.

DIY Bird Feeder Kid Craft: Let kids make their own bird houses in just a few minutes!

Place it on a solid surface, or thread string or rope through the top of the tube to hang from a branch or a porch hook. We have ours sitting on our front patio table and the birds still come up for a snack!  These birdhouses are made with cardstock, so make sure to bring them in if you know a storm is coming…they probably won’t make it through the rain.

DIY Bird Feeder Kid Craft: Let kids make their own bird houses in just a few minutes!

My boys love looking out the window and watching the birds eat from their feeder! We’re also making a bird bath to see if we can get a few more visitors from nature to our porch. What fun ways do you like to bring nature close to home?  Tell me in the comments below!

Check out another fun way to get kids into nature:

Color Scavenger Hunt | Tastefully Frugal

Color Scavenger Hunt

Filed Under: Crafts Tagged With: Birdhouse, DIY, Kids Craft

3 Ways to Get Rid of Snails

July 10, 2016 by Kirsten

3 easy & cheap Ways to Get Rid of Snails, safe for pets and wildlife! www.westerngardens.com

Hello, thanks for stopping by!
3 Ways to Get Rid of Snails www.westerngardens.com

Have you ever had issues with snails or slugs eating your garden?  I sure have!  They’ve devoured some of my favorite plants, which motivated me to find some safe, natural ways to get rid of them!
3 Ways to Get Rid of Snails www.westerngardens.com
This is a pot I was prepping to plant in early Spring.  I especially love the bright colors, they look so happy!
3 Ways to Get Rid of Snails www.westerngardens.com
But this is what was left of my purple decorative kale after a gang of snails enjoyed it for a week or two. I actually found 5 or 6 snails sleeping contently in my pot. I was not happy with them!  If you need to protect your plants too, try one of these cheap and easy methods!  Beer Traps, Egg Shells and Sluggo all have benefits, so keep reading to see which one is right for you!

3 Ways to Get Rid of Snails

 1. Beer Traps

3 Ways to Get Rid of Snails www.westerngardens.com
I developed this particular trap to make it easy to get rid of the snails after they drown in beer.
3 Ways to Get Rid of Snails www.westerngardens.com

Beer Trap Supplies:

  • 2 disposable plastic cups
  • an old pencil
  • a can of beer
3 Ways to Get Rid of Snails www.westerngardens.com
In the evening, dig a hole outside in your vegetable or flower garden, near your plants. Place the cup inside the hole. Make it level with the ground so the snails don’t have to climb far.
3 Ways to Get Rid of Snails www.westerngardens.com
Using scissors, carefully poke 4 drainage holes in the bottom of the remaining cup.  Poke two more holes near the top, just under the lip, for the pencil to go through. This will ensure a gap between the cups so you can easily remove the top one to dispose of the snails the next morning.
3 Ways to Get Rid of Snails www.westerngardens.com
Place the cup with the holes and pencil inside the cup buried in the ground. Pour the whole can of beer inside the cup, leaving about an inch of headspace. This forces the snails to climb down into the cup, where they will drown in the beer.
3 Ways to Get Rid of Snails www.westerngardens.com
We put a few of our snails near the cup, and they were immediately drawn to the beer!
3 Ways to Get Rid of Snails www.westerngardens.com
He started in on his own.
3 Ways to Get Rid of Snails www.westerngardens.com
And down he went for a drink.
3 Ways to Get Rid of Snails www.westerngardens.com
We caught 5 snails the first night!  To empty the dead snails, just pull the inner cup out and the beer will drain out the holes.  Dispose of the snails and gently push the pencil cup back into the inner cup, and the beer will fill back into that inner cup.
This method is easy, it uses only a few items, and I saw results literally overnight. The beer will last up to a week, but after being in the heat all day, I prefer to change it every other night.

Don’t Want to Buy Beer?

The yeast is what lures the snails to the cup to take a drink.  If you don’t want to buy beer because you don’t drink or you just want to save some money, you can make your own yeast mixture with a few pantry staples!

DIY Yeast Snail Bait

  • 1 Tbsp of flour
  • 1 tsp of sugar
  • 1 tsp of yeast
  • 2 cups of water

Click HERE for printable Beer Trap instructions!

2. Egg Shells

3 Ways to Get Rid of Snails www.westerngardens.com
If you eat a lot of eggs, this is a free way to deter snails from your plants—and I stress the word deter, as this will not kill them. Simply save the shells from your eggs and allow them to dry out for a day or two. Then, using the bottom of a cup, crush the egg shells into small, sharp pieces.  Sprinkle the egg shells all the way around your plants, making a border. Make a fairly wide berth around the plant, or the snails will not be deterred.
3 Ways to Get Rid of Snails www.westerngardens.com
Snails hate the sharp pieces and will turn around and look for another place to eat…but they will not die, which is honestly what I want…to get rid of them entirely!  If it rains or if you water, you will probably need to sprinkle more egg shells around your plants again, otherwise they will be feeding on your plants the moment they get the chance!  This isn’t all bad though…egg shells are great for the garden because they add a lot of nutrients to the soil.

3. Sluggo

3 Ways to Get Rid of Snails www.westerngardens.com
Sluggo is a great option when it comes to purchasing a natural snail-killing bait. It is completely safe to use around wild animals and pets as it has iron phosphate—a natural mineral found in the soil.  The snails eat the bait, lose their appetites, head to their hiding place and die within a few days.  And it still works if it rains or if you water your garden!  Sprinkle it around your plants about every two weeks.  I purchased mine as a recommendation from one of the associates at Western Gardens and I love it!

Which One is Best?

There are other methods that claim to get rid of (or deter) snails.  After trying just these 3 methods though, I have to say I loved seeing the dead snails in the beer.  It’s so satisfying to see a difference that quickly. However, the Sluggo is the easiest method of the 3.  Sprinkle the tiny pellets every two weeks and walk away.  This gives me more time to enjoy other things!  Like weeding.  😉  Both of these methods will rid you of snails, and hopefully prevent them from laying eggs before they die.
Have you had success in deterring/killing snails or slugs?  I would love to hear what has or hasn’t worked for you!
See the Happy!
           Kirstensig
Pages: Page 1 Page 2

Filed Under: Gardening, How To, Tips & How To's Tagged With: control, deter, DIY, get rid of, natural, repel, safe, slugs, snails

DIY Kid-Friendly Bug Spray

June 15, 2016 by Sydney Anderson

Make this DIY Kid-Friendly Bug Spray at home with our quick and easy recipe!

DIY Kid Safe Bug Spray: Make your own bug spray at home in minutes and with just 4 ingredients!

Is your favorite part of summer spending those lazy evenings out in the yard, watching the kids play and talking to friends or family?  Mine too!  Avoid making other “friends” while you’re enjoying your summer nights…bugs!

Conventional bug sprays are filled with yucky chemicals that we don’t in our kids’ growing bodies (or our own bodies, for that matter!).  They not only absorb through the skin, but it’s hard to avoid inhaling them while applying the sprays.  We certainly don’t want to do nothing and get bitten…so what’s a mom to do? Make her own, of course!

Kid Safe Bug Spray: Make your own bug spray at home in minutes and with just 4 ingredients!
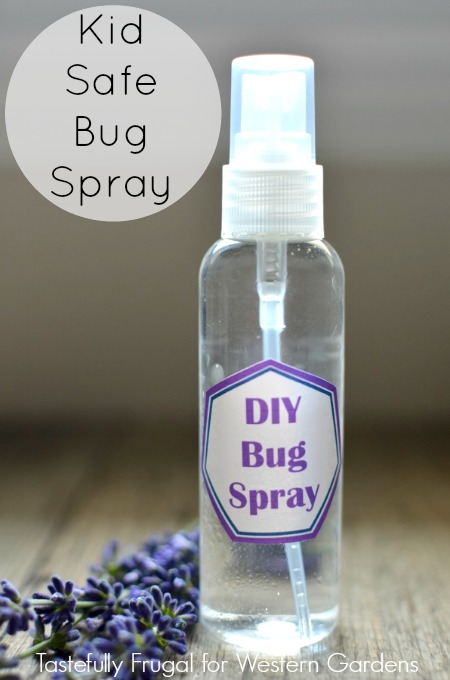
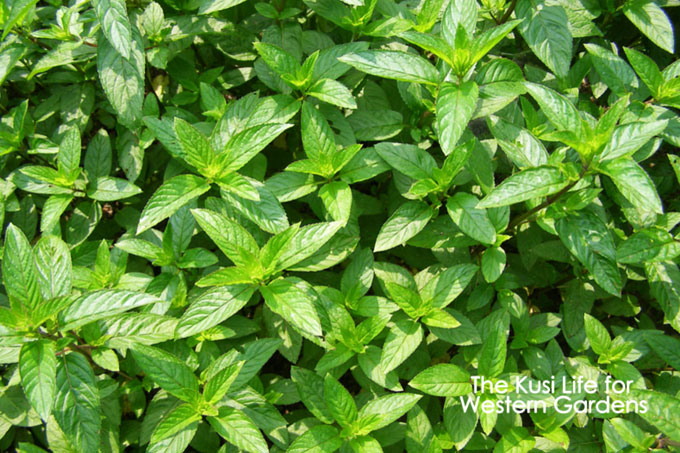
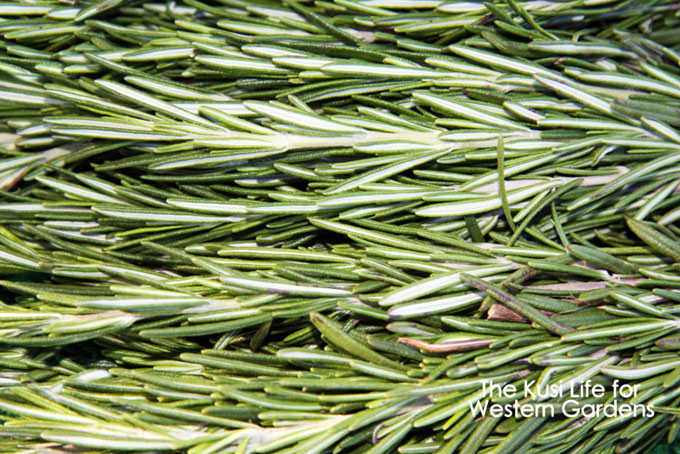
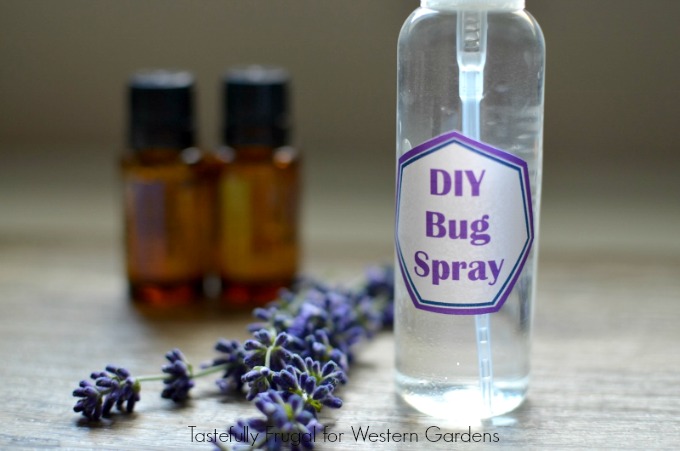
There are lots of different recipes for making your own bug spray because they are so easy to customize to the bugs you want to avoid.  Different bugs dislike different scents, so add what you need in order to avoid those bites! Here are a few essential oils that are good to keep these bugs away:

Mosquitoes—lavender, eucalyptus, citronella

Flies—lavender, peppermint, rosemary

Ticks—lavender, lemongrass, eucalyptus

Some essential oils aren’t safe for kids, so I’ve only included oils in this spray that are safe for everyone…lavender and lemon. Both are fresh scents, safe for kids and good for keeping away mosquitoes and ticks!  And if you want to add some plants to your yard to help repel mosquitoes, click HERE!

DIY Kid-Friendly Bug Spray

Supplies:

  • Spray Bottle
  • Label (you can print your FREE copy here)
  • 1 oz witch hazel
  • 1 oz distilled water
  • 5 drops lavender essential oil
  • 5 drops lemon essential oil

Directions:

  1. Combine all ingredients in spray bottle and shake well to combine.
  2. Shake well before each use.

Notes:

  • I put my Bug Spray in a 2 oz travel size spray bottle.  They are inexpensive and small enough to carry in a purse or diaper bag!

Kid Safe Bug Spray: Make your own bug spray at home in minutes and with just 4 ingredients!

Now that you’re protected from the bugs check out these fun (and FREE) outdoor activities:

Nature Bingo | Tastefully FrugalNature Bingo

Color Scavenger Hunt | Tastefully FrugalColor Scavenger Hunt

Filed Under: Recipes, Tips & How To's Tagged With: bug spray, DIY, kid friendly, tips

DIY Tabletop Terra Cotta Fire Pit

June 7, 2016 by Sydney Anderson

Hi there, thanks for stopping by today!

DIY Fire Pit: Make Your Own Campfire At Home For Less Than $5 | Western Gardens

Do you love camping with your family in the summer?  Roasting hot dogs and marshmallows over a fire with the people you enjoy most?  Me too!

Some of my favorite memories are of camping in the mountains, at the lake, in the desert, and even in the backyard!  I can’t wait to make the same memories with my boys…but since I’m 20+ weeks pregnant, sleeping on the ground isn’t very appealing.
DIY Fire Pit: Make Your Own Campfire At Home For Less Than $5 | Western Gardens

So we’re bringing my favorite part of camping right to our front porch—campfires!

There’s nothing better than sitting around a camp fire, roasting hot dogs, making s’mores and just spending time together, laughing and telling stories. Currently we live in a great little townhome community— without a backyard—so building a fire pit was out of the question.

I couldn’t let that stop me!

DIY Fire Pit: Make Your Own Campfire At Home For Less Than $5 | Western Gardens
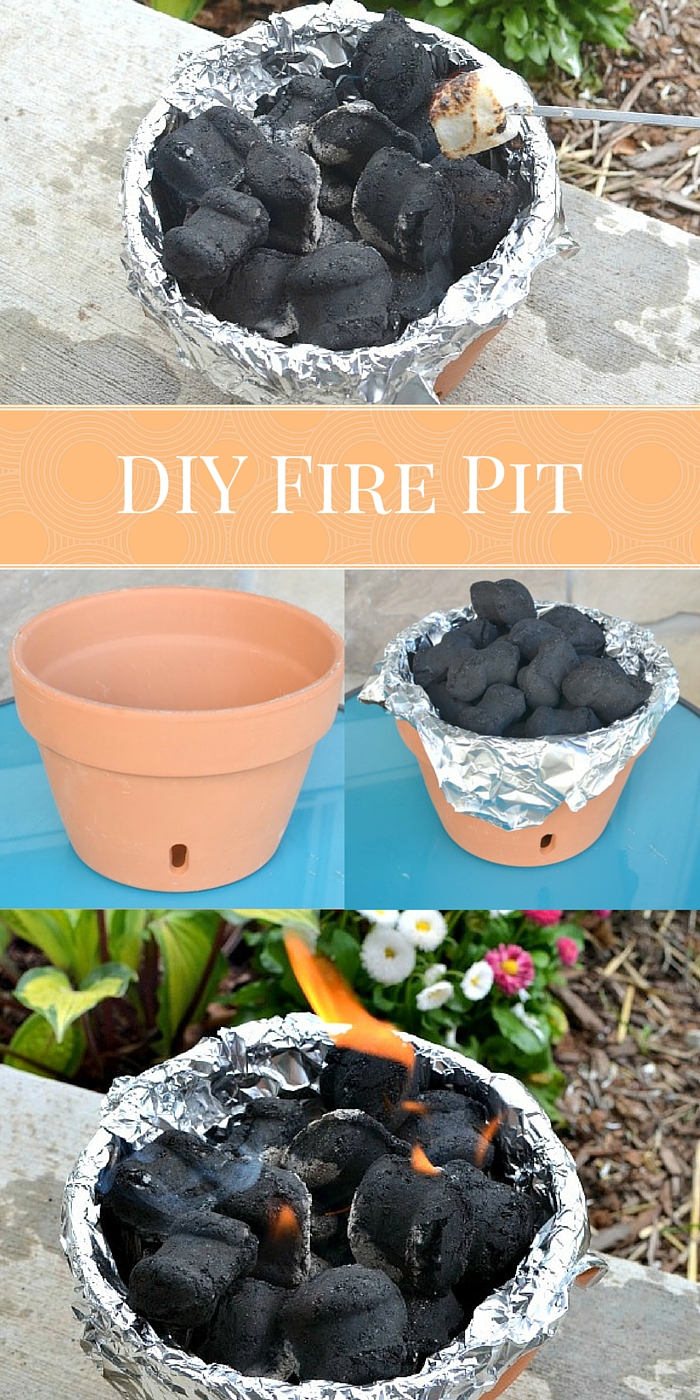
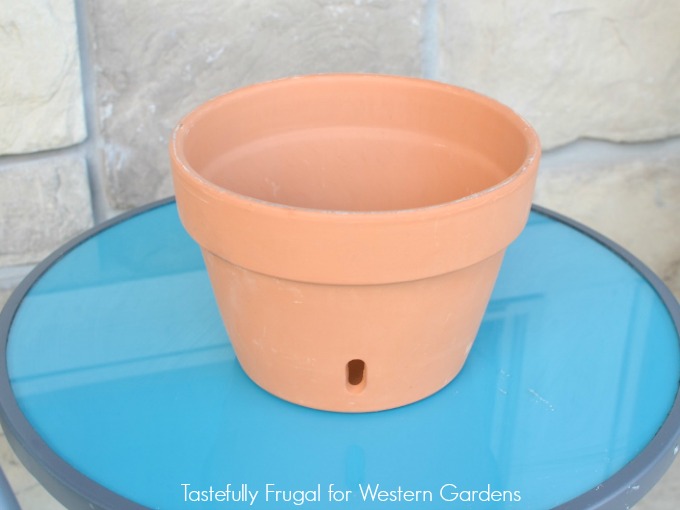
I took matters into my own hands and made a mini fire pit out of a terra cotta pot for our front porch!  I took my husband, who is definitely the brains of our family, into Western Gardens and he picked out this terra cotta pot with holes in the bottom.  The holes allow more oxygen to enter the pot (just like on a charcoal grill), which will let the fire burn longer.

Longer lasting fires are perfect for those summer nights when the kids are playing, grown ups are chatting and you want to be able to make more s’mores when you get that craving (which happens a lot when you’re pregnant!).

Click NEXT to get the simple instructions!

Western Gardens | Utah

Pages: Page 1 Page 2 Page 3

Filed Under: Crafts, Outdoors Tagged With: DIY, Fire Pit, How To, how to's, Terra Cotta Pot, tips, Utah, Western Garden Centers, Western Gardens

4th of July BBQ Decor

June 4, 2016 by Jenn Crookston

4th of July BBQ Decor

Looking to update your 4th of July BBQ decor?  Try this fun layered look with paper fans, banners and garlands!

4th 1

Plus, I’m sharing sources for everything you see here so you can recreate this patriotic look for your BBQ.

IMG_0945

4th of July BBQ Decor

  • Paper Fans and Confetti (My Mind’s Eye)
  • Stars & Stripes and Flag Banner and Red, White, and Blue Pails (Target Dollar Spot)
  • Table Skirt, Blue and Silver Star Garland (Zurchers Party Store)
  • RWB Balls in the vase and Fountain Type vase decor (Hobby Lobby)
  • Lightbox and Letters (Heidi Swapp)

IMG_0950
What’s great Red, White & Blue decor without a barbecue to go with it?  Nothing beats an “All American” menu for a fun family get together!

4th of July Menu

  • Hamburgers (don’t forget the avocado for an amazing burger!)
  • Hotdogs
  • Steak
  • Chicken
  • Green Salad
  • Potato Salad
  • Chips (lots of varieties)
  • Fresh Fruit (watermelon is a must!)
  • Veggie Tray
  • Punch
  • Soda
  • Strawberry Shortcake
  • RWB Fresh Fruit topped Sugar Cookies
  • Funnel Cakes
  • Homemade Frostys

IMG_0938

I mixed and matched the paper fans from three different decor lines at My Mind’s Eye: 4th of July, Red and Blue.  They may have come from different lines, but they all coordinate perfectly!  (For a great deal, shop right after the holiday, if you can wait that long!  You’ll have to wait for nearly a year before you can use it, but the wait will be worth it if you’re patient!)

IMG_0941 IMG_0939

Don’t be afraid to use some height in your decor for added dimension.  And if you feel like more layers would be better, add as many as you want.  The most important design element is that you love it, so have fun with it and make it your own!

IMG_0948
Have a safe and happy Fourth of July, with beautiful decor and lots of great food!

Filed Under: Crafts Tagged With: 4th of July, BBQ, decor, DIY, holiday, How To

DIY Solar Lantern

May 31, 2016 by Heather Leister

Do you love the look of solar lanterns, but not the cost? Make your own ! They're cheap, easy and fast. Check out the simple instructions!

Welcome, I’m so glad you’re here!

Are you looking for an inexpensive way to light up your yard at night? Look no further! These easy DIY Solar Lanterns can be created with a quick trip to the dollar store.  They’re simple to make and add a fun element to your landscape.

All it takes is a few simple supplies and a few minutes of your time.  This is a project that kids love to help with too!  (or is it just my kids that enjoy taking things apart? 😉)

For this project you’ll need some empty mason jars (or other small decorative jars), inexpensive solar lights, canning jar rings (optional, but they do give them a nicer finished look), and some hot glue.

This simple DIY Solar Lantern will light up your yard and impress your neighbors! All it takes is a few inexpensive supplies and a few minutes to assemble. Great project to do with kids!!

Start with the mason (or other small decorative jar…I’ve used both and they work equally well). The key is to choose a jar with a small opening. If you use a wide-mouth canning jar, the solar light will fall through the opening to the bottom of the jar.

jar

Now is the perfect time to stock up on inexpensive solar yard lights for any DIY solar projects you might have planned. They can be found at the dollar store. Purchase the plainest, simplest solar light you can find. For this example I’m using a solar table lamp that I purchased at my local Dollar Tree.This simple DIY Solar Lantern will light up your yard and impress your neighbors! All it takes is a few inexpensive supplies and a few minutes to assemble. Great project to do with kids!!

If you (or your kids!) like tearing things apart, then you’ll enjoy this next step! Take apart the solar light, what you want is the black, round unit at the top. You will see the solar cells on the top, and the lights at the bottom. This is all you need for the project, so go ahead and recycle the rest of the light, or save it for another project.This simple DIY Solar Lantern will light up your yard and impress your neighbors! All it takes is a few inexpensive supplies and a few minutes to assemble. Great project to do with kids!!

Depending on the size of your jar, your light may fit down in its mouth, or it may sit on top. Either way, I like to secure the solar light to the jar with hot glue.This simple DIY Solar Lantern will light up your yard and impress your neighbors! All it takes is a few inexpensive supplies and a few minutes to assemble. Great project to do with kids!!

For a finishing touch, add a canning ring to the top of the jar. Again, a little hot glue works nicely.

This simple DIY Solar Lantern will light up your yard and impress your neighbors! All it takes is a few inexpensive supplies and a few minutes to assemble. Great project to do with kids!!

That’s it! Sit your lanterns on your porch or hang them on a shepherd’s hook in your yard and enjoy!

Click NEXT for the list of supplies and directions!

2

Pages: Page 1 Page 2 Page 3

Filed Under: Crafts, How To, Outdoors, Tips & How To's Tagged With: craft, DIY, garden, yard

Plants That Repel Mosquitoes

May 1, 2016 by Kirsten

5 Plants that Repel Mosquitoes - www.westerngardens.com

Hello and Welcome!

Do mosquitoes drive you crazy?  Do you love spending time outside until you become a feast for these pesky creatures?  Keep reading for our list of plants that repel mosquitoes…a simple solution that doesn’t involve chemical-laden sprays!

Mosquitoes are a real problem, not just because they’re annoying and no one likes the itchy bumps they leave behind, but because they carry disease.  Zika is the newest threat here in the U.S. and it’s particularly alarming for women who are pregnant or who want to become pregnant, as it causes birth defects.

The first step to reducing mosquitoes is to make sure you don’t have standing water around your home, as they need water to reproduce.  This includes rain gutters, outside toys, wagons, dog bowls, etc. Even a bottle cap of water can be a breeding ground for mosquitoes.

The next thing to do is add some mosquito-repelling plants to your landscape and containers.  It’s important to note that the mere presence of these plants doesn’t necessarily repel mosquitoes.  {There are a lot of claims that they do, but there is no scientific backing to support this idea!}

So now what?  To harness the power of these plants, you must actually break the leaves on the plants and rub the oil on your skin in order to truly repel the mosquitoes.

If essential oils are your thing, try THIS recipe for a kid-friendly spray.  You can also try making your own essential oils!  But whether or not you make your own oils, add these plants to your yard to keep your family safe from the summer mosquitos!

Plants that Repel Mosquitoes

5 Plants that Repel Mosquitos - www.westerngardens.com

1—Lavender ⇧ 

Lavender is a beautiful plant with a lovely fragrance. It’s known to bring on calmness and relaxation, and can even help you get to sleep. Lavender oil has also been known to stop the itchiness of bug bites and sunburns. Spraying lavender on your body masks your natural scent and will help keep you free of mosquito bites! You can make your own lavender oil by removing the flowers and allowing them to dry, then boiling them in fractionated coconut oil.

5 Plants that Repel Mosquitos - www.westerngardens.com

2—Lemon Balm ⇧

Many people enjoy lemon tea from lemon balm leaves and say they have found relief for indigestion, better sleep, and reduced anxiety. You can easily crush the leaves in your hands and rub them over your skin as a natural mosquito repellent.

5 Plants that Repel Mosquitos - www.westerngardens.com

3—Peppermint ⇧ 

Not only is peppermint used in tea and in baking, but it is a fantastic repellent for mosquitoes. It’s easy to gently crush some leaves in your hands and rub over your skin or exposed areas where mosquitoes can bite you. Not only can peppermint repel mosquitoes, it can help relieve the itch, as it has a cooling/tingling feeling when applied to the skin.

5 Plants that Repel Mosquitos - www.westerngardens.com

4—Rosemary ⇧

Rosemary is a great herb to have in your garden as the scent helps repel mice and deer. You can make delicious savory dishes and have the added benefit that using just a few leaves a day gives you all the vitamin A you need. Rosemary can be boiled in fractionated coconut oil and then be sprayed on your body as a natural mosquito repellent.

5 Plants that Repel Mosquitos - www.westerngardens.com

5—Sage ⇧

Sage isn’t just for cooking anymore!  This herb is a little different from the others on our list…you can actually burn some dried sage bundles to help keep the mosquitoes away.  We recommend using it in combination with some of the other essential oils mentioned above for total mosquito repelling success!

When you apply natural mosquito repellents on your skin for the first time, make sure you place a small amount on the back of your hand and rub it in. Wait one to two hours to see if the repellent causes irritation.  If you have no irritation, you can spray or rub the repellant over the exposed areas to keep the mosquitoes away.

Have you found another natural way to keep the mosquitoes at bay?  Tell us in a comment below!

See the Happy!

Kirstensig

Filed Under: Container Gardening, Gardening, Herbs, Outdoors, Tips & How To's Tagged With: chemical free, DIY, essential oils, lavender, lemon balm, mosquito, mosquitoes, natural, non toxic, peppermint, plants, repel, repellent, rosemary, sage

  • Go to page 1
  • Go to page 2
  • Go to Next Page »

Primary Sidebar

Shopping Cart

Items in Your Cart

Your cart is empty
Visit The Shop

Follow Western Gardens

  • Facebook
  • Instagram
  • Pinterest
  • YouTube

See what we’ve been pinning!

Follow Me on Pinterest
Followed by people.
?

Pinterest Badge by Skipser

Here’s What We’ve Been Up To!

Save water and money by Turf Training - train your lawn to grow deep roots
work at western gardens utah garden center
Senior gardening woman Edu Carvalho from Pexels
nursery center open to public

Copyright © 2023. Western Gardens - Privacy Policy