• Skip to primary navigation
  • Skip to main content
  • Skip to primary sidebar

Western Garden Centers

for what grows here

  • Home
  • How To
  • Gift Cards
  • Calculate Mulch
  • Locations
    • Store Hours
    • About
    • Garden Shop Employment Team
  • Weddings
    • Salt Lake City, UT
    • West Valley, UT
  • Blog
    • Gardening
    • Recipes

Crafts

Celebrate the Potato in September

September 2, 2017 by Heather Leister

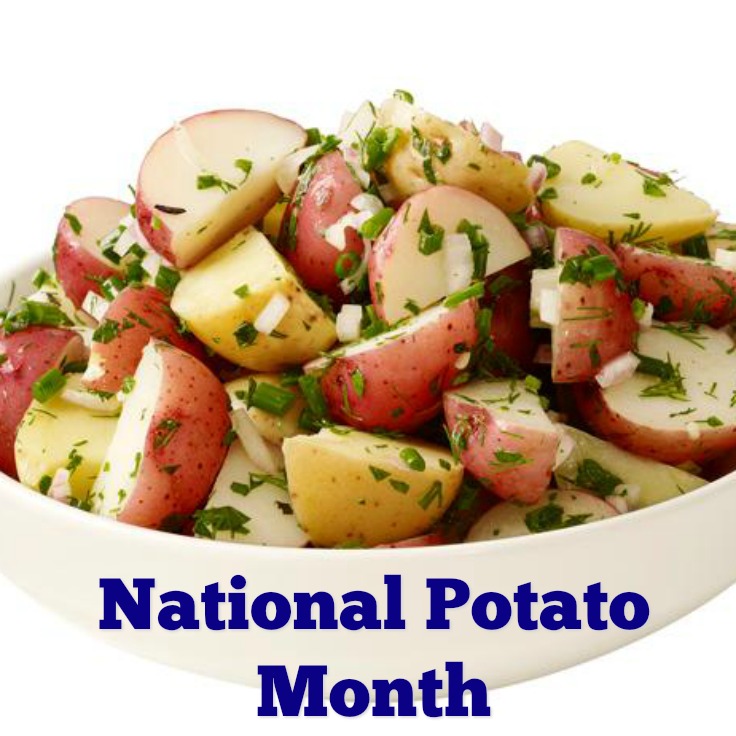
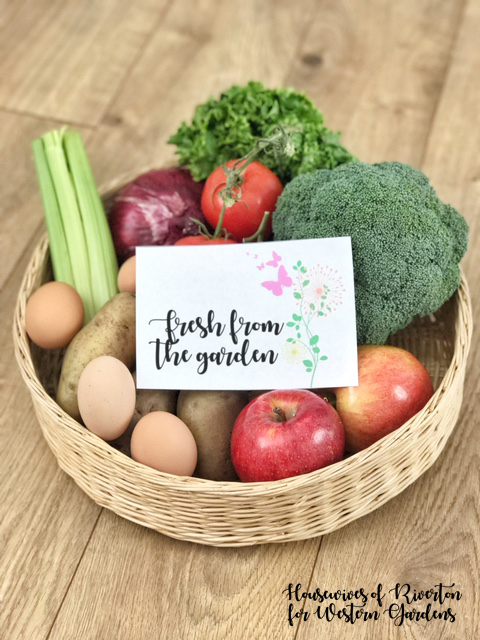
September is the special month of the year that is set aside to celebrate the wonderfully dependable, always reliable potato.  This solid side dish performer works with almost any meal and if you planted potato starters in the spring then you should have a harvest ready to be served up this the fall. Mashed potatoes are always a solid side dish but if you’re looking for something different here are six ideas for side dishes this month as you celebrate the potato!

Hashbrowns – Who says that hashbrowns have to stay put on the breakfast menu? Try serving them at dinner and adding in bell peppers, onions, and your favorite spices for flavor. Serve the hash browns with a traditional dinner menu or make it an evening of breakfast. It’s always a good time for pancakes and bacon!

Funeral Potatoes – A Utah classic, funeral potatoes are a satisfying comfort dish for any occasion, even a weeknight family dinner. Potatoes can be diced, sliced, or shredded before you add them to the recipe. This potato dish can be as simple or as elaborate as you want to make it, the varieties are endless. Here’s a basic funeral potato recipe from Lil’ Luna to get you started if you’ve never baked this comfort food before!

Baked – You can’t deny the simple, great taste of a baked potato. Toss the potatoes in olive oil and kosher salt before baking and they’ll come out of the oven crisp on the outside and warm and fluffy on the inside. The beauty of the baked potato is that each family member can create their own. Whether it’s with simple butter and salt or fully loaded with sour cream, bacon, cheese, and green onions, everyone will have a say in how this potato dish is made.

Photo Credit: Flickr

Grilled – While the weather is still warm outside you may not be in the mood to use your oven to cook potatoes. If that’s the case you can always grill them. Grilled potatoes are an excellent choice when you’re already planning on grilling meat for dinner. Slice or dice the potatoes and then put them in a foil packet. Don’t forget to spray the foil with non-stick cooking spray to prevent the vegetables from sticking to the sides.  Add in bell peppers and onions or cheese and bacon, depending on your taste preference. Seal up the foil packets and place them on the grill earlier than your meat as the potatoes will take longer to cook.


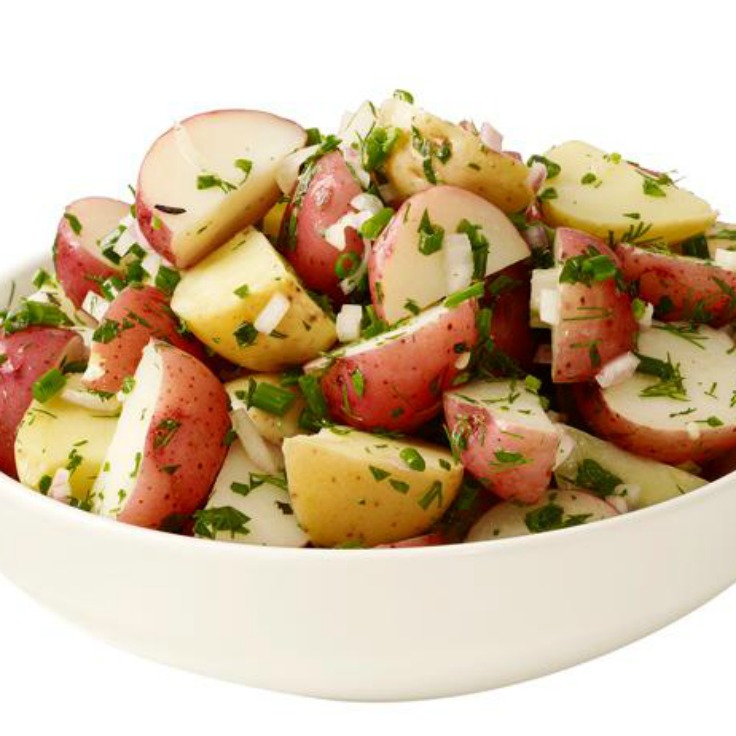
Photo Credit: Food Network

Potato Salad – Potato salad isn’t only a dish for summer potlucks! If you find yourself in the mood for a potato side dish but want something a little lighter, try a potato salad. You can stick with the traditional recipes or try one that’s eggless, or a version that uses red potatoes and vinegar.

Potato Wedges – Celebrate the potato with homemade potato wedges.  They are about as family friendly as you can get. Wedges can be served with simple, kid friendly main dishes or fancier adult fare. While cutting the potatoes can seem like a chore, in the end the homemade taste will be worth it! Try this recipe from Our Best Bites for oven fries and experiment with the different seasoning. 

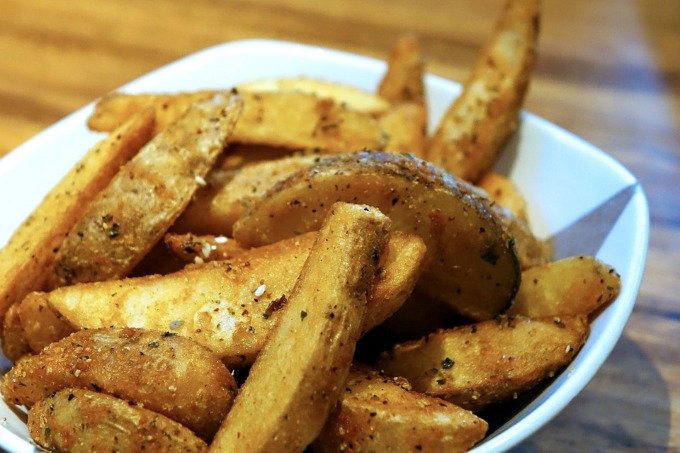
Photo Credit: Pixabay


Enjoy the month with your homegrown potatoes, but if you didn’t grow any, plan ahead for next spring.  Western Gardens carries in the spring a variety of only the best potatoes to grow in your own garden.  You will be able to celebrate the potato even more next September.

Other Delicious Potato Recipes and Information:

Ranch Roasted Potatoes

Garlic and Rosemary Mashed Potatoes

Smashed Potatoes

Planting Potatoes


Filed Under: Holidays, Recipes, Vegetables Tagged With: Gardening, potato recipes, potatoes, recipes

National Sneak Some Zucchini Onto Your Neighbor’s Porch Day

August 5, 2017 by Jenn Crookston

Hello!  I’m Jenn from Housewives of Riverton and am so excited to be here with you today.  Did you know that August 8th is National Sneak Some Zucchini Onto Your Neighbor’s Porch Day?  I am absolutely loving these different national days and have so much fun coming up with ways to celebrate them.
Leave a basket of zucchini on a neighbor's porch. 
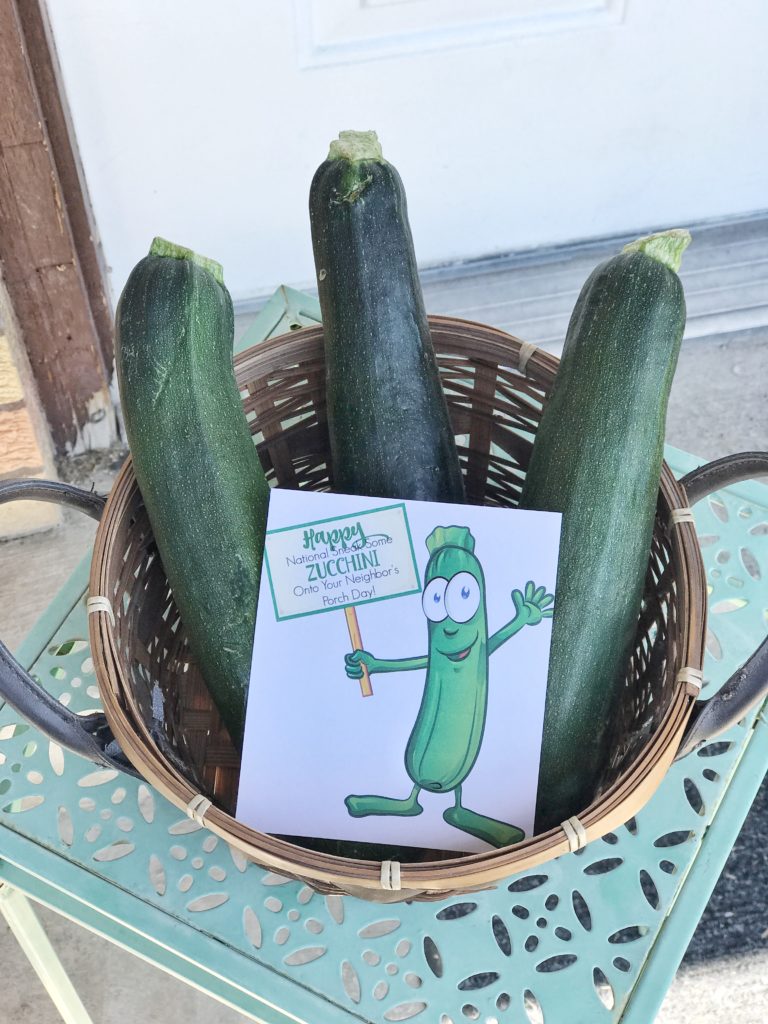
The funny thing about National Sneak Some Zucchini onto your Neighbor’s Porch Day is, what person (who has a garden) isn’t going to be over the moon excited to celebrate this day.  I mean, if you were to start putting some of your zucchini abundance onto all your neighbor’s porches on just a random Tuesday people might think you were weird BUT make it a national day that you can include on a fun note and it’s perfectly acceptable to share the zucchini love!
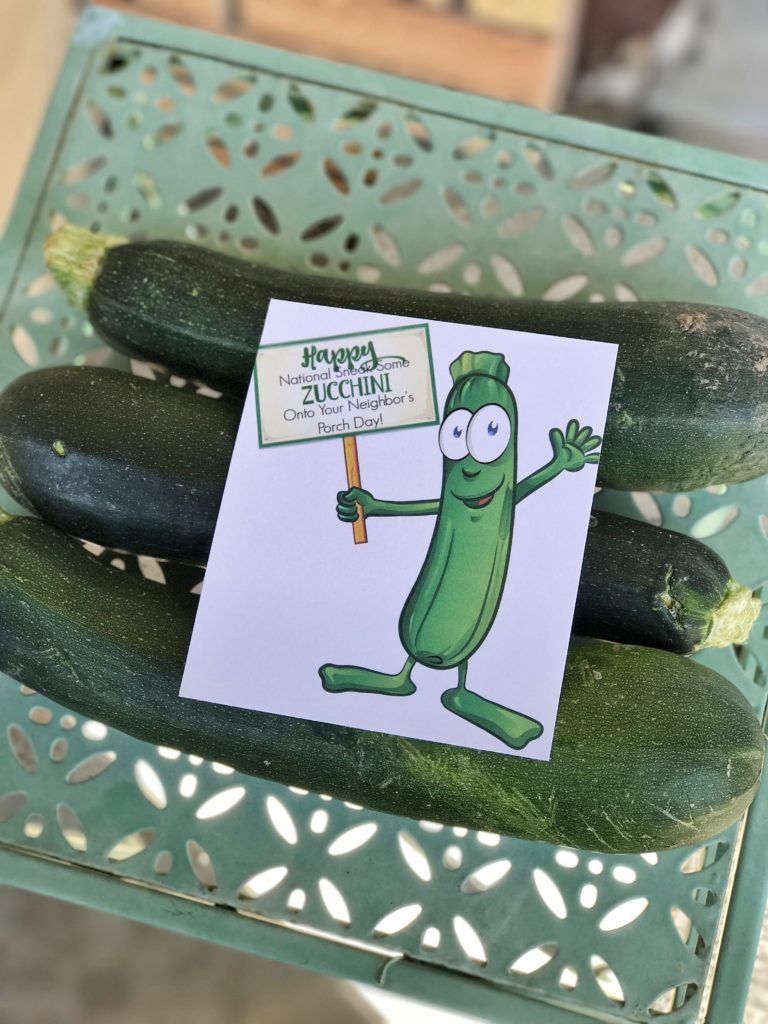
As I was thinking of different ways to celebrate this fun holiday I started thinking of some of my favorite zucchini recipes.  I think zucchini bread has to top the list, I like to pretend it’s completely healthy because it has quite a bit of zucchini in it, perfect for those days when I’m dieting.  I don’t want to make National Sneak Some Zucchini Onto Your Neighbor’s Porch Day a chore for you so I am not suggesting that you make zucchini bread for all your neighbors but you could include a recipe for zucchini bread (or cookies, cupcakes, brownies…there are so many delicious zucchini recipes) along with the needed amount (or more) of zucchini.  You may just introduce them to a new favorite recipe.
Free printable for National Zucchini day.
To help make this day and the giving easier for you, I’ve created this fun free printable for you to include with your bounty.  CLICK HERE to print it off! I think that cute smiling zucchini would make anyone’s day brighter, he just seems to scream “Hey you, I was thinking about you today!” and everyone loves to be thought of.
I say plan ahead, don’t let this fun new holiday sneak up on you, collect your zucchini abundance, print out a few of our free printable and maybe a recipe or two and hit the neighborhood on August 8th and bring a smile to the faces of your neighbors!

If you’re looking for a fun new way to eat your zucchini you’ve got to try our Zucchini Cookies with Cream Cheese Frosting or our Applesauce Zucchini Bread both are serious crowd pleasers and are sure to have your friends and family asking for more zucchini from your garden!  Check out our National Zucchini Bread Day recipe as well.

Filed Under: Eat from Garden - Recipes, Holidays, Vegetables Tagged With: august 8, happy zucchini day, national sneak zucchini day, share with neighbor, zucchini, zucchini recipes

Fresh From The Garden Gift Tags

July 12, 2017 by Jenn Crookston

gift tags for garden produce for neighbor gifts
We’re heading into the very best time of the year when it comes to fresh fruits and vegetables.  If you’ve got a garden you know how quickly, once things start to ripen, you can end up with lots of extras.  These Fresh from the Garden gift tags may be incentive to get out and share your joy!

I have loved sharing my bounty with friends and neighbors over the years.  It’s always nice when something I’m not in need of brings a smile to someone else’s face.

July 15th is National “Give Something Away” Day.  I created these bright “Fresh from the Garden” and “From our Garden to You” printable tags to celebrate this fun day.  Grab a small basket (or large, depending on your bounty), fill it with garden fresh fruits and veggies, print off a cute tag and deliver to one of your favorite people.

This would also be a cheerful tag to use with a fresh loaf of zucchini bread or other garden fresh treat.
Ready to print garden gift tag for giving fruits and vegetable away from your garden.

Click HERE for the Fresh From the Garden tag.

Garden gift tag "From Our Garden to You!" - ready to print

Click HERE for the From Our Garden to You tag.

I think sharing is one of my favorite things about having a garden (and having chickens, I love sharing fresh eggs).  In the past, a few neighbors and I were very intentional with our gardening.  We looked at the things we knew we wanted to grow and used a lot of and then sort of split up the planting.  Why would everybody in the neighborhood plant zucchini plants when we knew a couple well maintained plants would supply more than enough for us all.  Same with tomatoes and cucumbers.  As I’m trying my hand more at canning having a couple plants each of my own has been awesome and there is still plenty to share.
Fresh from the garden gift tags to use on a basket of produce for someone in need.
I hope you take advantage of National Give Something Away Day this July 15th.  Remember while these fresh from the garden and from our garden to you tags are created for you to gift something from your garden this is also an opportunity for other ways to give something away.

Give Something Away Idea – Go through your home, find those items that are still in good repair that are just not being utilized by you or your family, then donate them as well!

Give Something Away Idea – Put together your own little farmer’s market where neighbors can gather and share their bounty.

Give Something Away Idea – Create a little swap-n-shop where people can bring things they no longer need and look through things others have brought that might be a perfect fit in their home.

You can download the free printable tags here and here.  We’d love to see how you use them!
Happy Summer!!

Filed Under: Crafts, Gardening, Holidays, Tips & How To's, Utah Gardening Tagged With: DIY, eat your garden, fresh produce gifts, garden gifts, Gardening, national holidays, tips, Utah gardening, Western Garden Centers

Use Living Flowers for Centerpieces during Easter and Spring

April 14, 2017 by Jenn Crookston

Use living flowers for centerpieces this Easter. Contains basket, tulips, bunnies, fake grass and plastic eggs
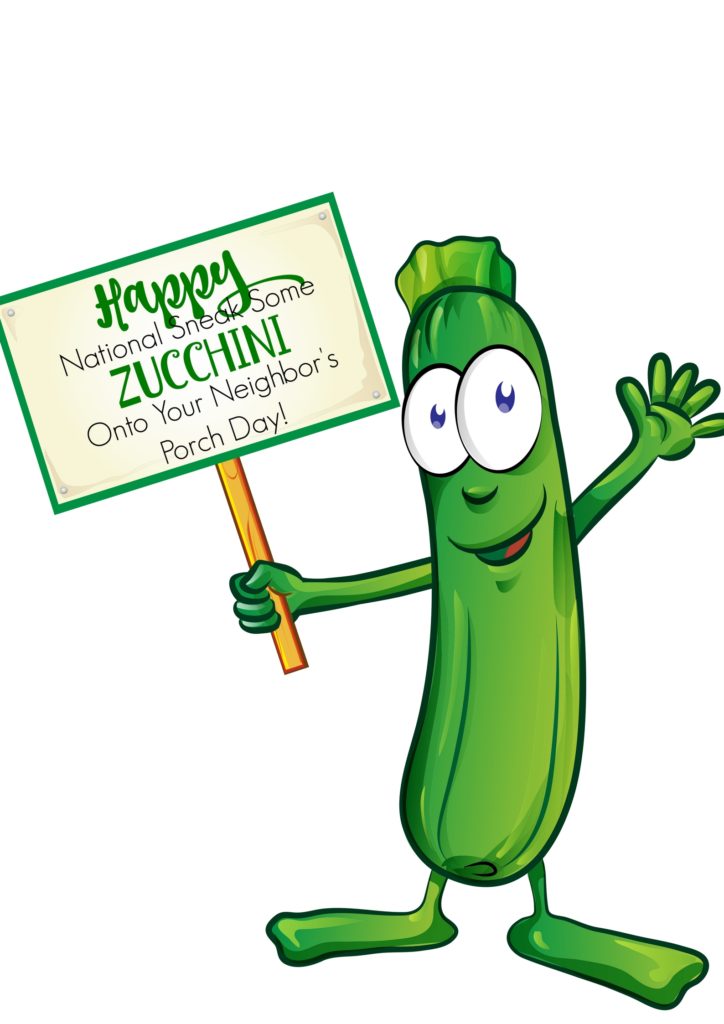
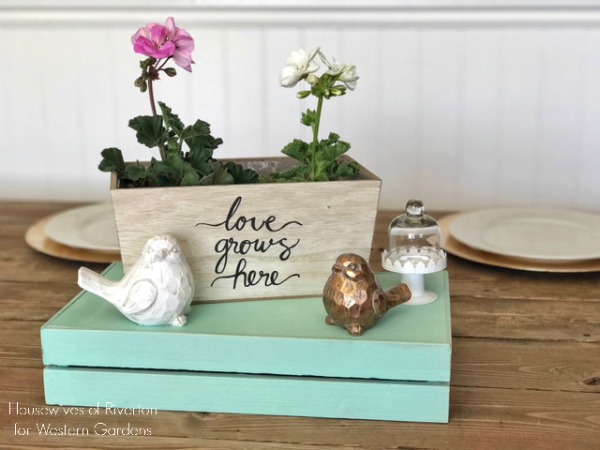
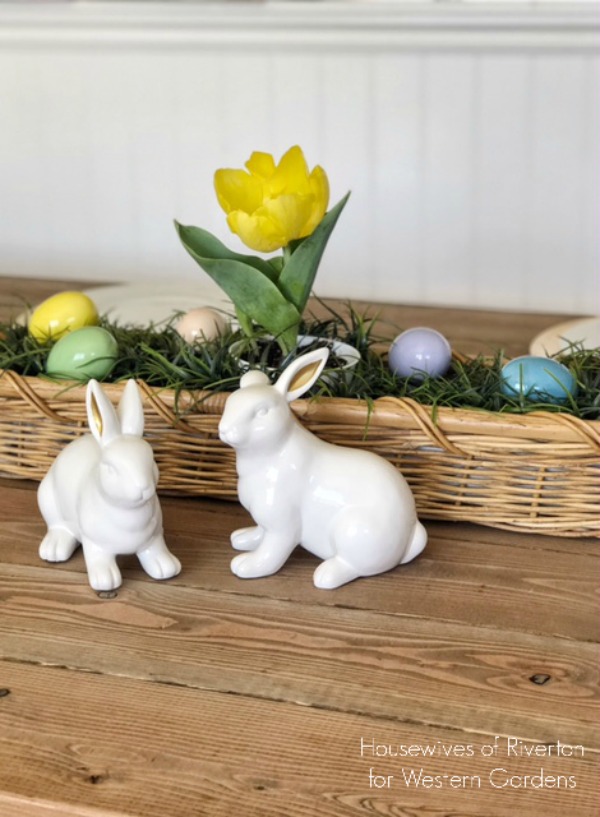
It’s pretty safe to say the very best part of Spring is the beautiful living flowers for centerpieces.  I love having fresh flowers in and around my home.  I love the instant brightness they bring and the amazing smells…it’s like bringing sunshine right inside the house.

As I plan my spring and Easter decor I love to plan for flowers anywhere and everywhere I can.  While I love a beautiful spring bouquet I especially love finding ways to use fresh flowers inside that I can then transfer outside so they can continue to grow and beautify my home.
Easter table centerpieces with tulips and ceramic bunnies
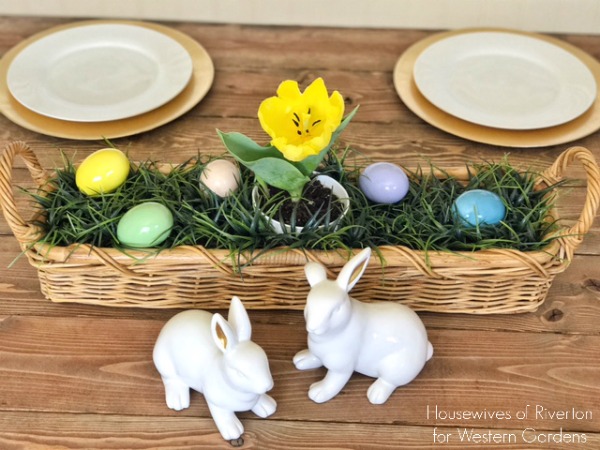
First up I have this adorable Easter Table Centerpiece.  Using just a few items (many you may already have on hand) you can create the perfect centerpiece for your Easter dinner that will last for years to come because you can take that Tulip bulb and plant it in your yard!

Easter Table Centerpiece Supplies:
Basket
(I used a long skinny one I had on hand, you could use any variety)
Fake Grass
(or real grass if you plan ahead and grow some – see growing Wheatgrass)
Small Bucket
Fake Eggs
Ceramic Bunnies
Live Flowers
(I used a tulip, but again any flower would work.  Dainty primroses and colorful pansies are also great living flowers in centerpieces.)

First gather your supplies, plant your flower in the bucket and then place the bucket in the center of the basket and arrange your fake grass.  Once you have the grass arranged place fake eggs in the grass, mine had a hole in one end so I made sure to place the egg so that wouldn’t show.

I used two ceramic bunnies in front of the basket to bring the whole Easter look together. Simple and oh so cute.
Geraniums are a great way to use living flowers for centerpieces.
Once bunnies and Easter eggs are past being in season it’s time for a new Spring Centerpiece to take over the table.

Spring Table Centerpiece Set Up:
I found this cute blue crate at Target and flipped it upside down then added these little chubby birds and tiny cake stand from Hobby Lobby.  The Love Grows Here crate is also from Target and I love that it comes lined with plastic so adding flowers that need watering won’t damage it or anything under it.

I added two geraniums in their little plastic store bought containers, they are a perfect fit!
Easter table centerpieces with geraniums
While I love love love how both of these centerpieces turned out I think my very favorite part is that when I’m ready to make a change for the next season/holiday I get to plant these flowers outside and watch them continue to grow, I don’t have to throw them away in 7-10 days like we have to with cut flowers.

I highly recommend finding ways to bring living flowers into your decor.  I promise they’ll put a smile on your face every time you walk past them.

Filed Under: Crafts, Flowers, How To, Tips & How To's Tagged With: DIY, easter centerpieces, flowers, home decor, living flowers, living flowers centerpieces, spring centerpieces, use living flowers in centerpieces, Western Gardens

Wheat Grass Easter Eggs – Kids Project

March 28, 2017 by Wendy Pettit

Welcome Friends!  Glad you dropped in.

This Wheatgrass Easter Egg is a great kid craft to do anytime in the spring, not just for Easter.  It is inexpensive and easy to make – even little 3 year-old hands can do this; customizable to whatever you have – plastic egg, bucket, basket, whatever; quick and fun to do – who doesn’t like to play in the dirt; and very gratifying within a few days – children observe the growing seeds.  If you want to do this for the holiday, you need to think ahead about 1 1/2 weeks. Easter changes every year, so be sure to check the calendar!

wheatgrass easter eggs are simple to make and fun to watch grow.

SUPPLIES:

» Leak-proof Easter container – pail, bottle, cup, plastic-lined basket, etc.  (I’m using a large plastic easter egg I found at my local dollar store. It came with a lid.)

» Plastic wrap or plastic lid

» Potting soil or vermiculite  (I used potting soil from my last year garden pots.)

» Whole-wheat grain (I used 30 year old wheat I had in my food storage.)

» Water

Items needs for making wheatgrass easter egg project.

Soil, whole wheat grain, container, plastic wrap or cover, and water. That’s it!

Wheatgrass Easter Egg INSTRUCTIONS:

1. One to two weeks before Easter, fill container with soil or vermiculite to 1-2 inches below the top of the rim.  Gently pat down.

Placing soil into container.

Little by little putting soil in to within 1-2 inches of rim.

Pat down the soil

Gently pat soil. (You can talk or sing to it too if you want!)

Little girl with soil on hands.

Don’t have to get all dirty!

2. Sprinkle a layer of wheat over the soil.

Sprinkling wheat grain on top of the soil.

The layer of wheat stays on top of the soil. Do not cover the seeds with dirt.

3. Pour water into container until water is barely visible beneath the wheat.  Note: Drain or “bail” out some water if you accidentally add too much and the seeds are swimming.

Pour water onto seeds and dirt.

Be slow and careful when pouring water into your container.

bailing out too much water from seeds and soil.

Be careful to bail out water if you get too much. Don’t want the seeds to drown!

4. Place lid or plastic wrap over the wheat.  

5. Place container in a sunny spot (not in direct sunlight).

6. After 2-3 days, small sprouts should appear.  Remove plastic top.  

Little wheatgrass starts are popping out.

Take lid or plastic off when you see the wheat growing. Put in good sunlight (not direct-sunlight).

7. Watch your wheatgrass grow.

NOTE:  During this process, if wheat appears to be dry, mist lightly with water.

8. In 7-10 days, you should have a velvety grass patch!!  

wheatgrass grows quickly.

Be patient and watch your grass grow. For fun, get a ruler and mark how far the grass grows in a day.

I initially did this project with a group of women.  We tied pretty ribbons around the eggs and shared them with family and neighbors to watch grow.

Wheatgrass Easter Eggs are ready to give away with ribbon around them.

Put a ribbon around the egg and give to another to let them see the seeds grow. Or keep for yourself and enjoy measuring how much the grass grows in a day! Or make a fairy garden in the grass!

9. Add smaller plastic eggs or other little Easter characters in the wheatgrass, if desired.  After the wheatgrass had grown in the egg that I kept for my own family,  I placed in the grass colorful plastic eggs filled with jelly beans and other Easter favorites.  IDEA: It could be fun to create a fairy scene.

A byproduct of this activity – Wheatgrass juice  

Instead of throwing away your Wheatgrass Easter Egg, you could try making wheatgrass juice.  You’ve got a good little crop to give it a try.  Wheatgrass is gluten-free and is touted as one of the best super foods.  Many believe that it can detoxify the body and improve digestion.   Learn some basics about preparing this superfood by clicking here. 

Basics about wheatgrass juice


Filed Under: Crafts, How To Tagged With: Easter, easter craft, easter eggs, how to's, kid crafts, kid friendly, Kids Craft, seeds, wheat, wheatgrass

DIY Bird House Kid Craft

July 15, 2016 by Sydney Anderson

This DIY Bird House is a great kid craft, it’s easy to make and customize…even for little hands!DIY Bird Feeder Kid Craft: Let kids make their own bird houses in just a few minutes!

Do you get birds in your yard? We didn’t get many last year, but this year it seems like there is always a flock (well, at least 5 or 10!) coming and going throughout the day.  My boys love looking out the window and watching them on the grass, so I decided to bring nature a little closer to home and build a bird house for the front porch!

DIY Bird Feeder Kid Craft: Let kids make their own bird houses in just a few minutes!
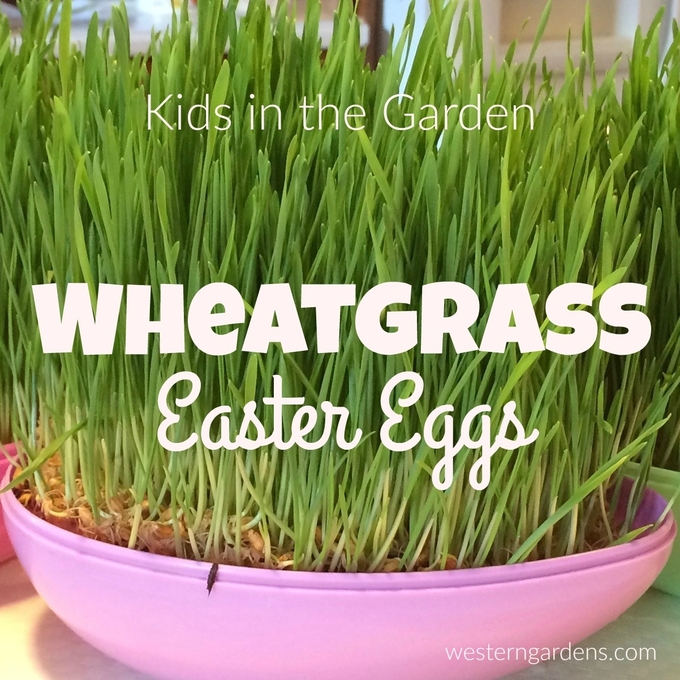
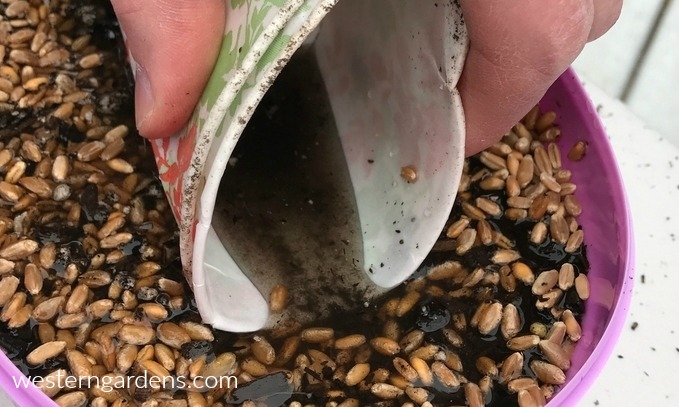
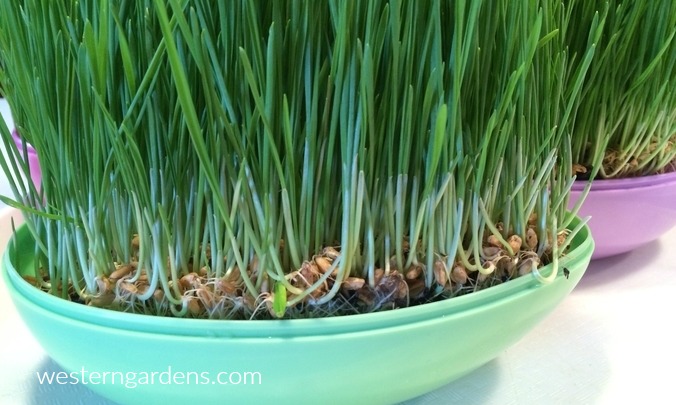
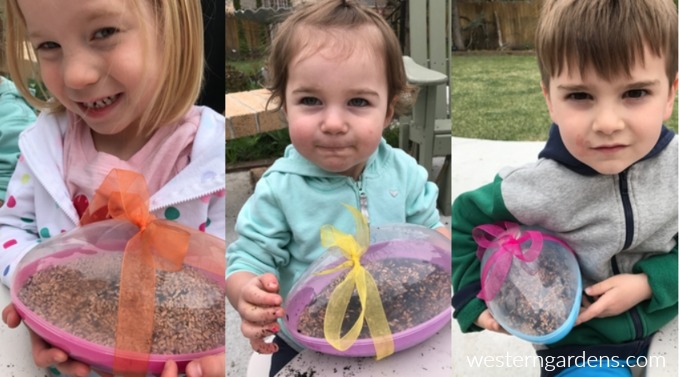
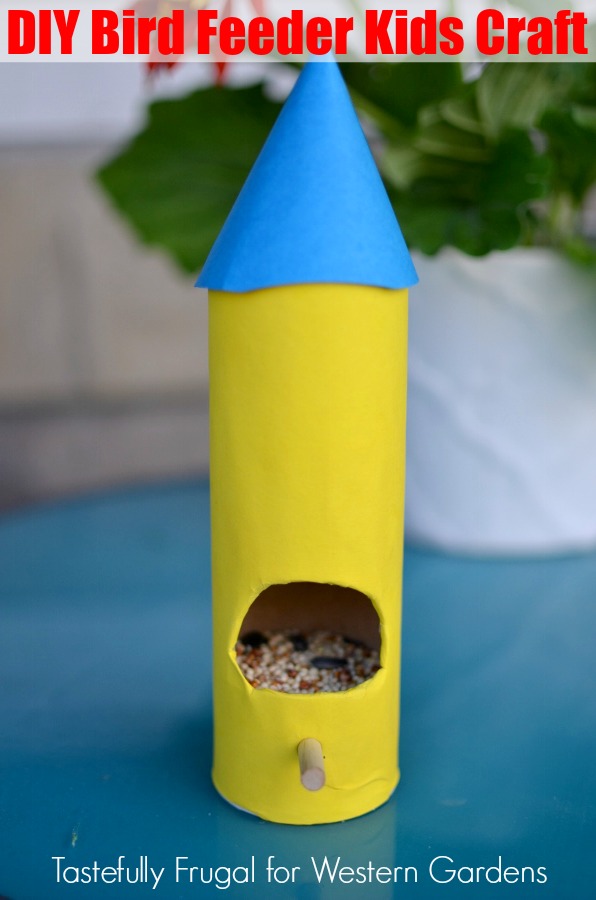
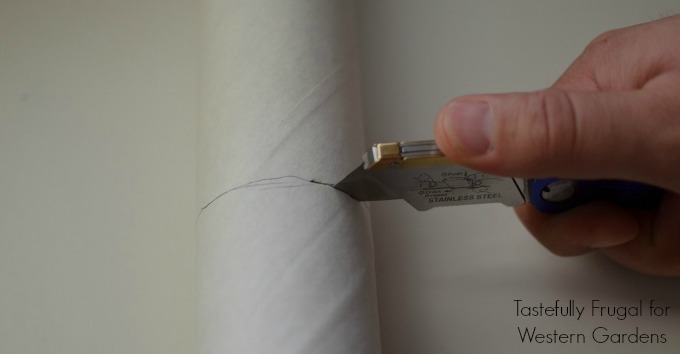
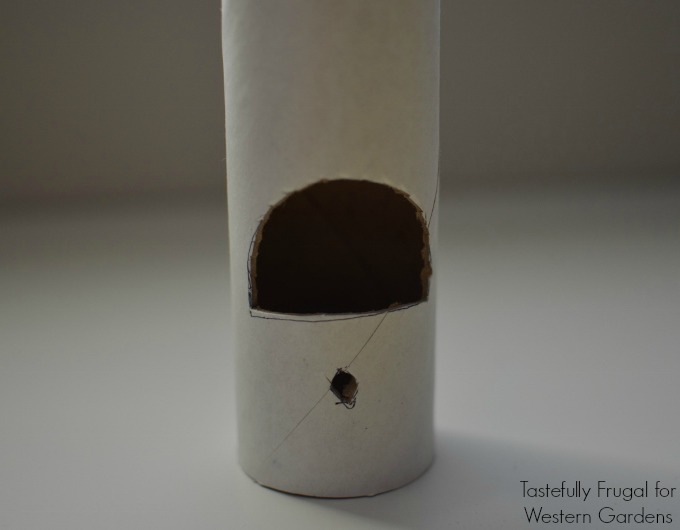
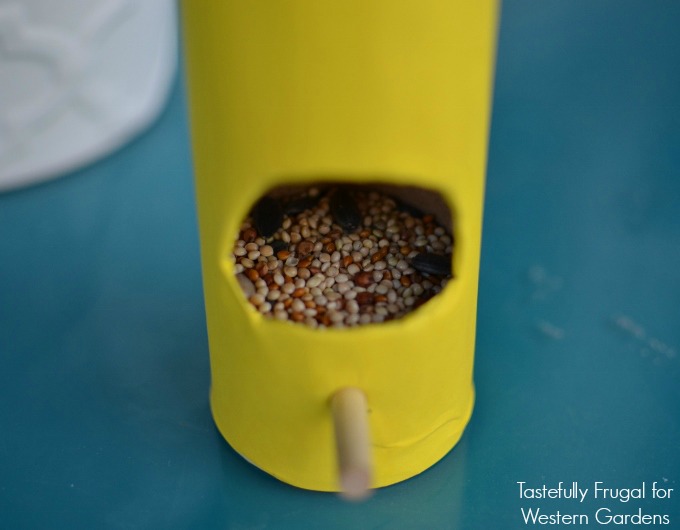
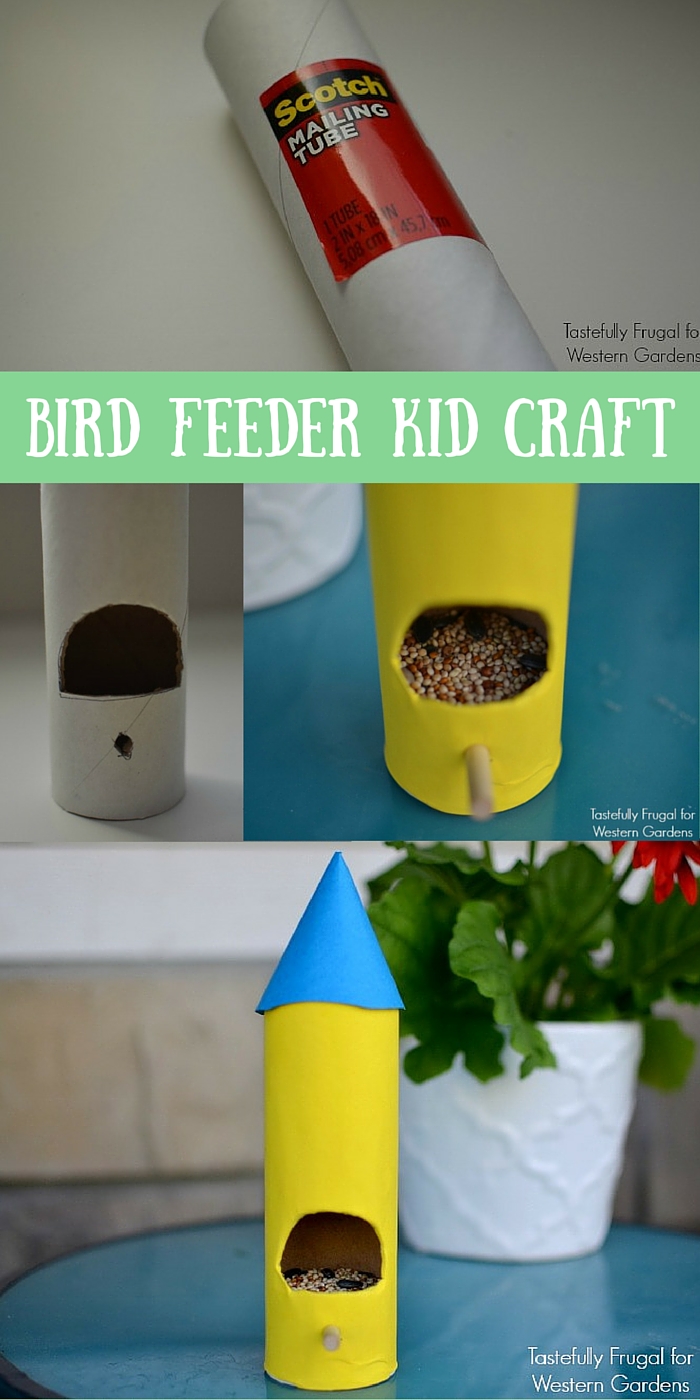
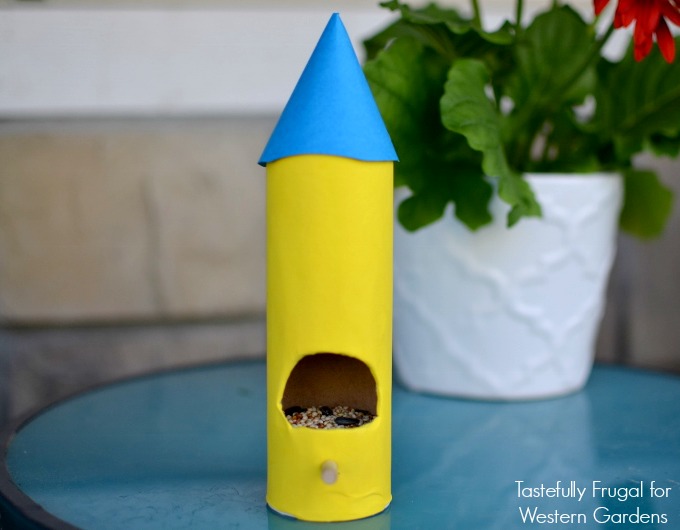
I didn’t think my kids would have the patience to sit through building a birdhouse from wood (they are 3 and 4) so I decided to go with something a little more simple.
DIY Bird Feeder Kid Craft: Let kids make their own bird houses in just a few minutes!

DIY Bird House Kid Craft

Supplies:

  • Shipping Tube (I picked this one up from the FedEx store for $3)
  • Wooden Dowels (you can pick them up at any hardware or hobby store)
  • Cardstock or Construction Paper
  • Scissors
  • Hot Glue Gun
  • X-Acto Knife or Razor Blade
  • Washi Tape, Feathers, Beads or other embellishments
  • Bird Seed (I found a huge variety at Western Gardens)

DIY Bird Feeder Kid Craft: Let kids make their own bird houses in just a few minutes!

DIY Bird Feeder Kid Craft: Let kids make their own bird houses in just a few minutes!

Directions:

  1. Decide on the height of birdhouse you want, measure and cut the shipping tube (we made ours 6″).
  2. Trace a half circle on the shipping tube to put the food in, and cut it out with the X-acto Knife.
  3. Measure and cut the dowel for the perch (ours was about 3″ long).
  4. Cut a small hole below the larger hole in the tube (for the dowel to go in).
  5. Wrap cardstock around tube, measure and cut the cardstock to fit around the tube.
  6. Hot glue the cardstock on to the tube.
  7. Hold the tube up to the light and cut out the large and small circles in the cardstock.
  8. Place the dowel inside the smaller hole and use hot glue to secure.
  9. Hot glue the shipping lid into place.
  10. Cut a piece of cardstock in a contrasting color 6″ x 2.5″.
  11. Roll into a cylinder and hot glue together.
  12. Let kids embellish the roof however they want.
  13. Use hot glue to attach the cylinder to birdhouse.
  14. Pour birdseed into the larger hole.

DIY Bird Feeder Kid Craft: Let kids make their own bird houses in just a few minutes!

Place it on a solid surface, or thread string or rope through the top of the tube to hang from a branch or a porch hook. We have ours sitting on our front patio table and the birds still come up for a snack!  These birdhouses are made with cardstock, so make sure to bring them in if you know a storm is coming…they probably won’t make it through the rain.

DIY Bird Feeder Kid Craft: Let kids make their own bird houses in just a few minutes!

My boys love looking out the window and watching the birds eat from their feeder! We’re also making a bird bath to see if we can get a few more visitors from nature to our porch. What fun ways do you like to bring nature close to home?  Tell me in the comments below!

Check out another fun way to get kids into nature:

Color Scavenger Hunt | Tastefully Frugal

Color Scavenger Hunt

Filed Under: Crafts Tagged With: Birdhouse, DIY, Kids Craft

DIY Garden Markers

June 21, 2016 by Jenn Crookston

Hi there!  I’m so glad you stopped by today!

DIY Garden Markers

Are you looking for an easy (and nearly free!) way to mark your veggies in the garden?  I have a simple idea for you!  Because if you’re like me, you probably won’t remember what you planted and where it went…but these DIY garden stakes will keep you organized and excited to see what veggies you’ve got coming.

DIY Garden Markers

This year we built some raised garden boxes to grow our veggies, and I can’t wait to see them overflowing with produce!  And I’ll know exactly what I have since these DIY garden stakes are so easy to see and read.

DIY Garden Markers
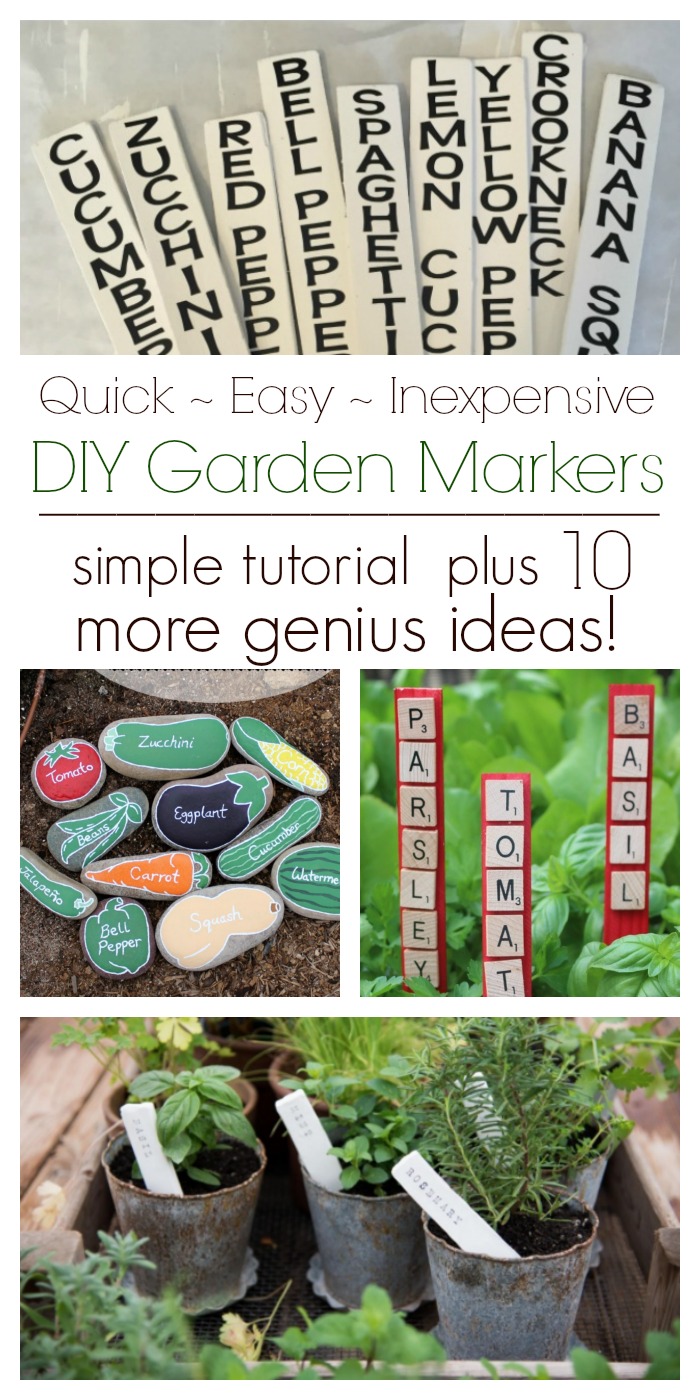
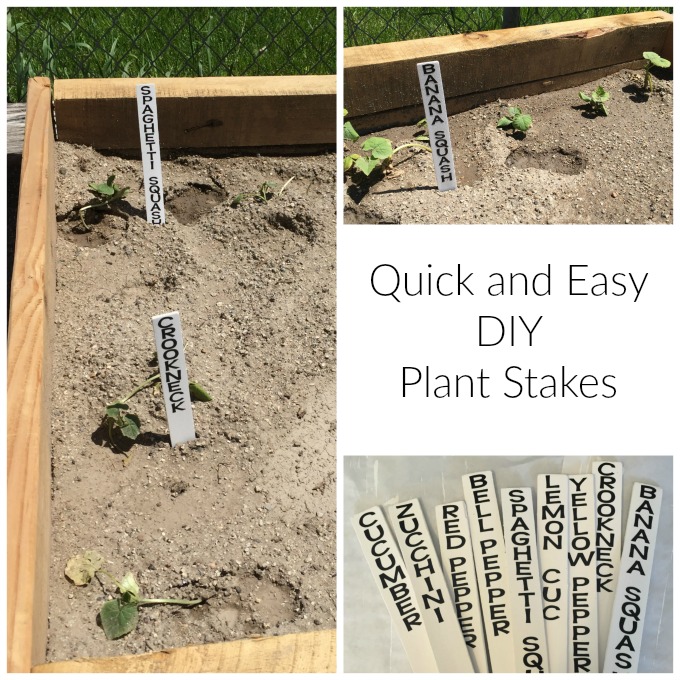
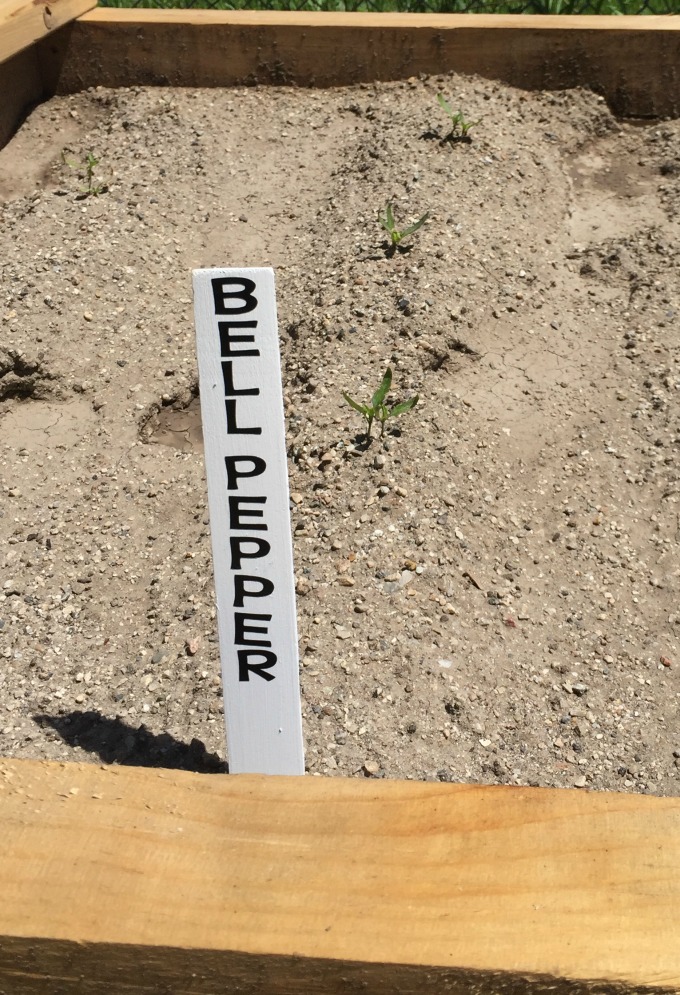
I was working on another project recently, and I mentioned it to the employee at my local paint counter.  She passed me a handful of stir sticks and said, “I think these might work for your project!”  And she was right!  Since then, when I’ve got a project to create, I consider what free items I can use.  For my DIY Garden Stakes, I headed back to the paint counter and requested some paint stir sticks.  I love how obvious it is that I’m not the only person who asks for stir sticks but no paint…without batting an eye, they just pass them over!
DIY Garden Markers

DIY Garden Markers

  1. Lay paint sticks out on wax paper (the paint doesn’t stick to the wax paper, making it easier to flip the sticks over).
  2. Paint with an exterior paint, for added durability (it’ll take a few thin coats to cover the stamped print on sticks, but if you don’t care about the back side being painted, you can get away with one coat).
  3. When the paint is dry, use outdoor vinyl and a vinyl cutter (like a Cricut machine) to cut out the names of each of your plants, and attach them to one end of the stir stick.
  4. If you don’t have a vinyl cutter, use a Sharpie to write the veggie names.
  5. Use as is, or cut the ends of your paint stir sticks to a point, to look more like a stake.  I didn’t need to do this since my soil was soft enough to push my markers in without a point.

I love how they look in the garden!  The bright white with the easy-to-read black print makes me smile each time I walk out to the garden.

DIY Garden Markers

Looking for even more garden marker inspiration?  Click the image below to see 10 cute, easy and inexpensive ideas!

DIY Garden Markers

Pages: Page 1 Page 2

Filed Under: Crafts, Gardening

DIY Tabletop Terra Cotta Fire Pit

June 7, 2016 by Sydney Anderson

Hi there, thanks for stopping by today!

DIY Fire Pit: Make Your Own Campfire At Home For Less Than $5 | Western Gardens

Do you love camping with your family in the summer?  Roasting hot dogs and marshmallows over a fire with the people you enjoy most?  Me too!

Some of my favorite memories are of camping in the mountains, at the lake, in the desert, and even in the backyard!  I can’t wait to make the same memories with my boys…but since I’m 20+ weeks pregnant, sleeping on the ground isn’t very appealing.
DIY Fire Pit: Make Your Own Campfire At Home For Less Than $5 | Western Gardens

So we’re bringing my favorite part of camping right to our front porch—campfires!

There’s nothing better than sitting around a camp fire, roasting hot dogs, making s’mores and just spending time together, laughing and telling stories. Currently we live in a great little townhome community— without a backyard—so building a fire pit was out of the question.

I couldn’t let that stop me!

DIY Fire Pit: Make Your Own Campfire At Home For Less Than $5 | Western Gardens
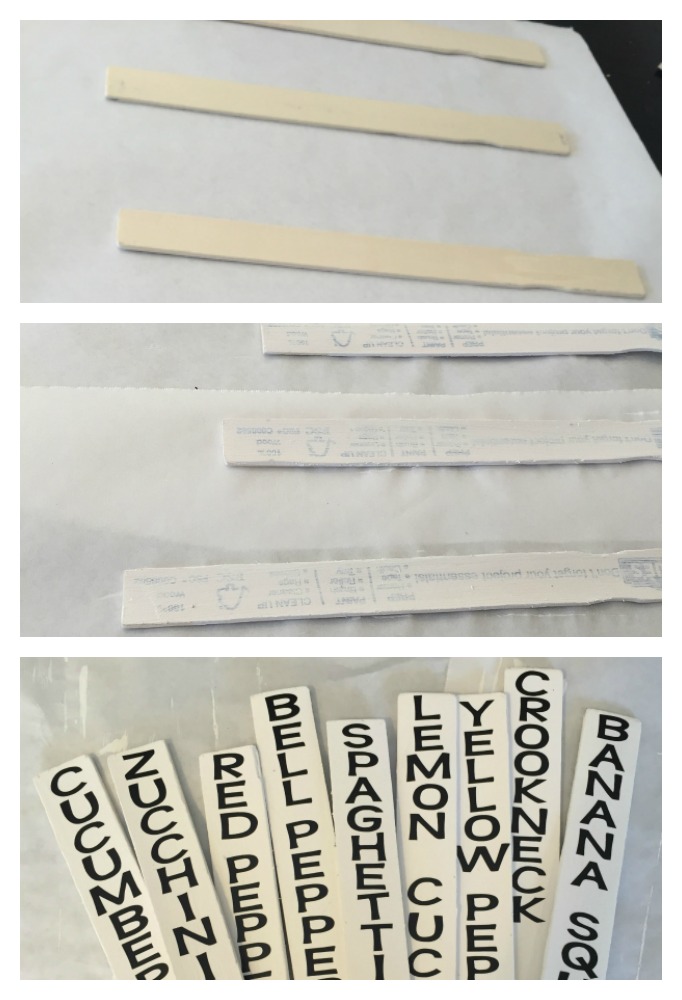
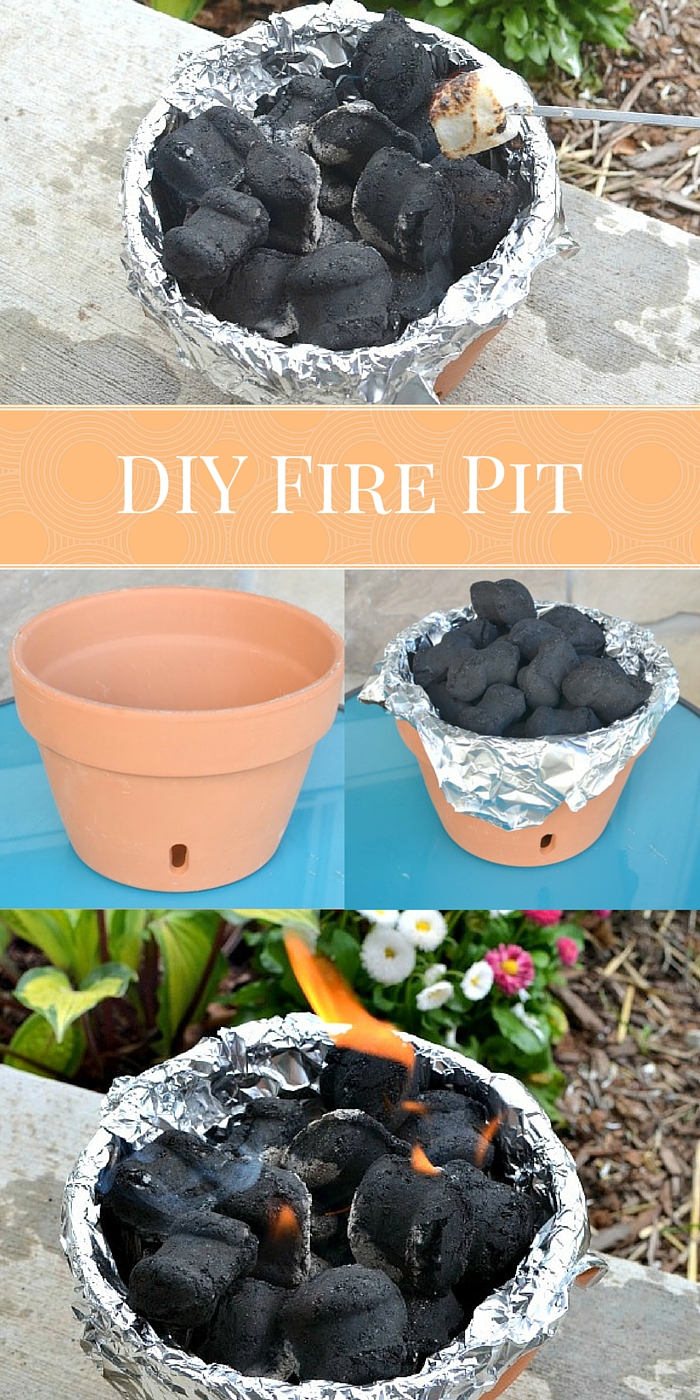
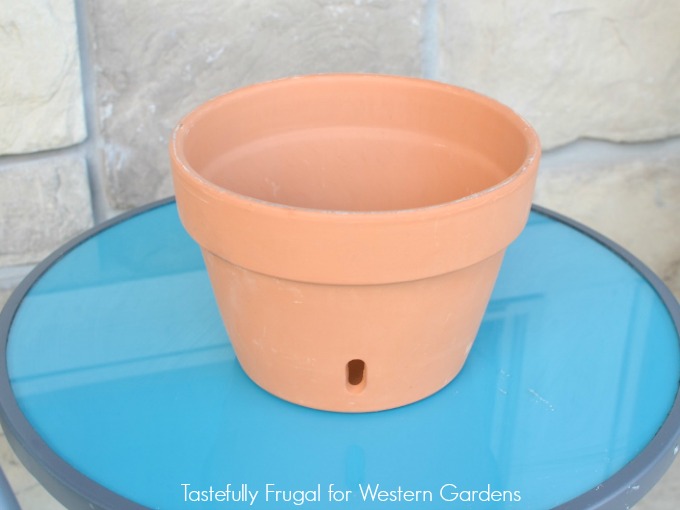
I took matters into my own hands and made a mini fire pit out of a terra cotta pot for our front porch!  I took my husband, who is definitely the brains of our family, into Western Gardens and he picked out this terra cotta pot with holes in the bottom.  The holes allow more oxygen to enter the pot (just like on a charcoal grill), which will let the fire burn longer.

Longer lasting fires are perfect for those summer nights when the kids are playing, grown ups are chatting and you want to be able to make more s’mores when you get that craving (which happens a lot when you’re pregnant!).

Click NEXT to get the simple instructions!

Western Gardens | Utah

Pages: Page 1 Page 2 Page 3

Filed Under: Crafts, Outdoors Tagged With: DIY, Fire Pit, How To, how to's, Terra Cotta Pot, tips, Utah, Western Garden Centers, Western Gardens

4th of July BBQ Decor

June 4, 2016 by Jenn Crookston

4th of July BBQ Decor

Looking to update your 4th of July BBQ decor?  Try this fun layered look with paper fans, banners and garlands!

4th 1

Plus, I’m sharing sources for everything you see here so you can recreate this patriotic look for your BBQ.

IMG_0945

4th of July BBQ Decor

  • Paper Fans and Confetti (My Mind’s Eye)
  • Stars & Stripes and Flag Banner and Red, White, and Blue Pails (Target Dollar Spot)
  • Table Skirt, Blue and Silver Star Garland (Zurchers Party Store)
  • RWB Balls in the vase and Fountain Type vase decor (Hobby Lobby)
  • Lightbox and Letters (Heidi Swapp)

IMG_0950
What’s great Red, White & Blue decor without a barbecue to go with it?  Nothing beats an “All American” menu for a fun family get together!

4th of July Menu

  • Hamburgers (don’t forget the avocado for an amazing burger!)
  • Hotdogs
  • Steak
  • Chicken
  • Green Salad
  • Potato Salad
  • Chips (lots of varieties)
  • Fresh Fruit (watermelon is a must!)
  • Veggie Tray
  • Punch
  • Soda
  • Strawberry Shortcake
  • RWB Fresh Fruit topped Sugar Cookies
  • Funnel Cakes
  • Homemade Frostys

IMG_0938

I mixed and matched the paper fans from three different decor lines at My Mind’s Eye: 4th of July, Red and Blue.  They may have come from different lines, but they all coordinate perfectly!  (For a great deal, shop right after the holiday, if you can wait that long!  You’ll have to wait for nearly a year before you can use it, but the wait will be worth it if you’re patient!)

IMG_0941 IMG_0939

Don’t be afraid to use some height in your decor for added dimension.  And if you feel like more layers would be better, add as many as you want.  The most important design element is that you love it, so have fun with it and make it your own!

IMG_0948
Have a safe and happy Fourth of July, with beautiful decor and lots of great food!

Filed Under: Crafts Tagged With: 4th of July, BBQ, decor, DIY, holiday, How To

DIY Solar Lantern

May 31, 2016 by Heather Leister

Do you love the look of solar lanterns, but not the cost? Make your own ! They're cheap, easy and fast. Check out the simple instructions!

Welcome, I’m so glad you’re here!

Are you looking for an inexpensive way to light up your yard at night? Look no further! These easy DIY Solar Lanterns can be created with a quick trip to the dollar store.  They’re simple to make and add a fun element to your landscape.

All it takes is a few simple supplies and a few minutes of your time.  This is a project that kids love to help with too!  (or is it just my kids that enjoy taking things apart? 😉)

For this project you’ll need some empty mason jars (or other small decorative jars), inexpensive solar lights, canning jar rings (optional, but they do give them a nicer finished look), and some hot glue.

This simple DIY Solar Lantern will light up your yard and impress your neighbors! All it takes is a few inexpensive supplies and a few minutes to assemble. Great project to do with kids!!

Start with the mason (or other small decorative jar…I’ve used both and they work equally well). The key is to choose a jar with a small opening. If you use a wide-mouth canning jar, the solar light will fall through the opening to the bottom of the jar.

jar

Now is the perfect time to stock up on inexpensive solar yard lights for any DIY solar projects you might have planned. They can be found at the dollar store. Purchase the plainest, simplest solar light you can find. For this example I’m using a solar table lamp that I purchased at my local Dollar Tree.This simple DIY Solar Lantern will light up your yard and impress your neighbors! All it takes is a few inexpensive supplies and a few minutes to assemble. Great project to do with kids!!

If you (or your kids!) like tearing things apart, then you’ll enjoy this next step! Take apart the solar light, what you want is the black, round unit at the top. You will see the solar cells on the top, and the lights at the bottom. This is all you need for the project, so go ahead and recycle the rest of the light, or save it for another project.This simple DIY Solar Lantern will light up your yard and impress your neighbors! All it takes is a few inexpensive supplies and a few minutes to assemble. Great project to do with kids!!

Depending on the size of your jar, your light may fit down in its mouth, or it may sit on top. Either way, I like to secure the solar light to the jar with hot glue.This simple DIY Solar Lantern will light up your yard and impress your neighbors! All it takes is a few inexpensive supplies and a few minutes to assemble. Great project to do with kids!!

For a finishing touch, add a canning ring to the top of the jar. Again, a little hot glue works nicely.

This simple DIY Solar Lantern will light up your yard and impress your neighbors! All it takes is a few inexpensive supplies and a few minutes to assemble. Great project to do with kids!!

That’s it! Sit your lanterns on your porch or hang them on a shepherd’s hook in your yard and enjoy!

Click NEXT for the list of supplies and directions!

2

Pages: Page 1 Page 2 Page 3

Filed Under: Crafts, How To, Outdoors, Tips & How To's Tagged With: craft, DIY, garden, yard

  • Go to page 1
  • Go to page 2
  • Go to Next Page »

Primary Sidebar

Shopping Cart

Items in Your Cart

Your cart is empty
Visit The Shop

Follow Western Gardens

  • Facebook
  • Instagram
  • Pinterest
  • YouTube

See what we’ve been pinning!

Follow Me on Pinterest
Followed by people.
?

Pinterest Badge by Skipser

Here’s What We’ve Been Up To!

Save water and money by Turf Training - train your lawn to grow deep roots
work at western gardens utah garden center
Senior gardening woman Edu Carvalho from Pexels
nursery center open to public

Copyright © 2025. Western Gardens - Privacy Policy